
Create a Line Spirograph in Adobe Illustrator
A Step-by-Step Tutorial
Article written on Tuesday, 21 Jan 2020
- Requirements
- Adobe Illustrator CS6
- Level
- Beginner
Spirographs look complex, but most of them aren't that hard to create. As promised, here is a follow-up tutorial on how to create a spirograph, only this time it's a different kind of spirograph than the one we've created before. We'll create a line spirograph. The one I created for this fictional fruit energy drink label.
I know I mentioned we would use the Blend tool in this follow-up tutorial, but I guess I shouted a bit too early, because instead we're still going with the same basic technique like before of copy rotating. Because of the wide variety of spirographs, I figured I spend a bit more time on the subject and write 3 tutorials instead of 2.

This fictional energy fruit drink label is only created for the purpose of this tutorial. Just to give you some ideas and inspiration of what you could do with the outcome of your creation. The photo used in this mockup and in the header is found on Unsplash, taken by Amy Shamblen. I had much fun creating this label. Being able to place this design directly on a real can finished it off. Thanks to these fabulous mockups by L Store it's very easy to apply. It's only a matter of copy and paste. The typeface used is Buffalo.
To get started make sure Smart Guides is enabled. Go to View > Smart Guides and see if the checkmark is there. If not, hit Cmd/Ctrl + u. Make also sure that guides are set to visible: go to View > Guides and if you see 'Hide Guides' then it means they are. Furthermore make sure you have Snap to Point on: go to View > Snap to Point. Again, if you already see the checkmark there, you are all set.
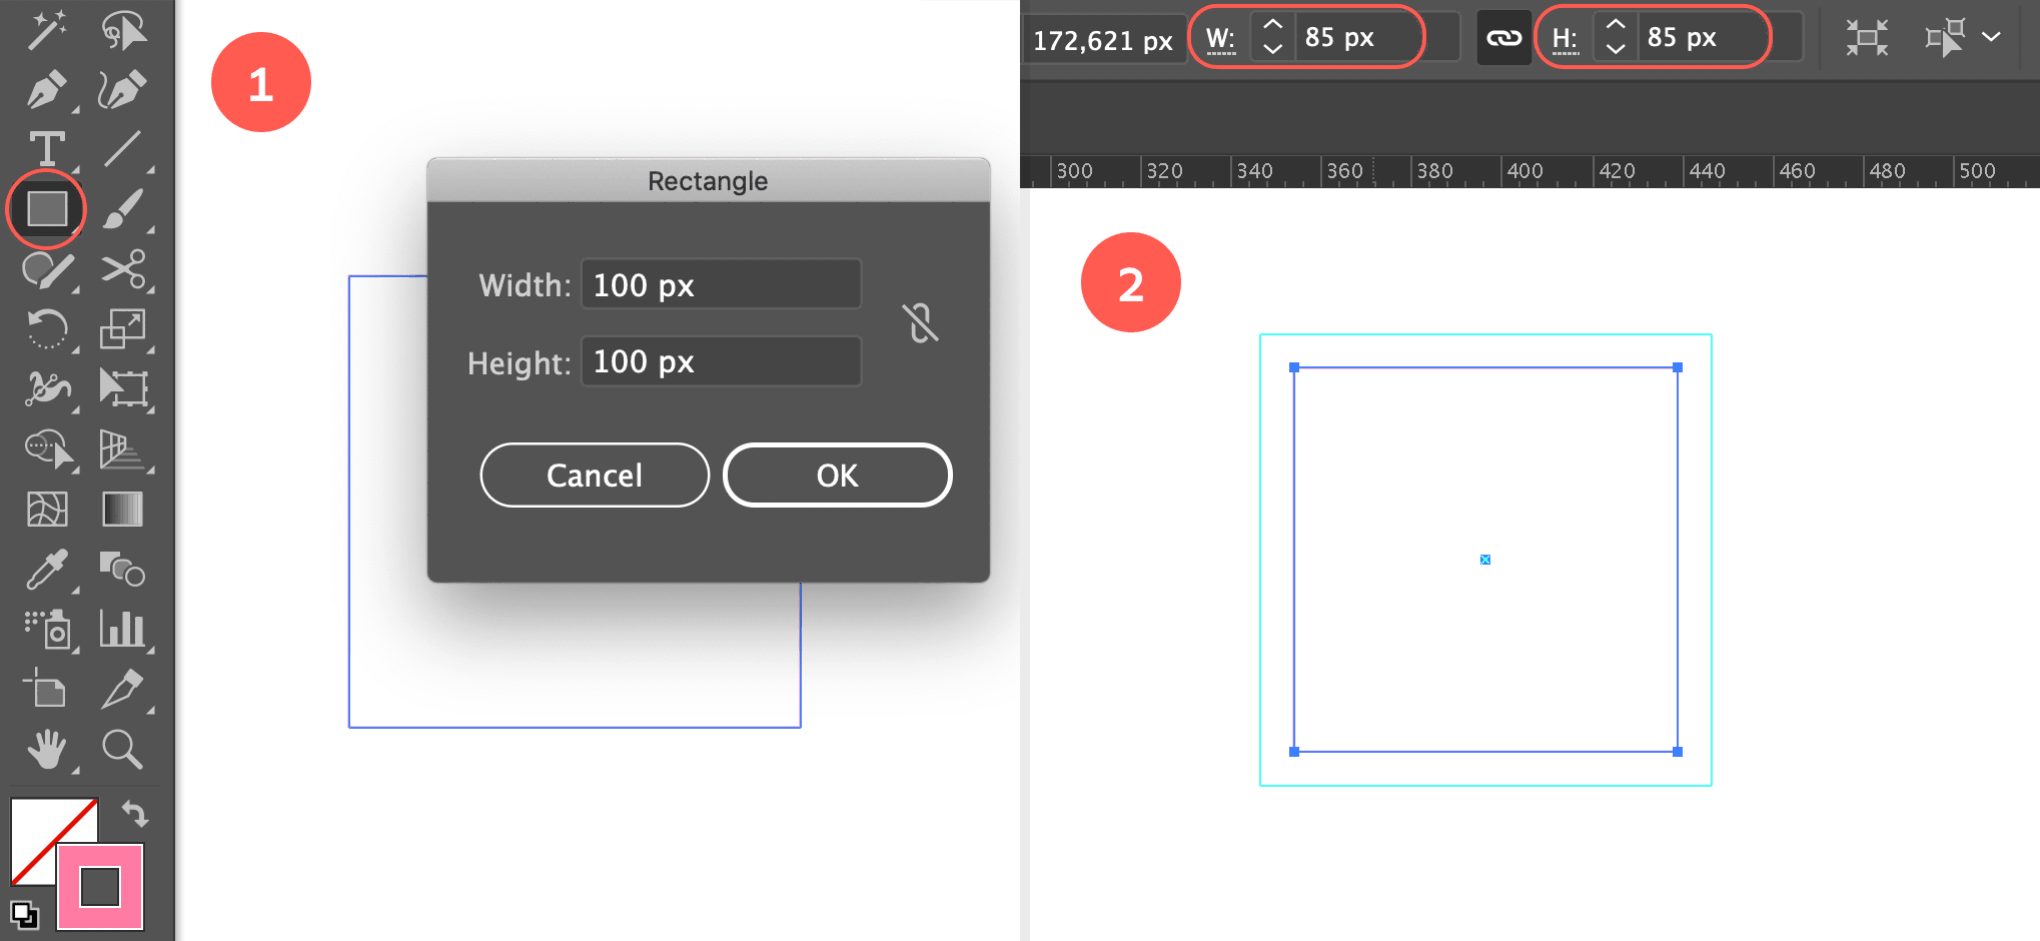
1. Draw a Square
Start by drawing a square of 100 x 100 px. Select the Rectangle tool, click on the canvas of your document and enter these values. Apply a very thin stroke in the color of your choice. I used a bright pink and 0.35 pt stroke width.
Draw a square, copy & paste in front...
2. Copy & Paste in Front
Copy the square shape and turn the shape into guides by hitting Cmd/Ctrl + 5 (View > Guides > Make Guides). Now hit Cmd/Ctrl + f to paste the square in front (in the exact same position). Change the size of the square to 85 x 85 px. First, make sure you resize the square from its center point. Go to the Control bar at the top (if this bar isn't visible on your screen go to Window > Control) and make sure the center point is selected as Reference Point (located next to the X coordination). You can also do this via the Properties panel (if you use the CC version of Adobe Illustrator). Next to W and H change 100 px into 85 px.
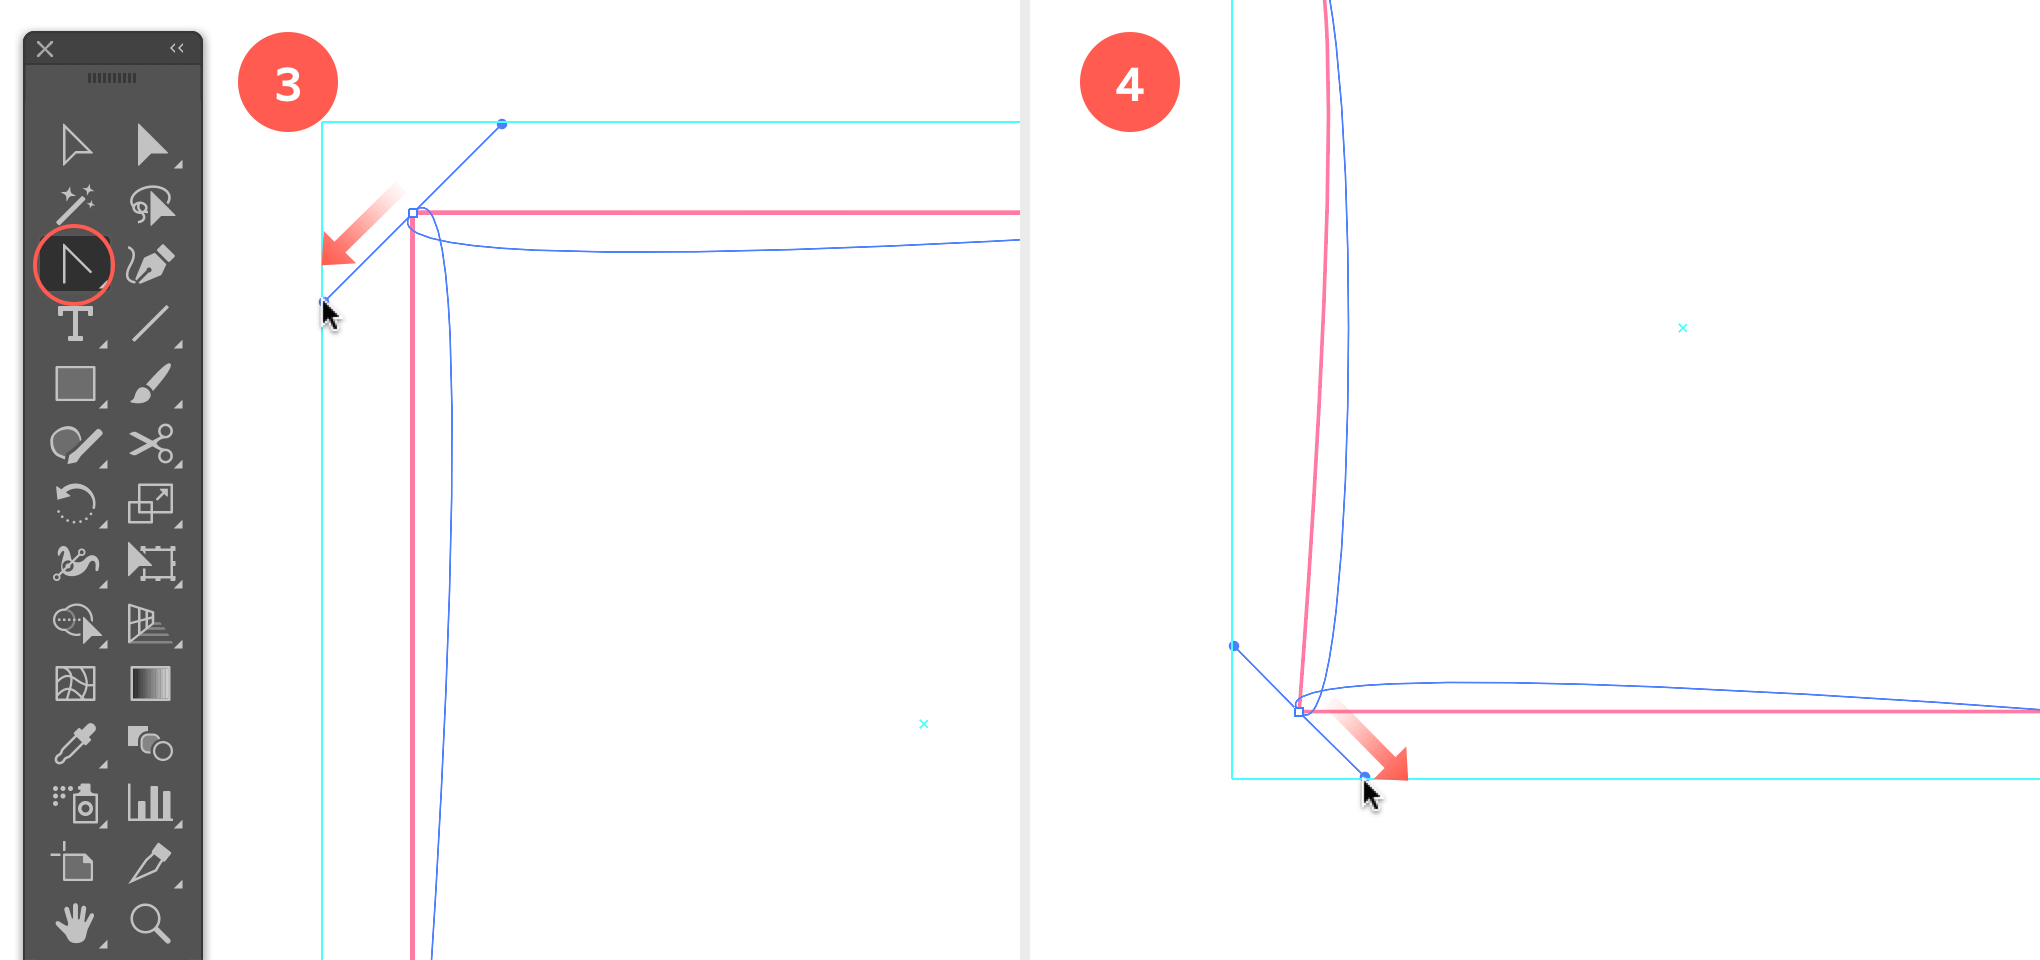
3. Change Top Left Corner Point into Bezier Anchor Point
Now, we're about to turn all 4 corner points of the square into bezier anchor points. First select the Anchor Point tool (hit Shift + C) which is located under the Pen tool. Click into the top left corner point, keep holding down the mouse while starting to drag diagonally down to the left (see image below). While you start to drag hold down the Shift key. Keep dragging until you've reached the guide of the bigger square. It should snap to the vertical guide line of the square. Release the mouse once you've reached this snapping point. It's important to note that you only start holding the Shift key when you are already dragging the bezier handles, not before or the end result will be wrong. In this case it's better to start over and hit Cmd/Ctrl + z to undo your action.
Turn the 4 corner points of the square into bezier anchor points.
4. Turn Bottom Left Corner Point into Bezier Anchor Point
Do the same for the bottom left corner point. Now you drag diagonally bottom right. Again, hold down Shift if you've almost reached the (bottom) guide line of the square, and release the mouse when you reach the snapping point.
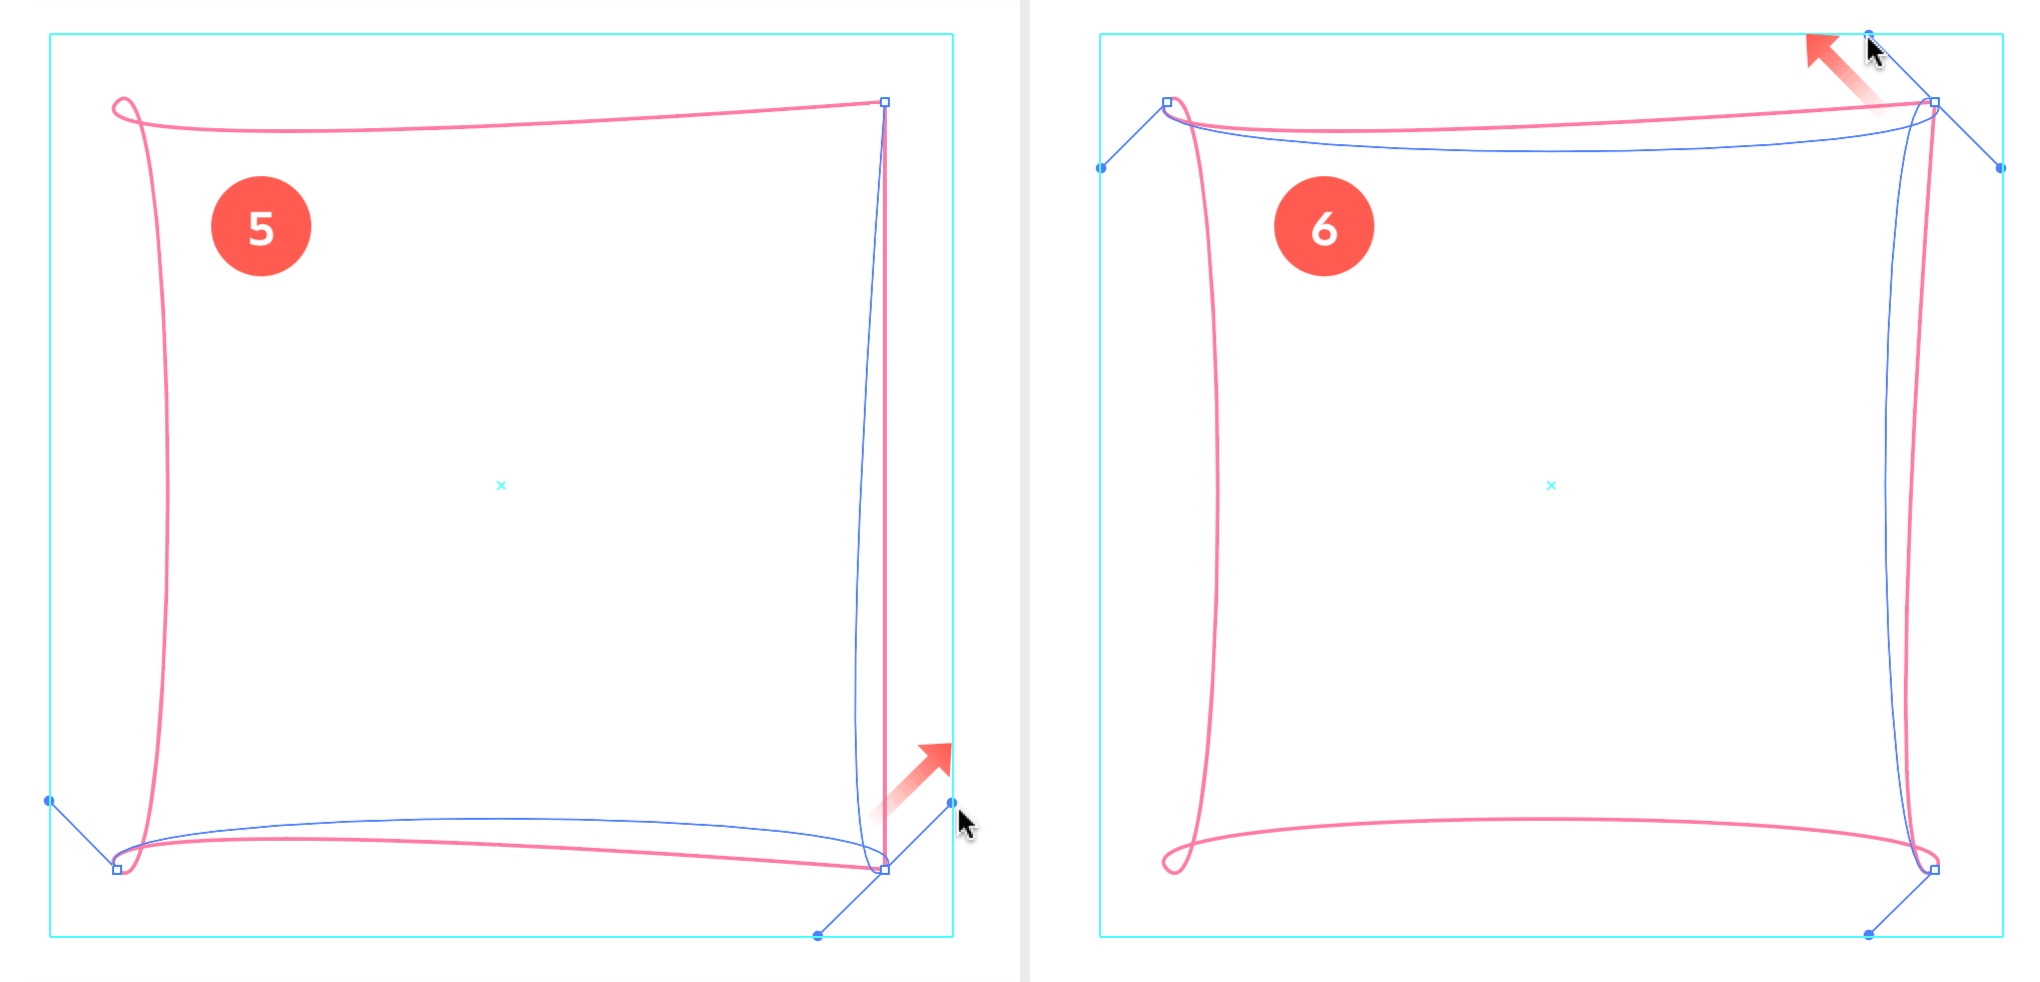
5. Turn Bottom Right Corner Point into Bezier Anchor Point
Repeat the steps again for the bottom right corner point. This time you drag diagonally top right. Hold down Shift once you've almost reached the (top) guide line of the square, and release the mouse when you reach the snapping point.
Turn the 4 corner points of the square into bezier anchor points.
6. Turn Top Right Corner Point into Bezier Anchor Point
Lastly, do the same for the top right corner point. Now you drag diagonally top left, you hold down the Shift key once you've almost reached the (left) guide line of the square, and release the mouse when you've reached the snapping point.
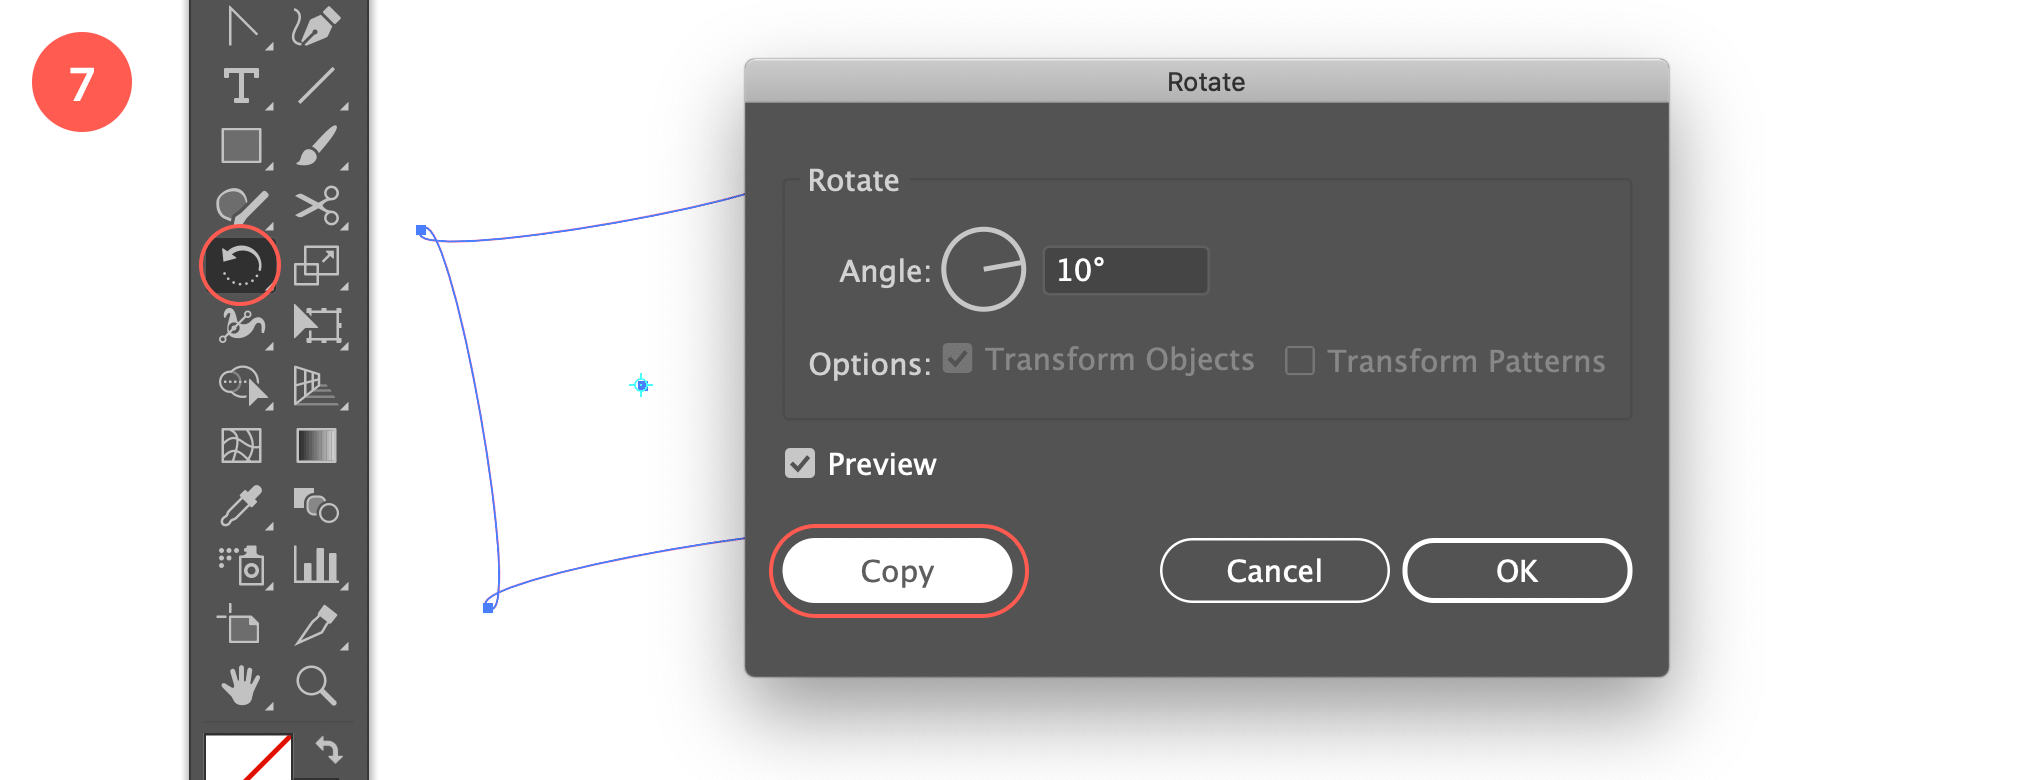
Copy rotate the object at 10°
7. Copy Rotate at 10°
With the object still selected, choose the Rotate tool and click into the center point of the object while holding down the Option/Alt key to evoke the Rotate window. Enter 10° as rotation Angle and hit the Copy button.
8. Transform Again
Now simply hit Cmd/Ctrl + d 7 times in a row to complete the spirograph.
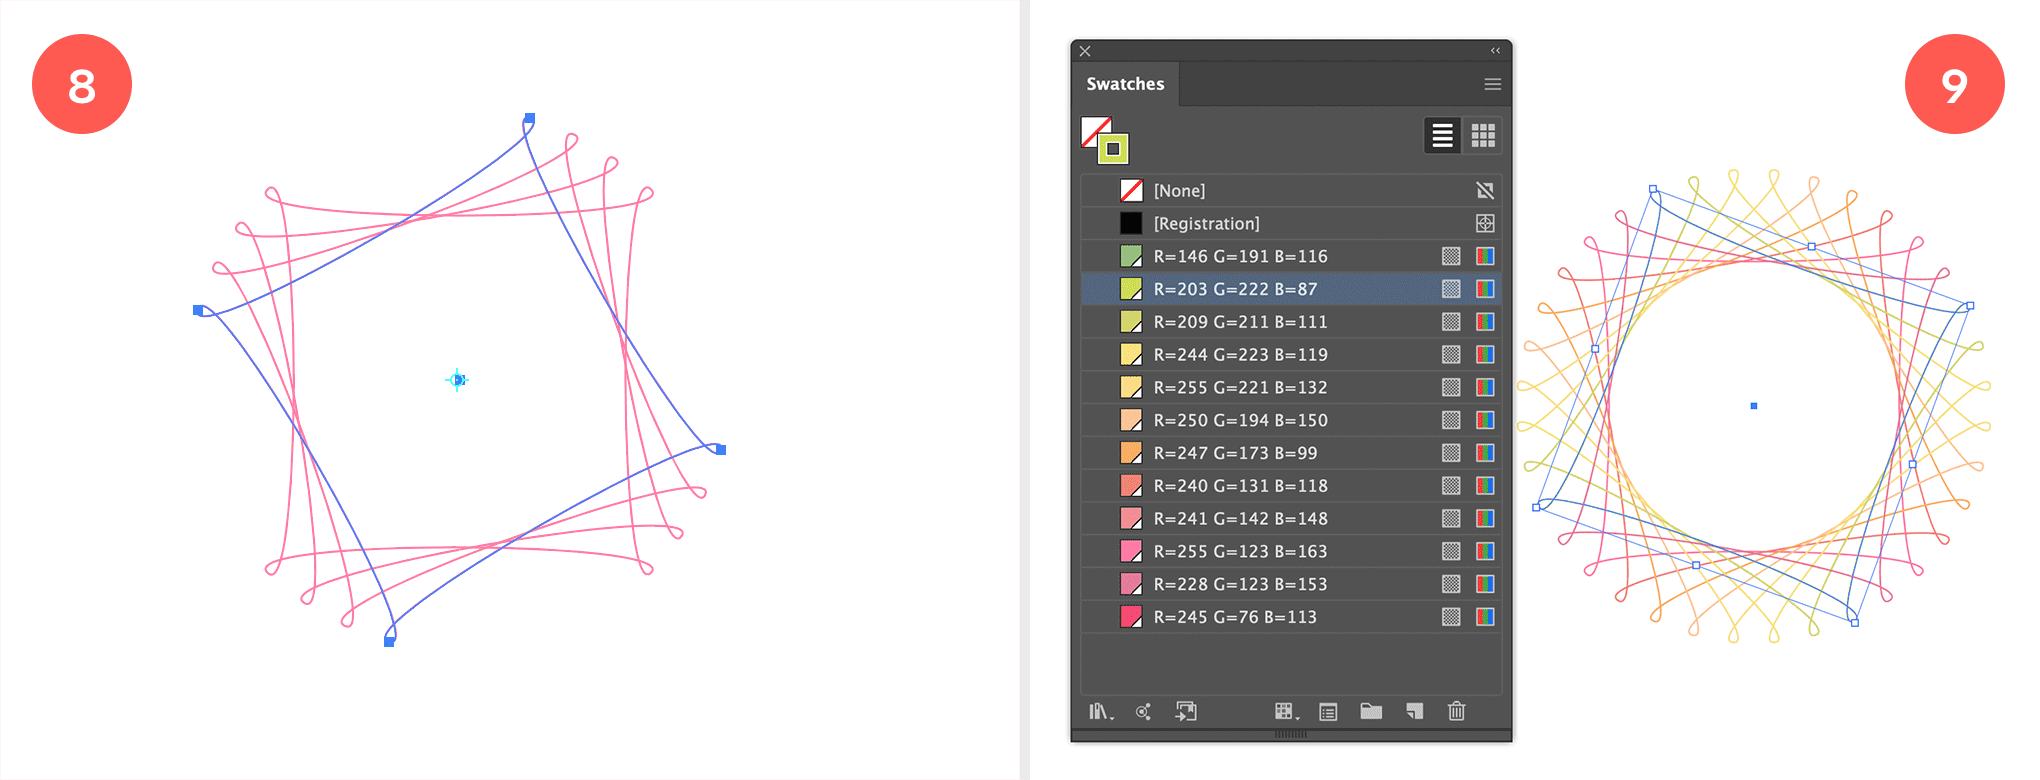
Transform Again 7x and apply color
9. Apply Stroke Color
Apply a different stroke color for each object. Just choose colors to your liking. That's it!
10. Experiment with other Shapes
This example is just one of the million things you can do to achieve an interesting result. Try things out using different shapes and angles. Best way to get a cool result is keep on experimenting. Here are a couple ideas to get you started:
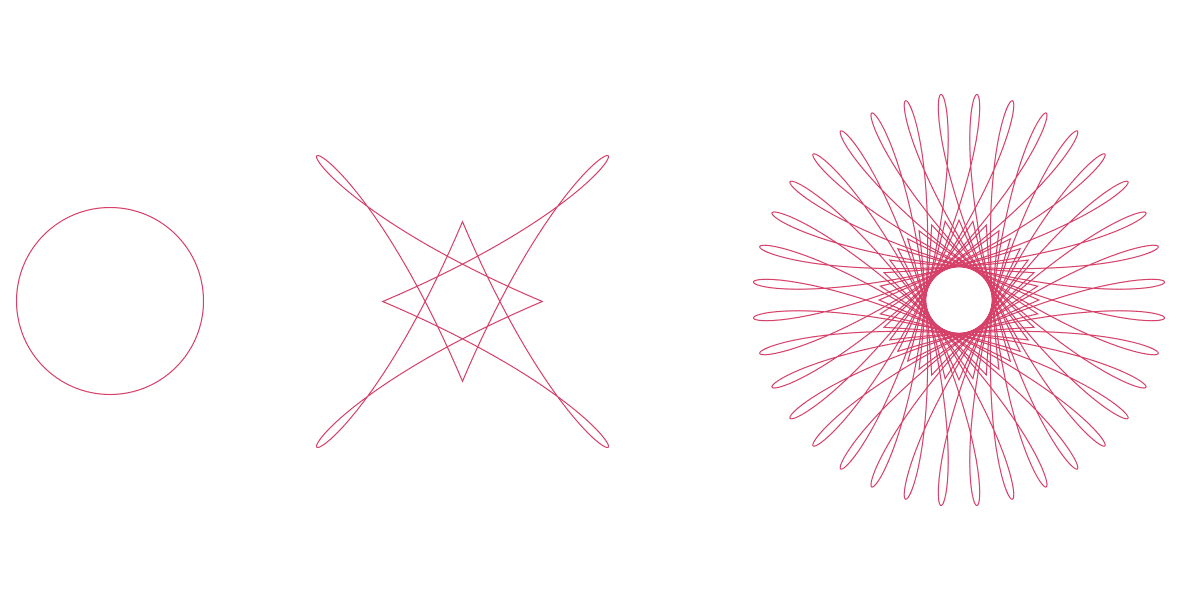
Circle with Pucker & Bloat Effect
This one is actually a very simple one. You start with a circle (50px), apply Pucker & Bloat effect by going to Effects > Distort & Transform > Pucker & Bloat, and enter 185%. Expand the effect: go to Object > Expand Appearance. Select the Rotate tool and Option/Alt click into the enter point fo the object. Enter 10° as rotation angle, hit the Copy button and then hit Cmd/Ctrl + d 7 times in a row.
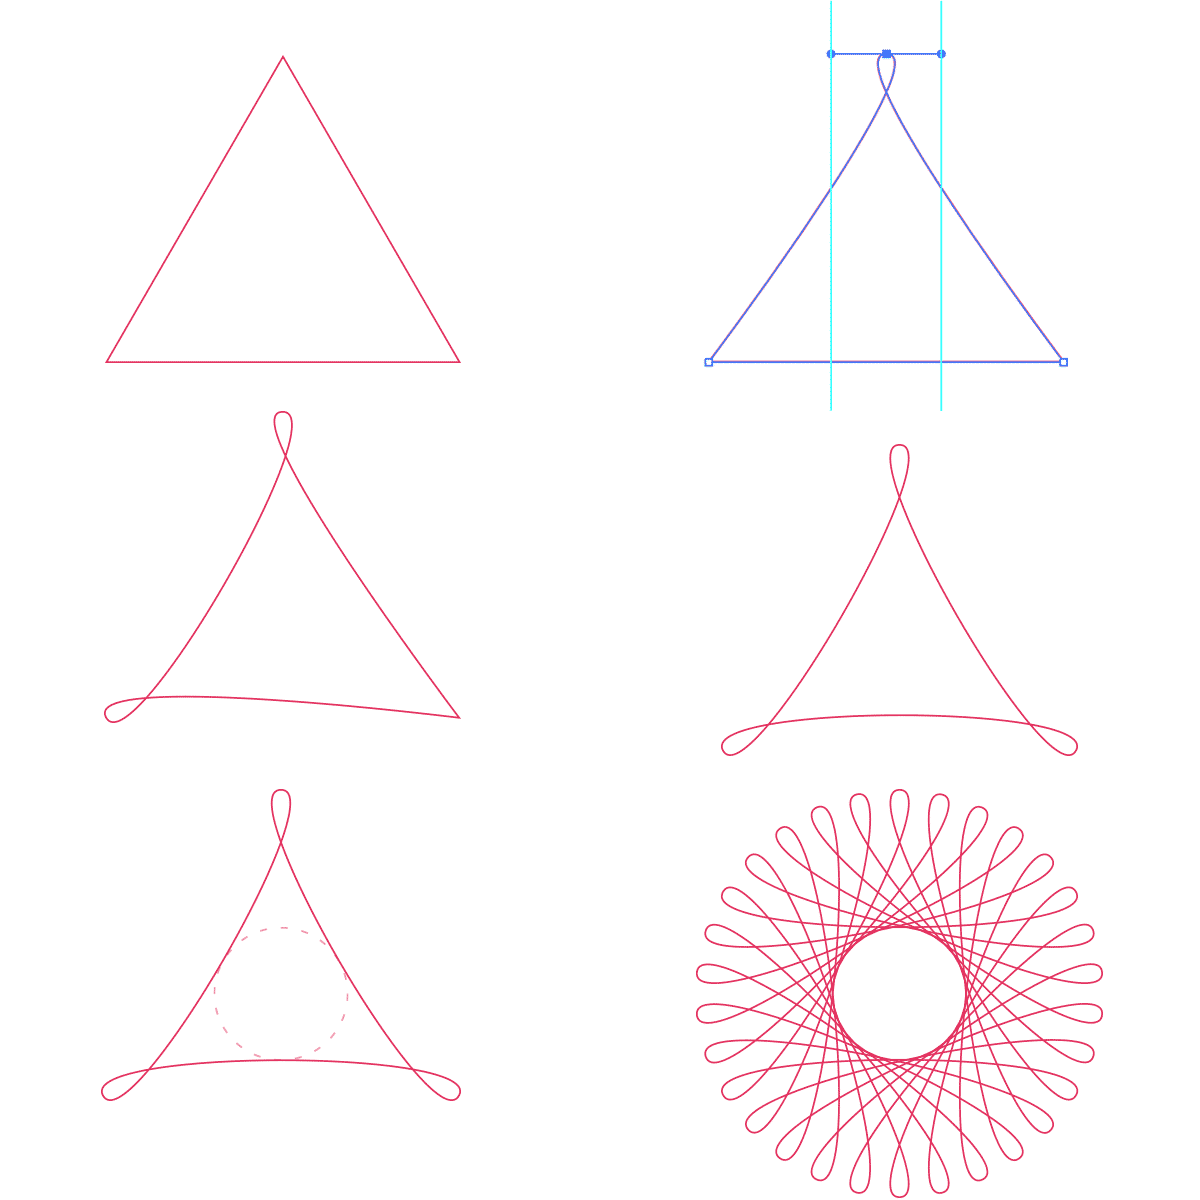
Triangle at 12°
This one is I think the most difficult one, but still rather easy to do and I actually find the result of this one the nicest of the 3. Select the Polygon tool and enter 30 px Radius and 3 Sides. Just like in the tutorial, you need to turn each corner point into a smooth equal anchor point. Grab the Anchor Point tool (hit Shift + C) located under the Pen tool, click into the top corner point of the triangle and drag horizontally to the left. Hold down the Shift key once you are dragging and release the mouse when you have a nice smooth looking loop hole. Drag 2 vertical guides at the location of each bezier handle. Now rotate> the triangle at 120° from its center point. Select the Rotate tool, Option/Alt click into the center point and enter 120°, hit OK. Repeat the previous step and use the guides as snapping point(s). Rotate the triangle again at 120° and repeat the corner point conversion so you end up with 3 equal curved corners. Now draw a prefect circle into the center space of the object as shown in the image. It's important to have it perfectly placed as shown in the image or the result won't be a nice circle effect in the center of the spirograph. Find the center point of the circle to use as rotation reference point (use vertical and horizontal guides if needed). Select the Rotate tool again, Alt/Option click into the center point and enter 12° as rotation angle. Hit the Copy button and Cmd/Ctrl / d 8x in a row. That's it!
Hope you like this tutorial. If you do, don't hesitate to share it ;) If you missed the 1st tutorial, make sure to check out the Full Spectrum Spirograph tutorial. As mentioned before, I'll write a 3rd tutorial on the subject of spirographs and in that one we'll be using the Blend tool technique. So stay tuned!
