
Create a Circle Spirograph in Adobe Illustrator
A Step-by-Step Tutorial
Article written on Thursday, 24 Sep 2020
- Requirements
- Adobe Illustrator CS6
- Level
- Beginner
- Download
- Illustrator Tutorial File
Complex looking graphics like spirographs look like they're difficult to create, but as I mentioned before, this can be a bit deceiving. As promised, here is another follow-up tutorial on how to create such spirograph. This time we're going to focus on using the Blend tool to create one.
I think this is my absolute favorite one (compared to the 2 previous ones). Maybe it's because it looks like it's the most complex one of all, or maybe it's because there is this perfection of seamless blending.
A Short Trip Down Memory Lane
People who have been using Illustrator since the early days, like version 3.0 will remember that the Blend tool was also the tool to use to create a gradient. You had to 'manually' create your gradient: e.g. you draw 2 lines, 1 for the beginning of your gradient and one for the end, say a 1 px yellow line and a 1 px red line. Then you select the Blend tool, click the points of each line, enter the amount of blending steps and hit OK to get an orange gradient going from yellow to red. When you wanted to apply this gradient to a shape you had to do this by masking it on the object. Luckily these days it's all much easier and it also won't take much processor resources either (which it did back then), but enough about that. Let's get started.

A spirograph circle ring using the Blend Tool

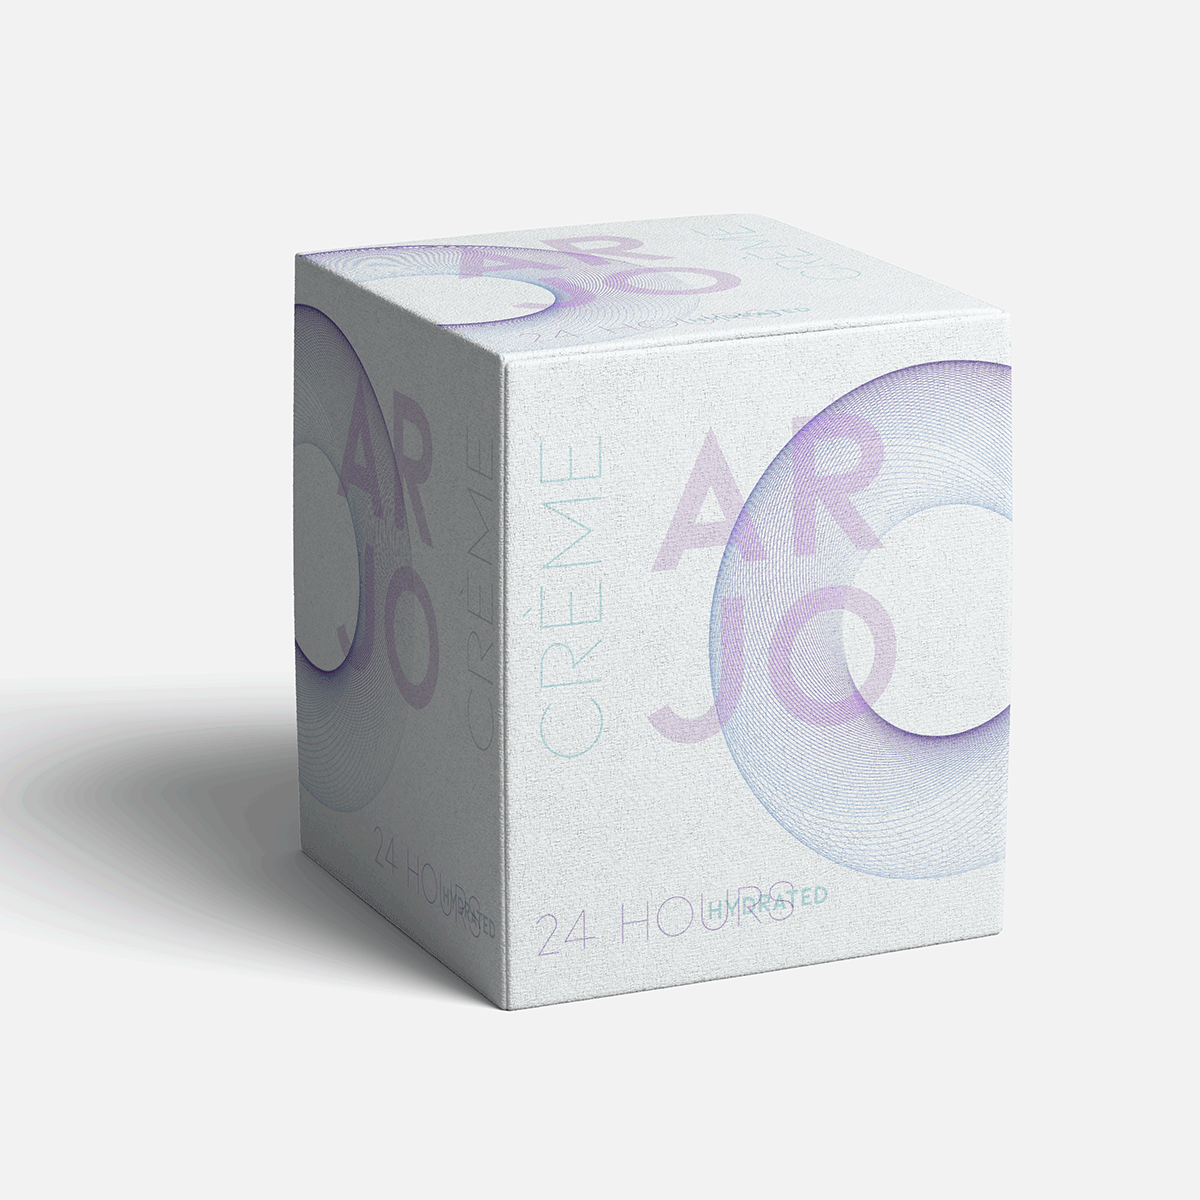
Here's what we'll be creating: a spirograph ring. I've used this graphic for the design of this fictional poster. I figured this shape suits perfect for the design of a music festival poster, together with some typographical layout it could give some interesting results. To finish it off and give it a realistic look, I tried out some Photoshop texture from this Poster Studio For Photoshop package which was included in one of Design Cuts bundle offers.
I also tried out a fictional cosmetic packaging design with the spirograph ring in different colors. The typeface used for the poster and the packaging is KIONA. It was part of one of these amazing typographical bundle offers (for only $29) from Design Cuts, and so is the box template used for this design. If you want to keep informed about all this, please sign up to my weekly newsletter.
Let's Get Started
1. Draw a Circle
Start by drawing a circle of 120 x 120 px. Click the Ellipse tool, click on the canvas and enter 120 px for Width and Height value. Select transparent (square with red diagonal line) as Fill, and the purple Swatch color as Stroke. Give the Stroke a width of 4 pt.
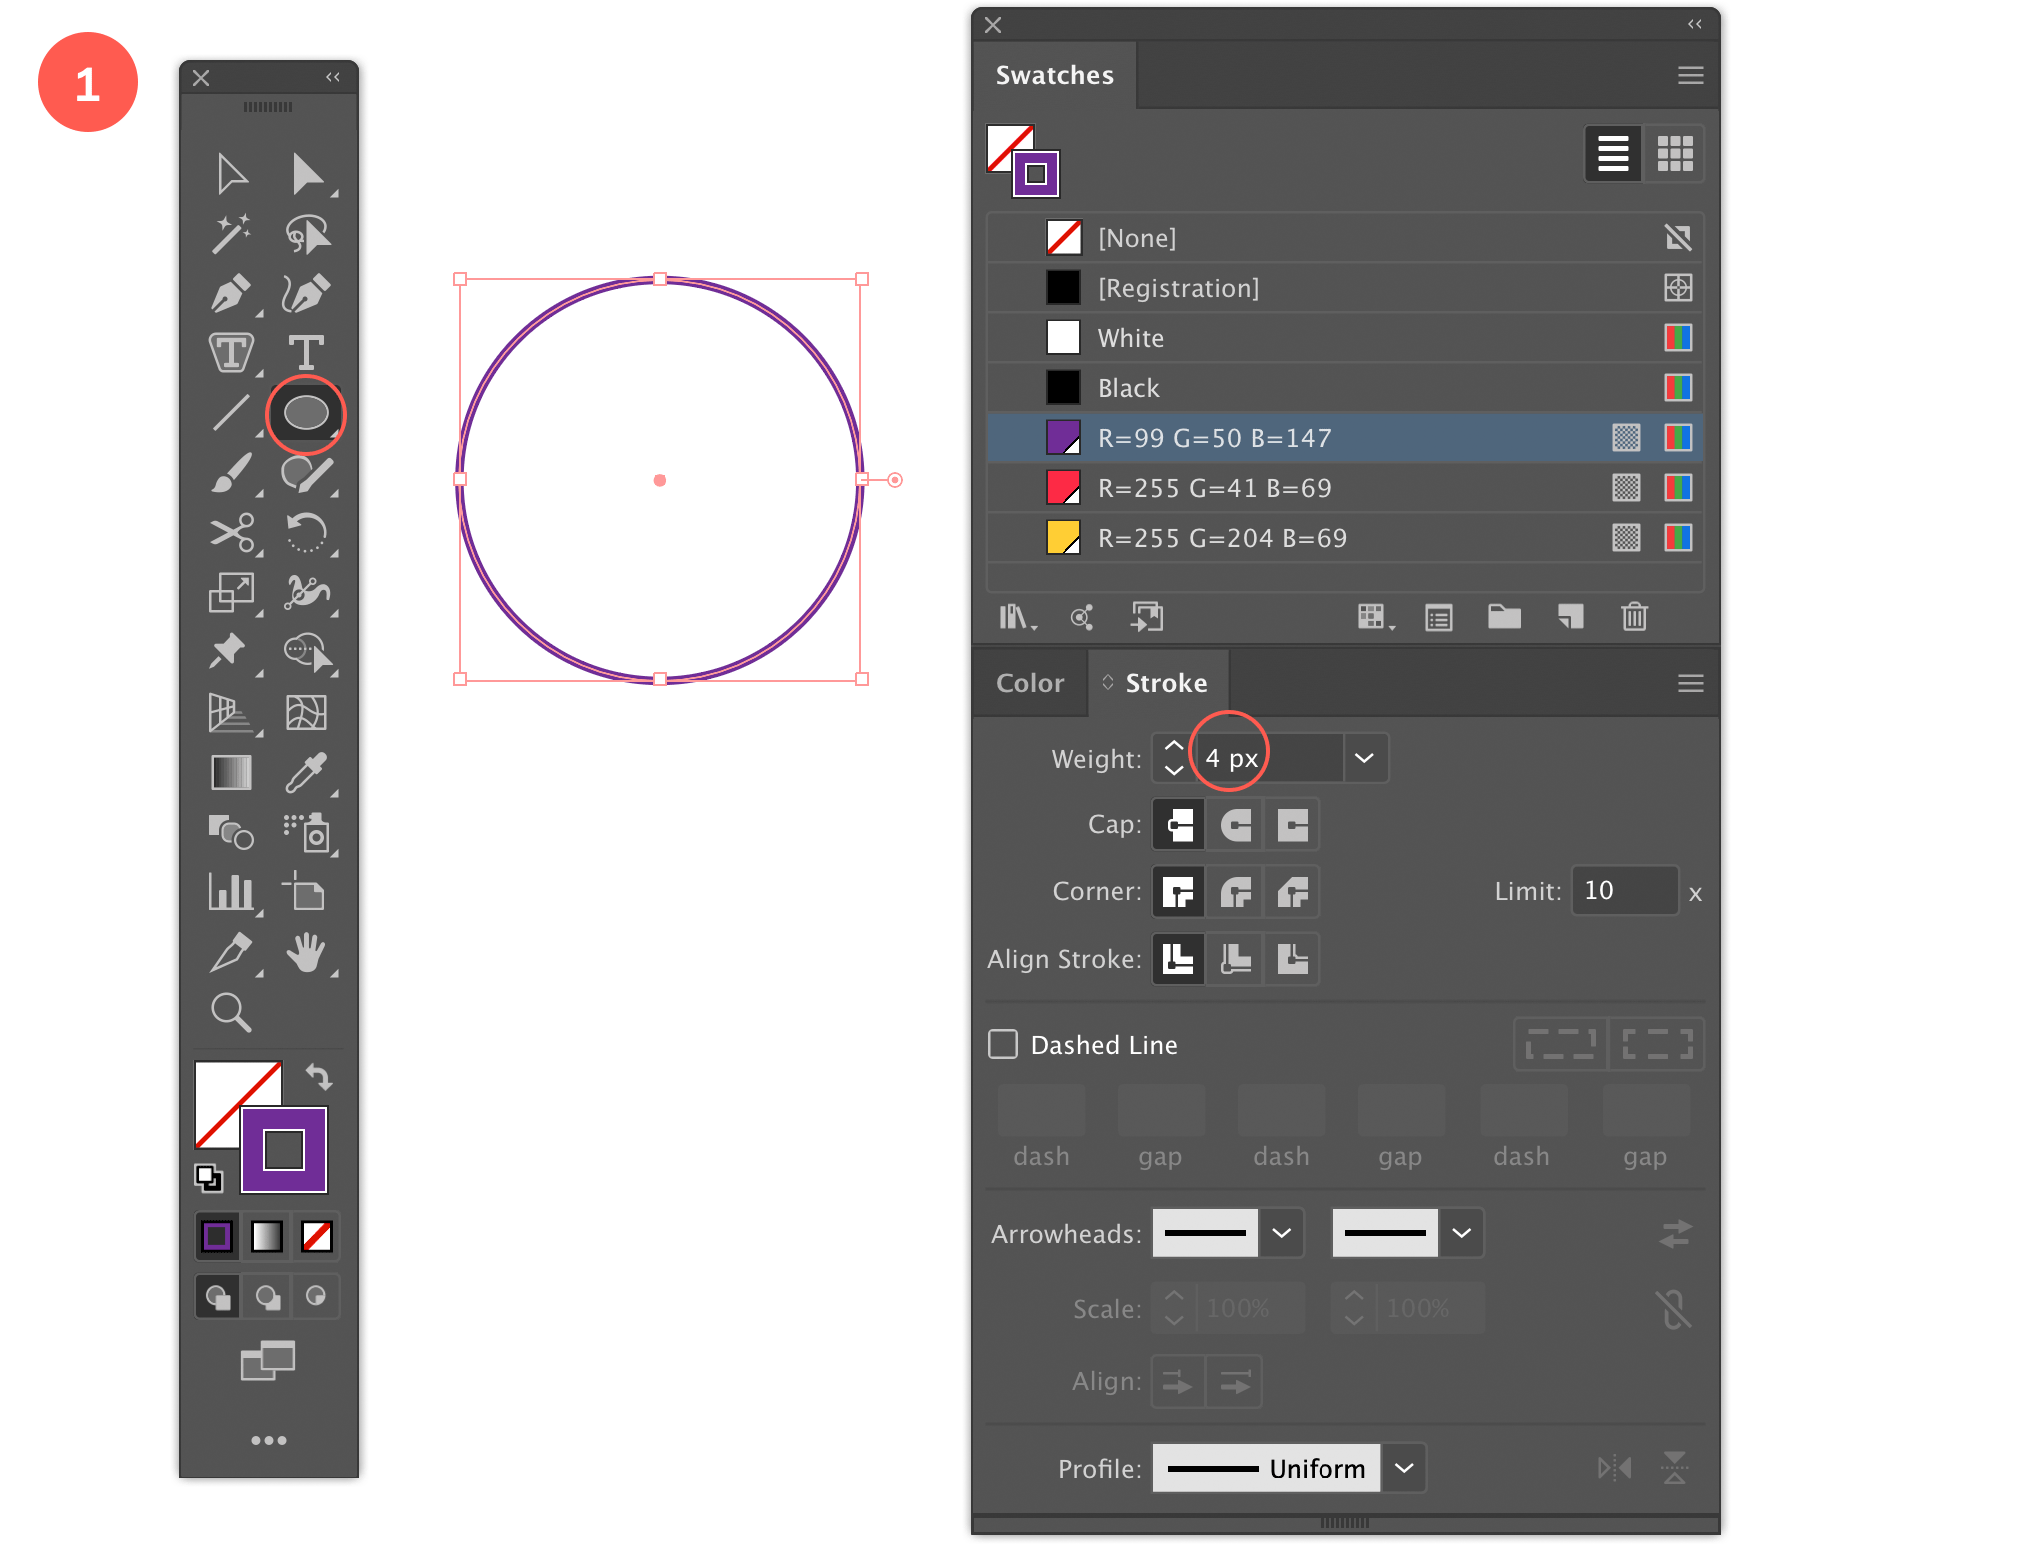
Step 1: Draw a Circle
2. Duplicate the Circle
With the Selection tool selected, click and drag the circle downwards while holding down the Alt/Option + Shift key. First select and start dragging, then hold down the keys. When you reached the spot, first release the mouse, then the keys. Give the circle the red color as Stroke (and also no fill).
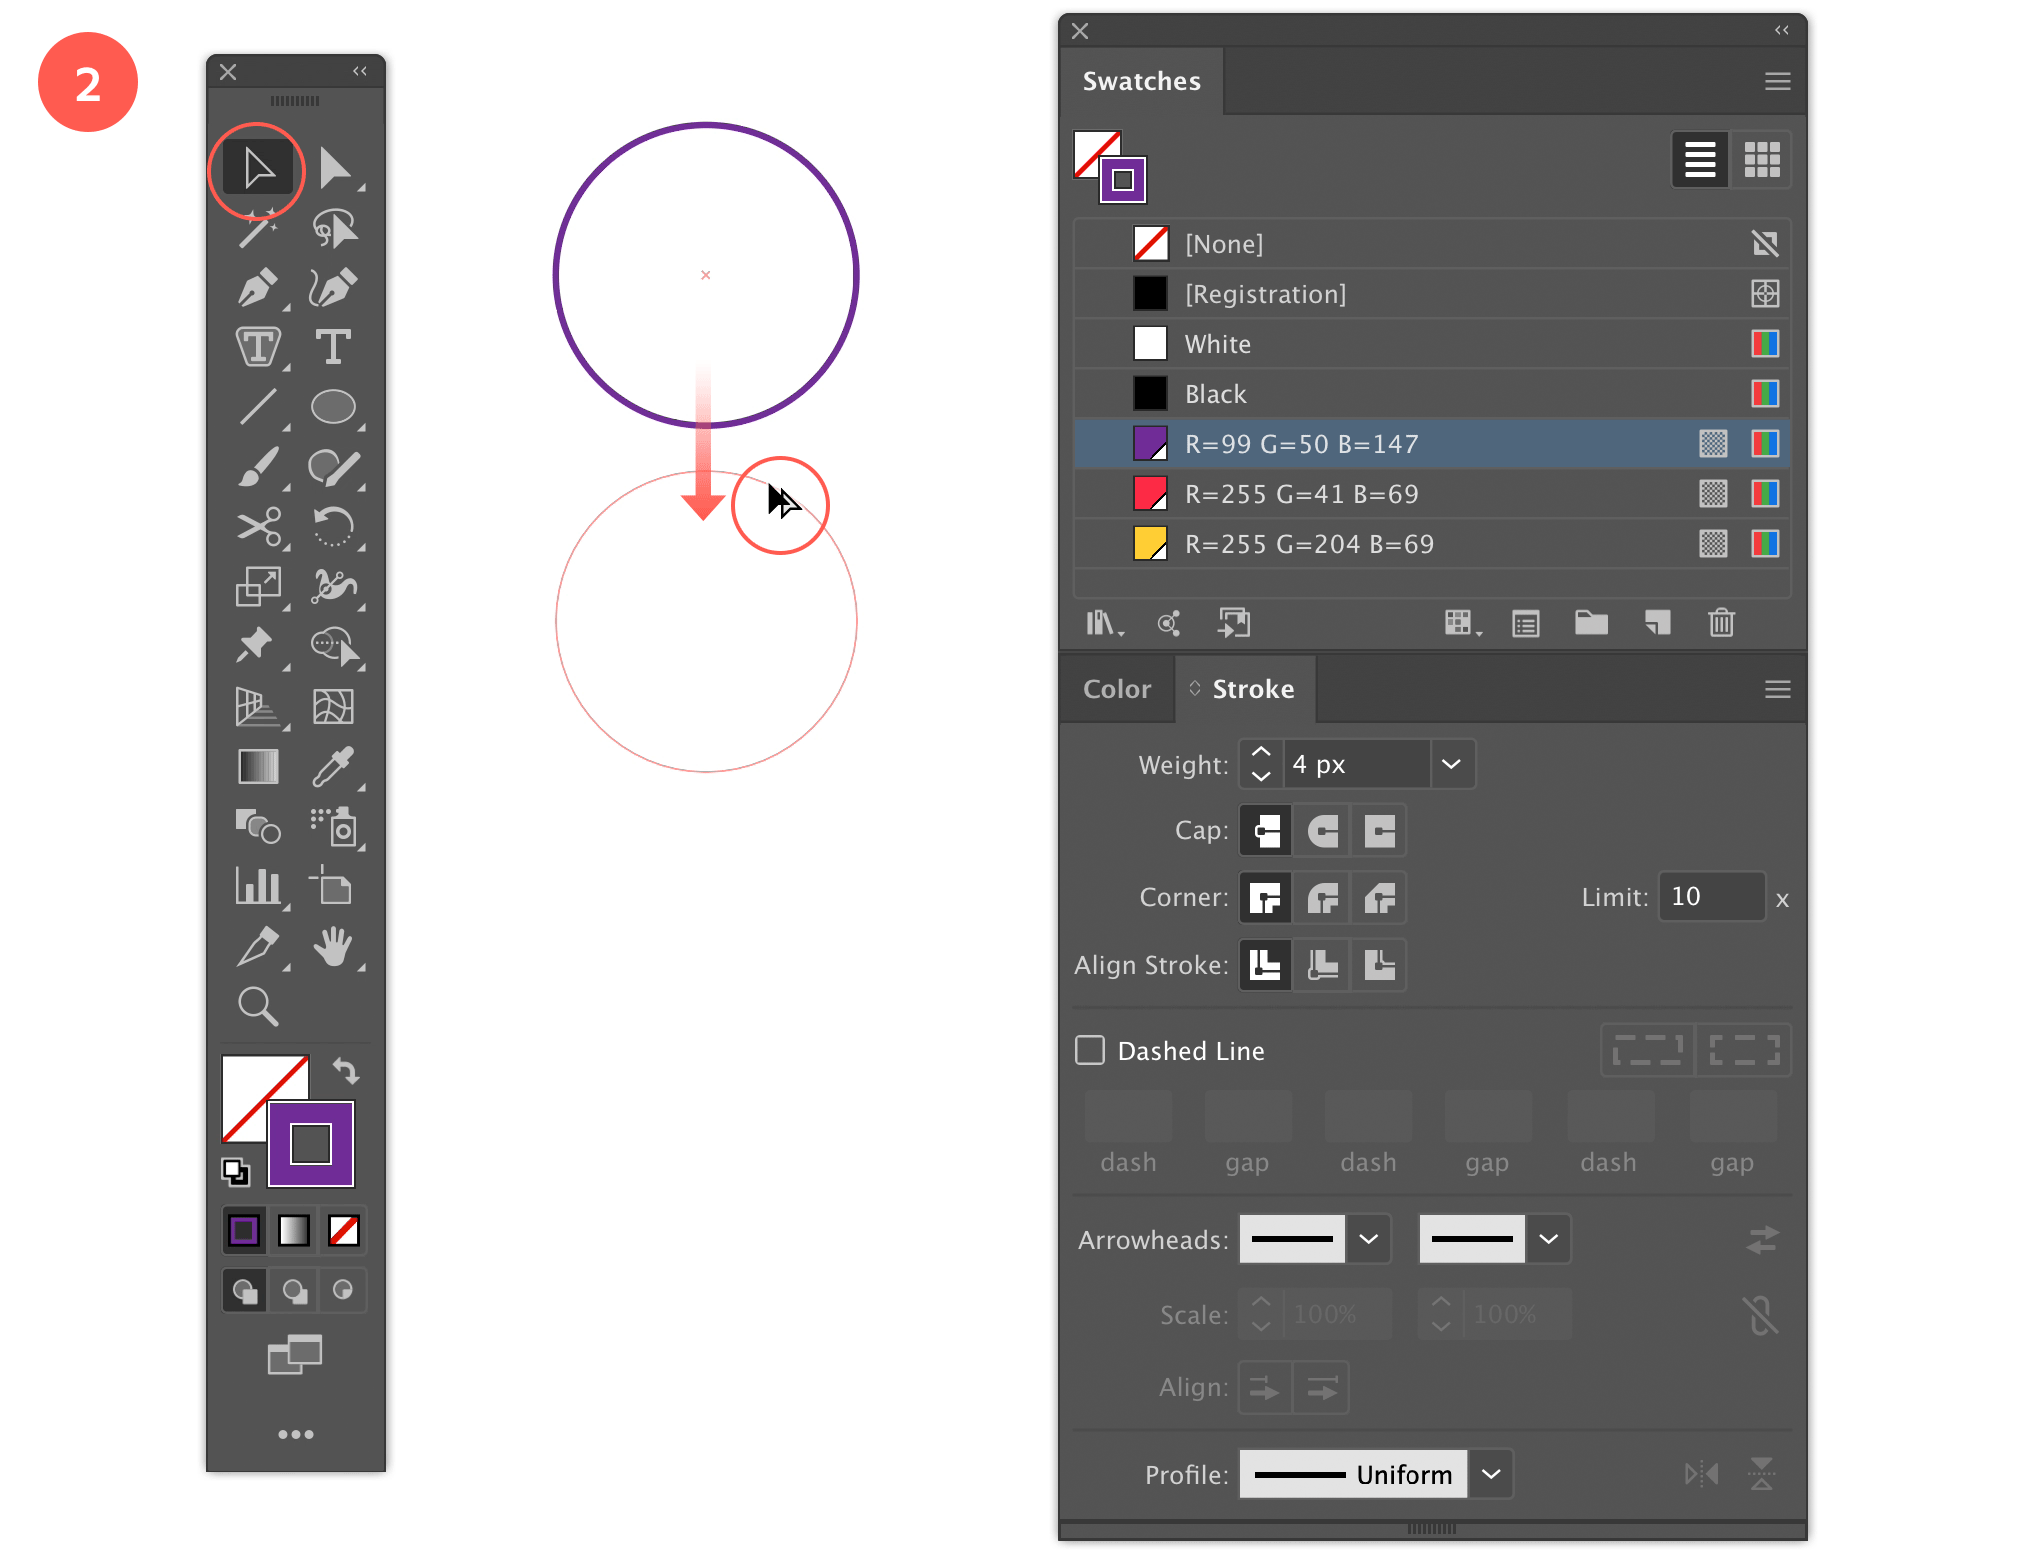
Step 2: Duplicate the Circle
3. Duplicate the Circle again
Duplicate the circle again below the 2nd one. In the same way like before. Give this circle the yellow color as Stroke (and also no fill).
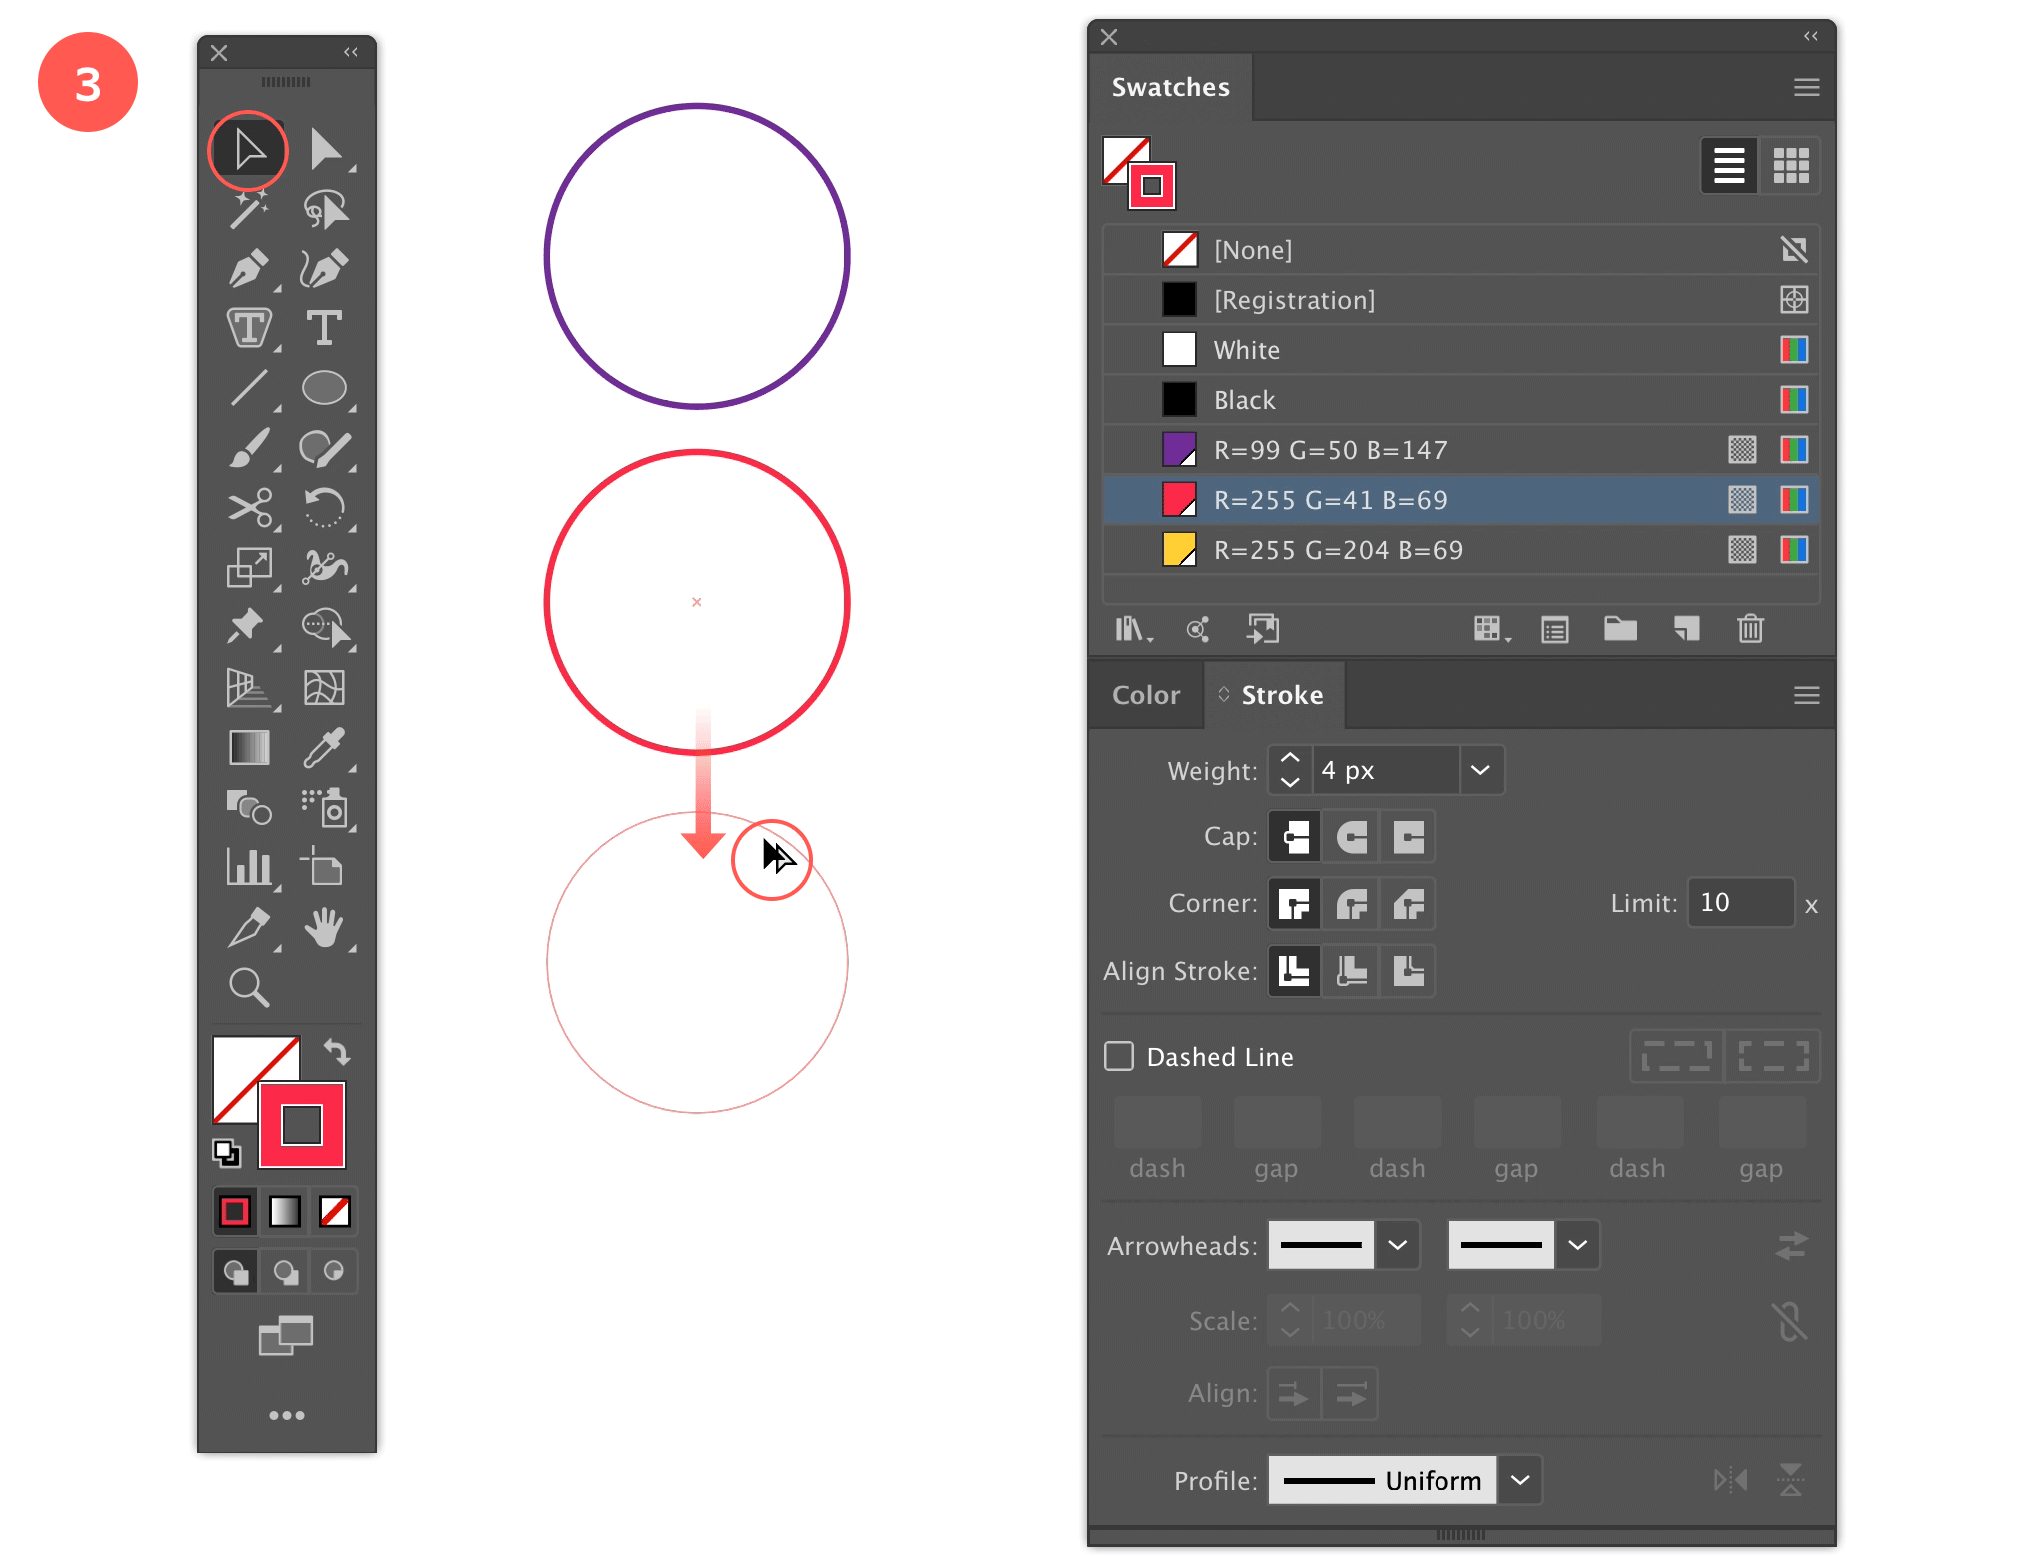
Step 3: Duplicate the Circle again
4. Align the Circles
Select all 3 circles, and select the Horizontal Center Align option from the Align panel. Next select the Vertical Distribute Center option
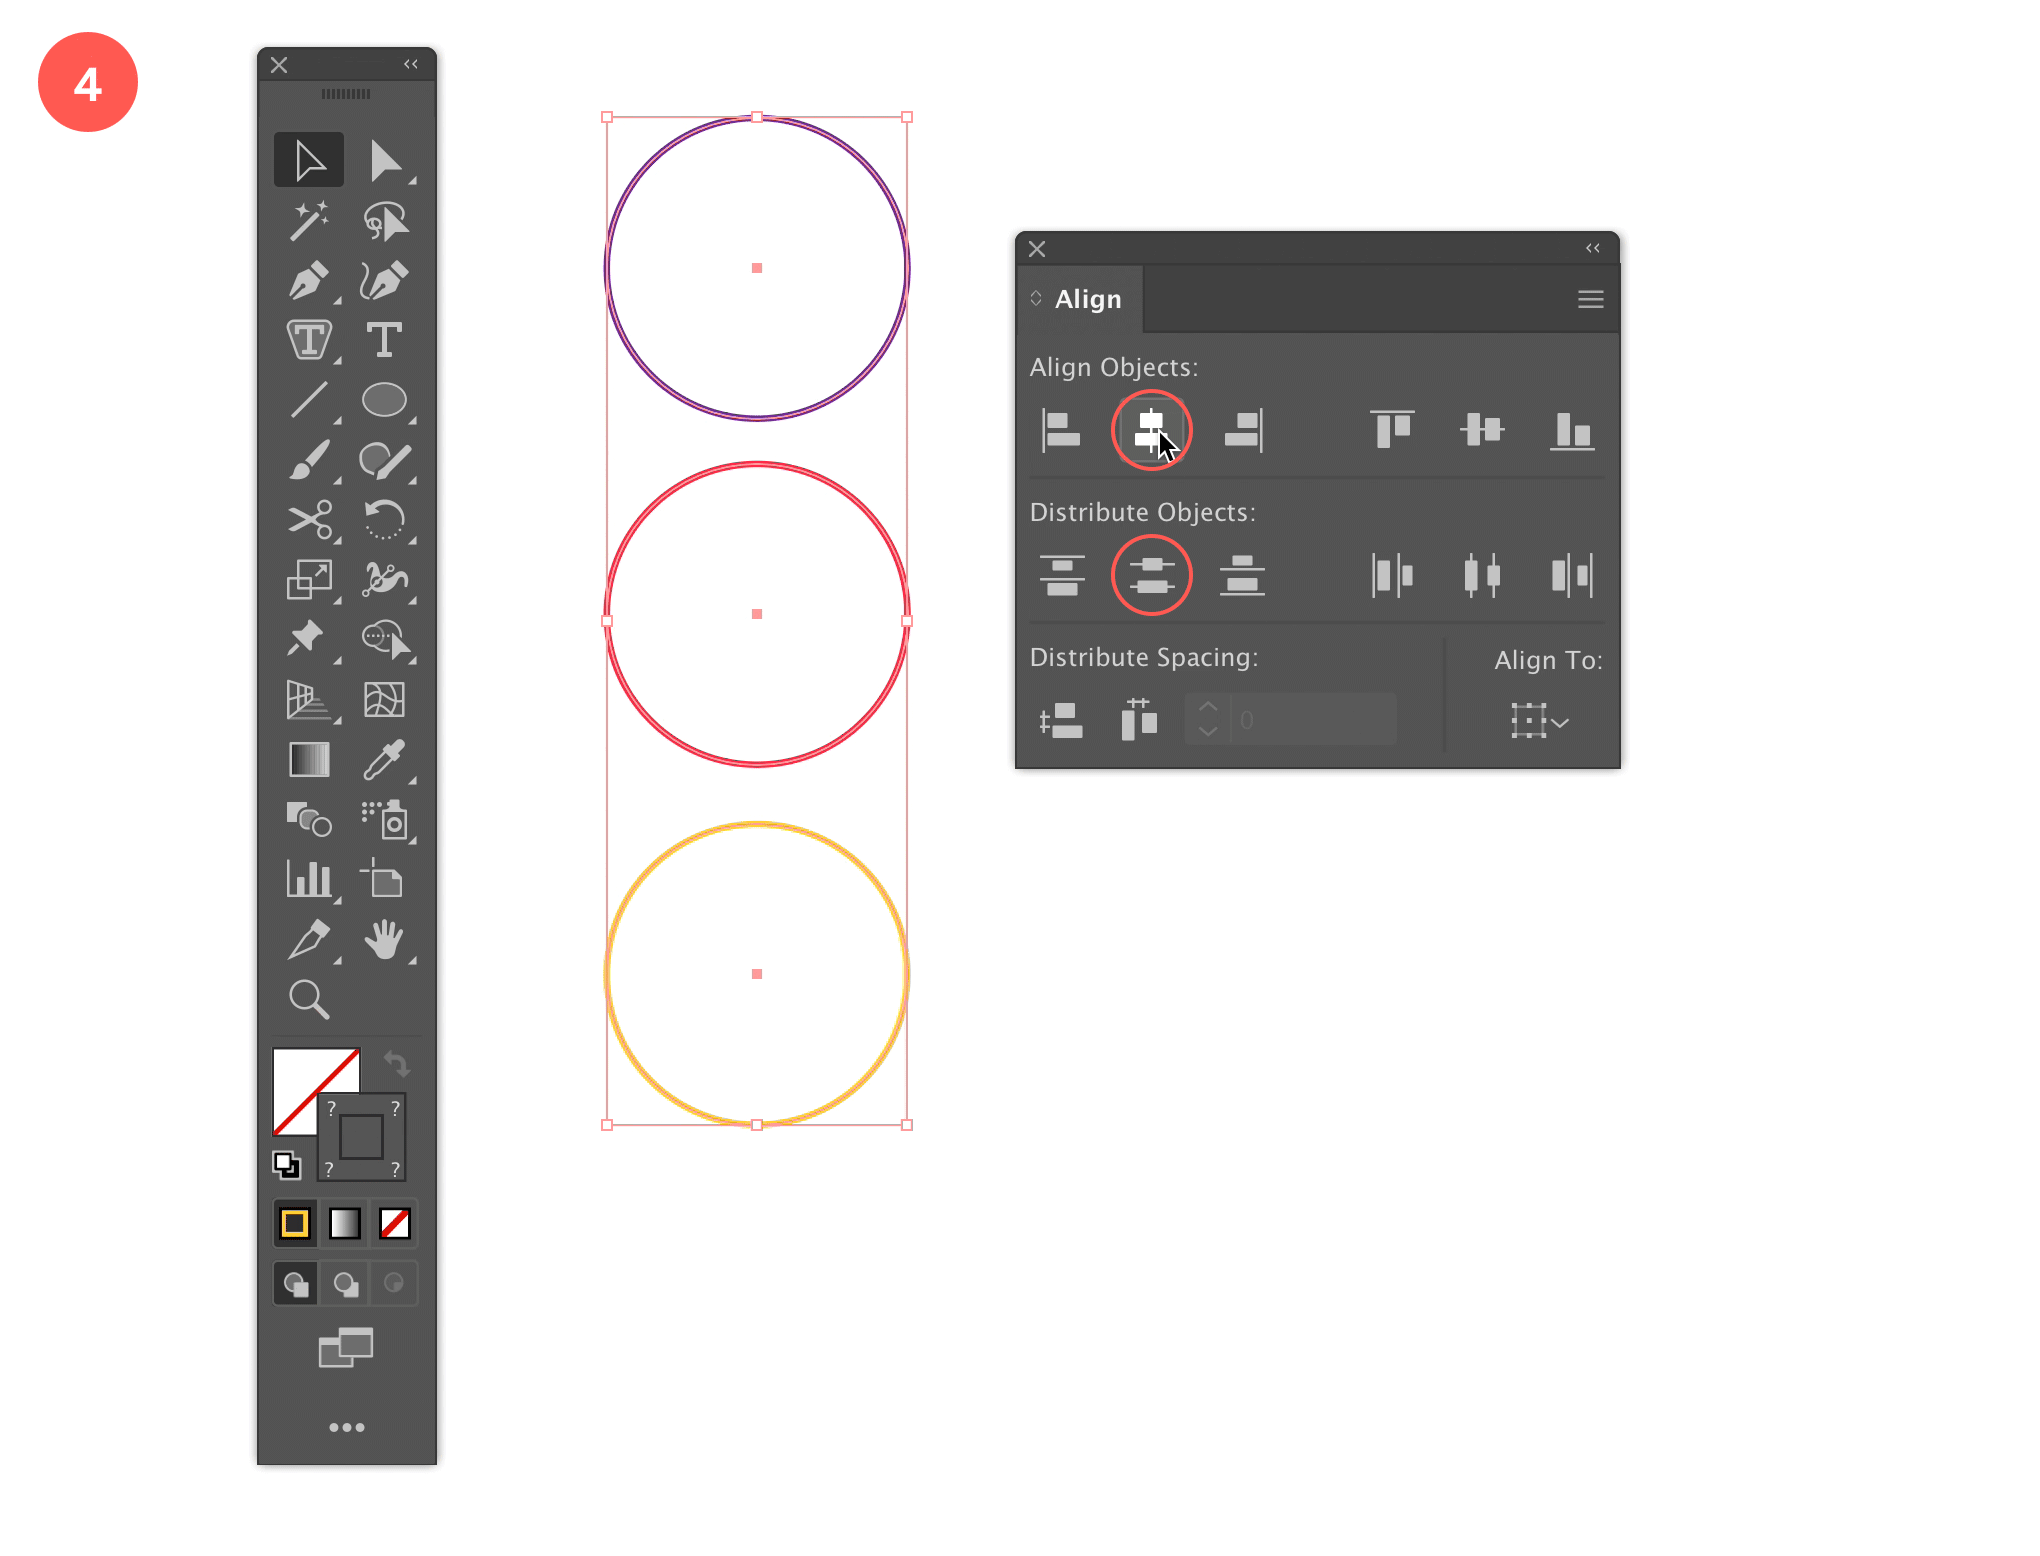
Step 4: Align the Circles
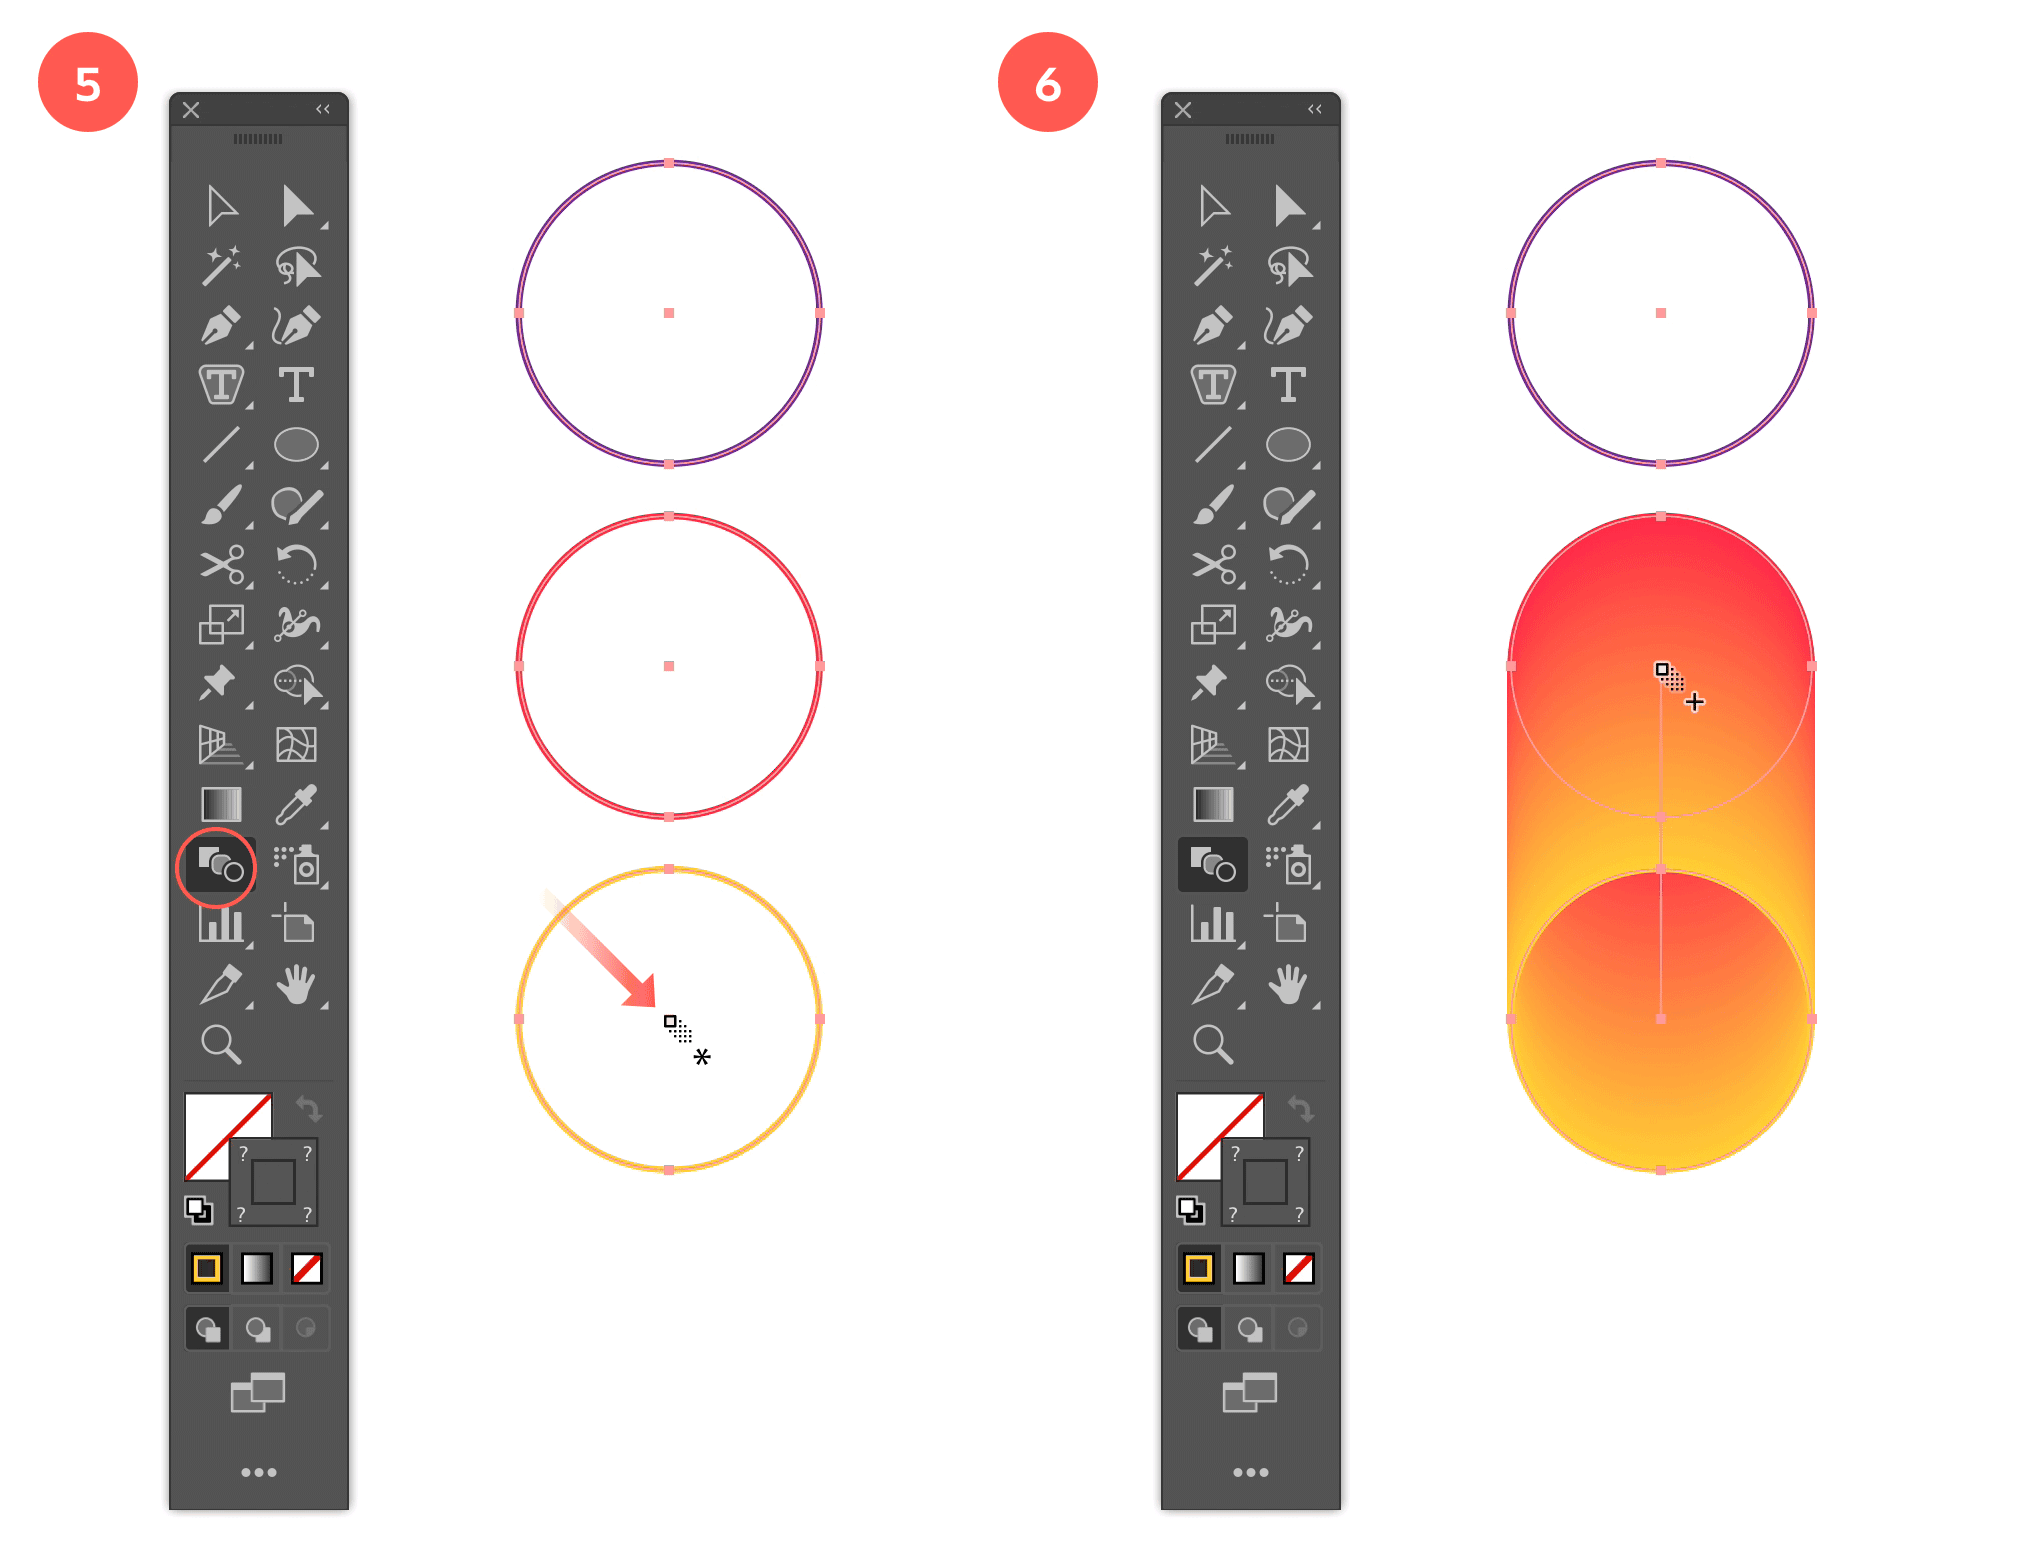
5. Blend the 3rd Circle with the 2nd Circle
Select the Blend tool from the toolbox and click into the center point of the 3rd circle.
Step 5: Blend the 3rd Circle with the 2nd Circle - Step 6: Create the Blending Between the 3rd and 2nd Circle
6. Create the Blending Between the 3rd and 2nd Circle
Then click into the center point of the 2nd circle.
7. Add the 1st Circle into the Blending
Next, click into the center point of the 1st circle.
Step7: Add the 1st Circle into the Blending - Step 8: Create the Blending Between All 3 Circles
8. Create the Blending Between All 3 Circles
You should see the blending appear between all 3 circles as shown in the image above.
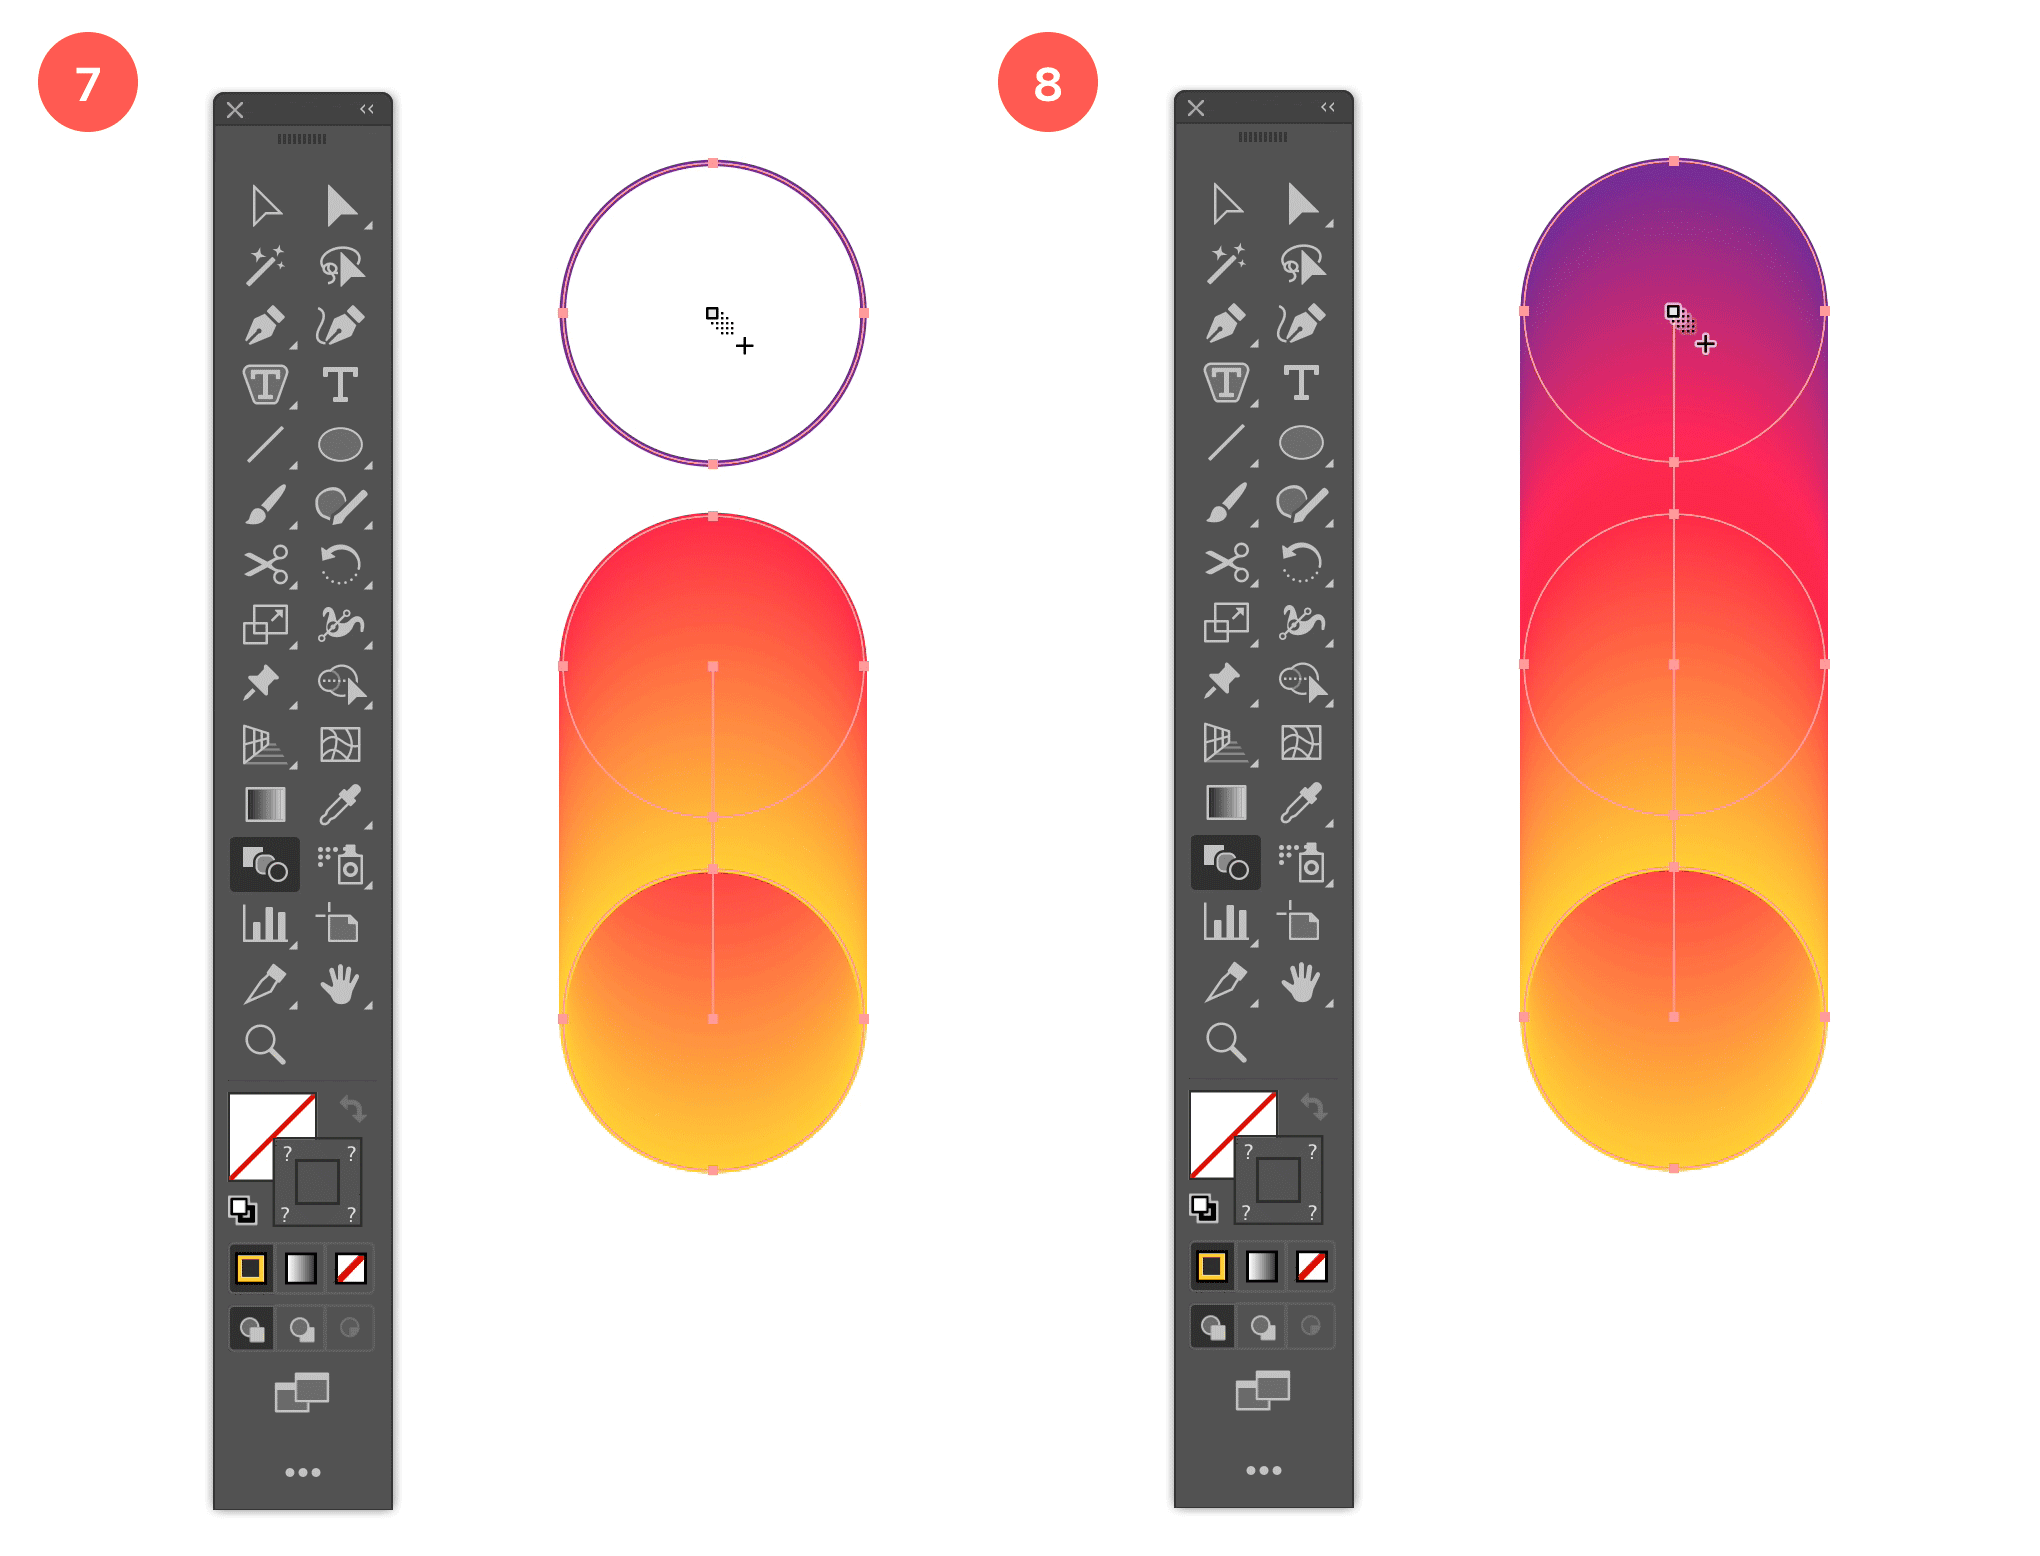
9. Create a Smaller Circle
Select the Ellipse tool and and draw a smaller circle (of 85 px width & height) to the right of the blend as shown in the image below. Give it a blue Stroke of 4 pt and no Fill.

Step 9: Create a Smaller Circle
10. Replace the Spine of the Blend
Select the both the blend and the smaller circle and go to Object > Blend > Replace Spine.
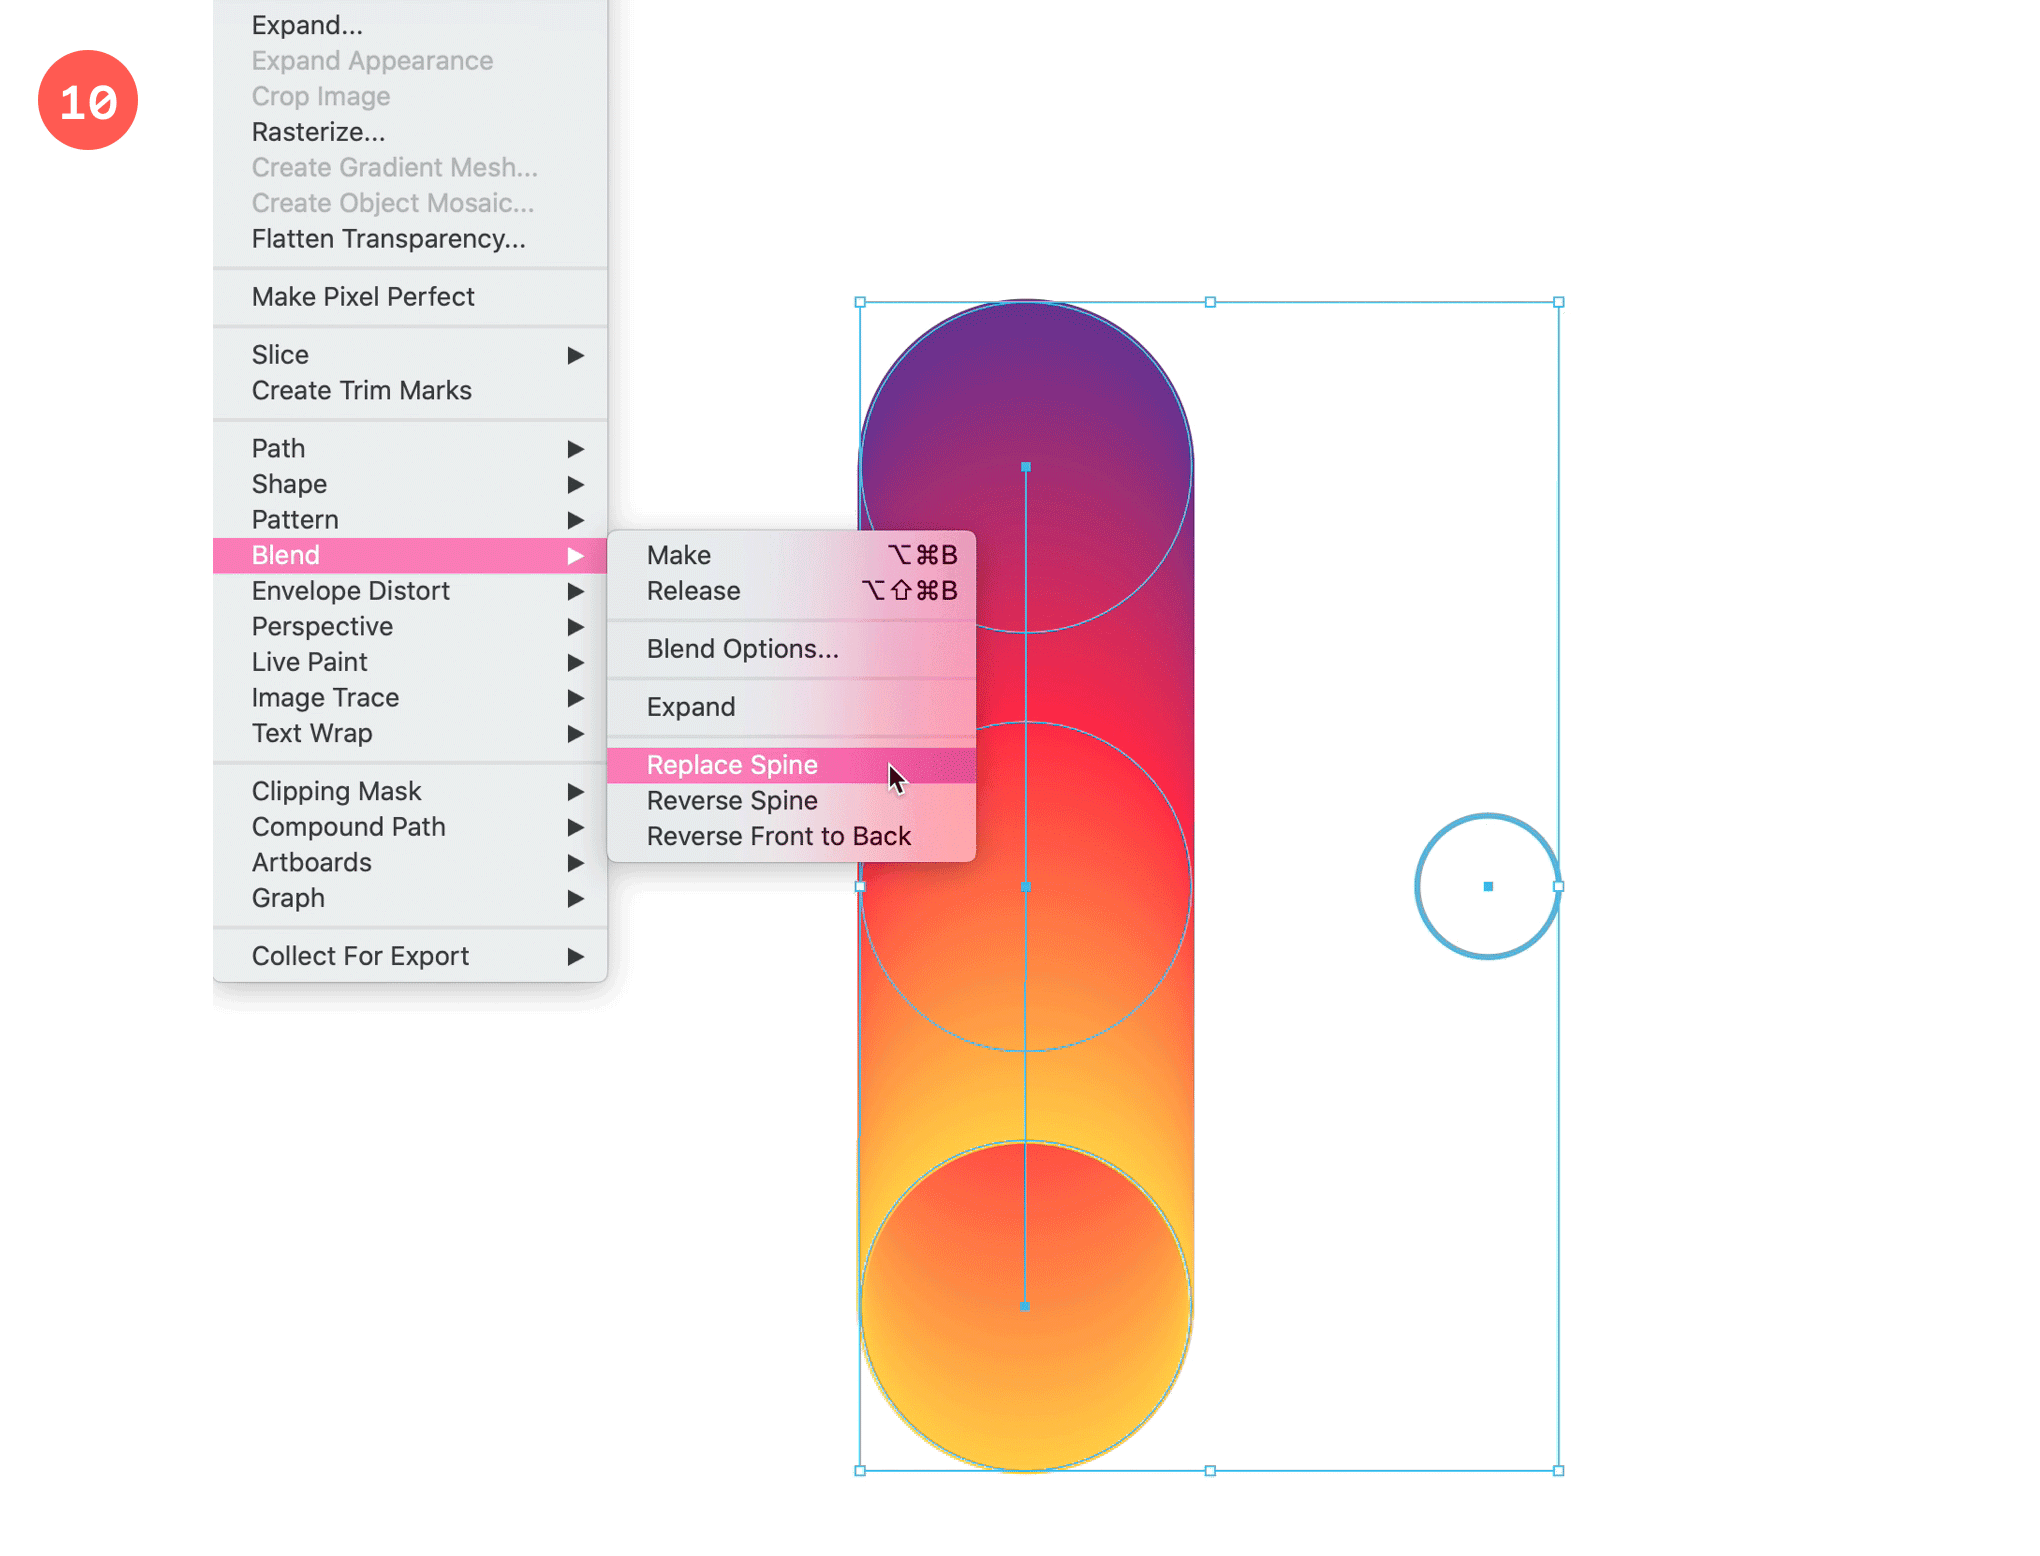
Step 10: Replace the Spine of the Blend
11. Finish the Blend
This should result in a ring shape. All is left to do is filling the gap on the top right by adding a last blend. Make sure all circles are selected, click with the Blend tool into the right anchor point of central smaller circle, and then click the most right anchor point of the circle positioned towards the top. The blending should now look complete and finished.
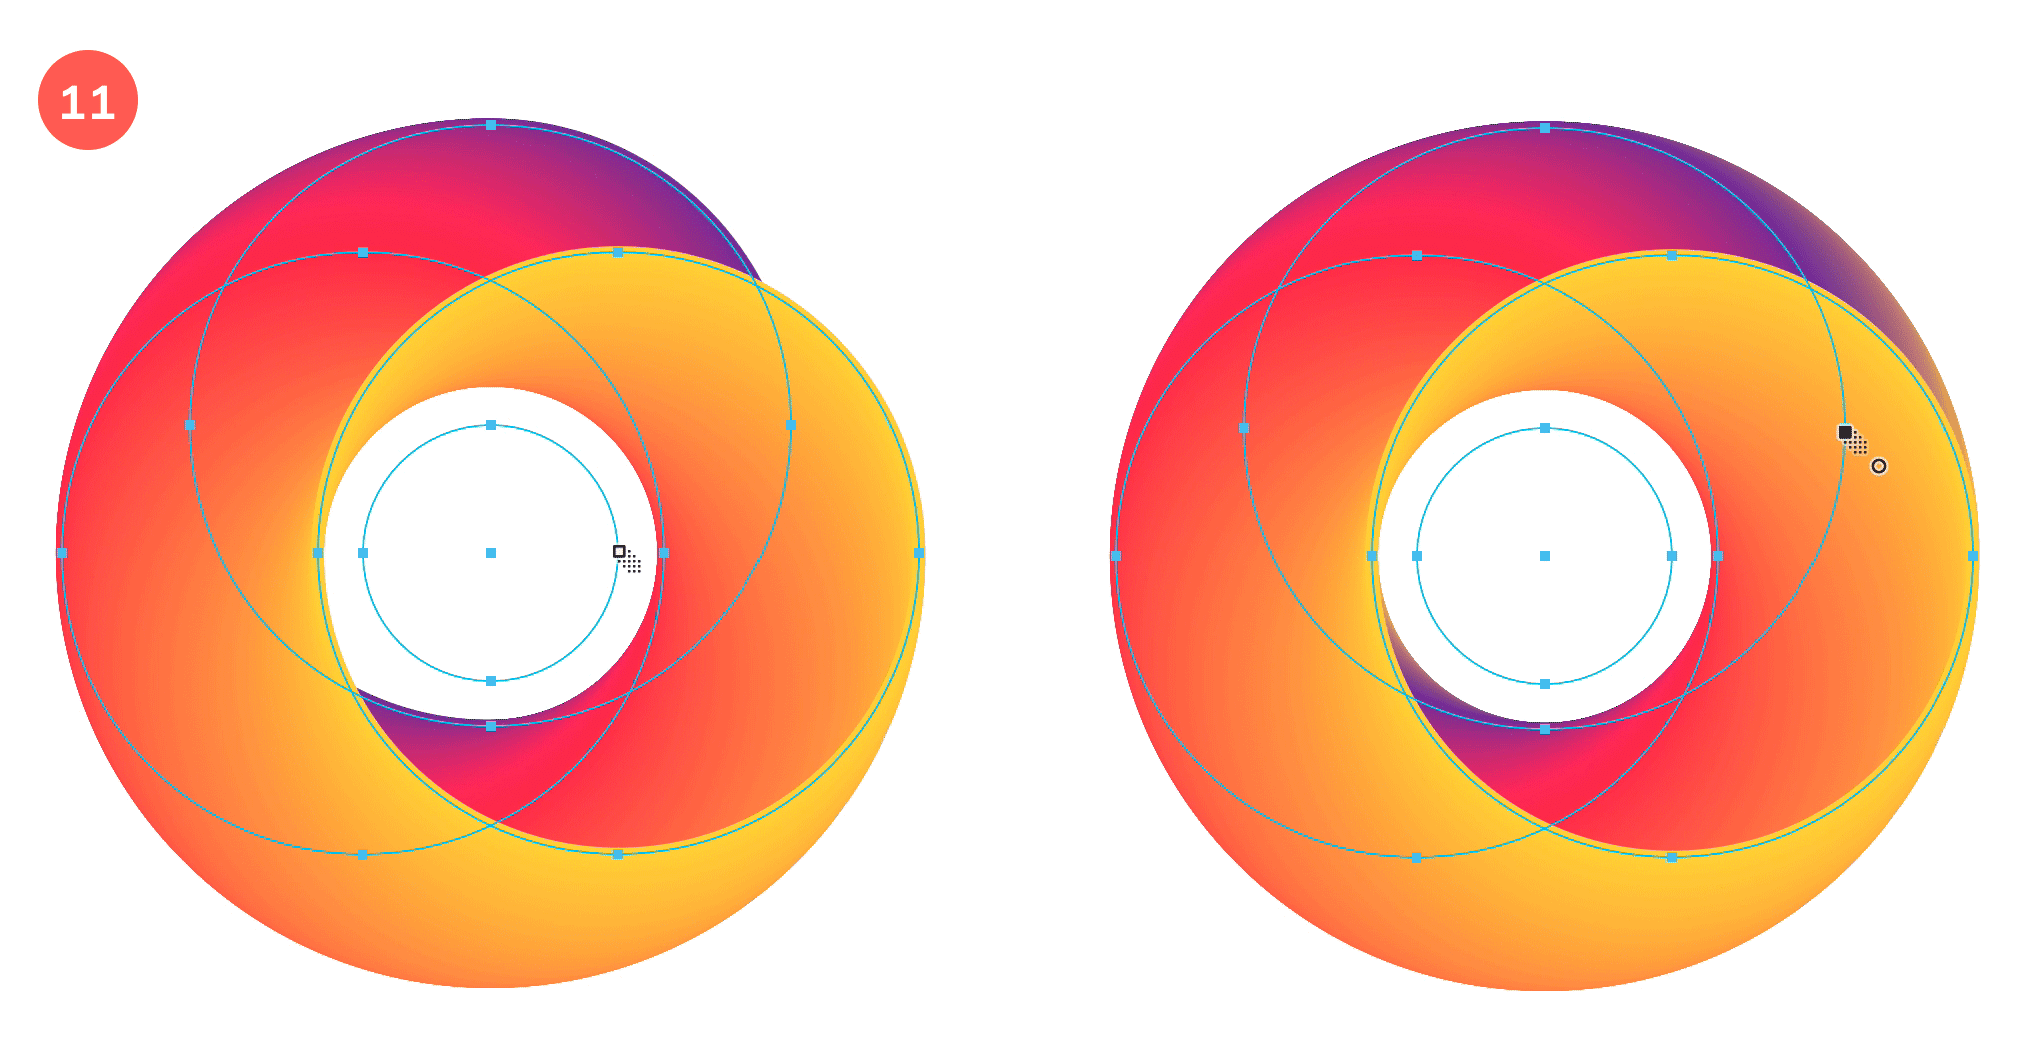
Step 11: Finish the Blend
12. Create a Wireframe Result
Now you can start editing your blend result by adjust the blending steps. Select your object and double click the Blend tool to get the Blend Options. Here you can adjust the Blending Steps. Set the steps to 25. You can check the Preview option to see what happens.
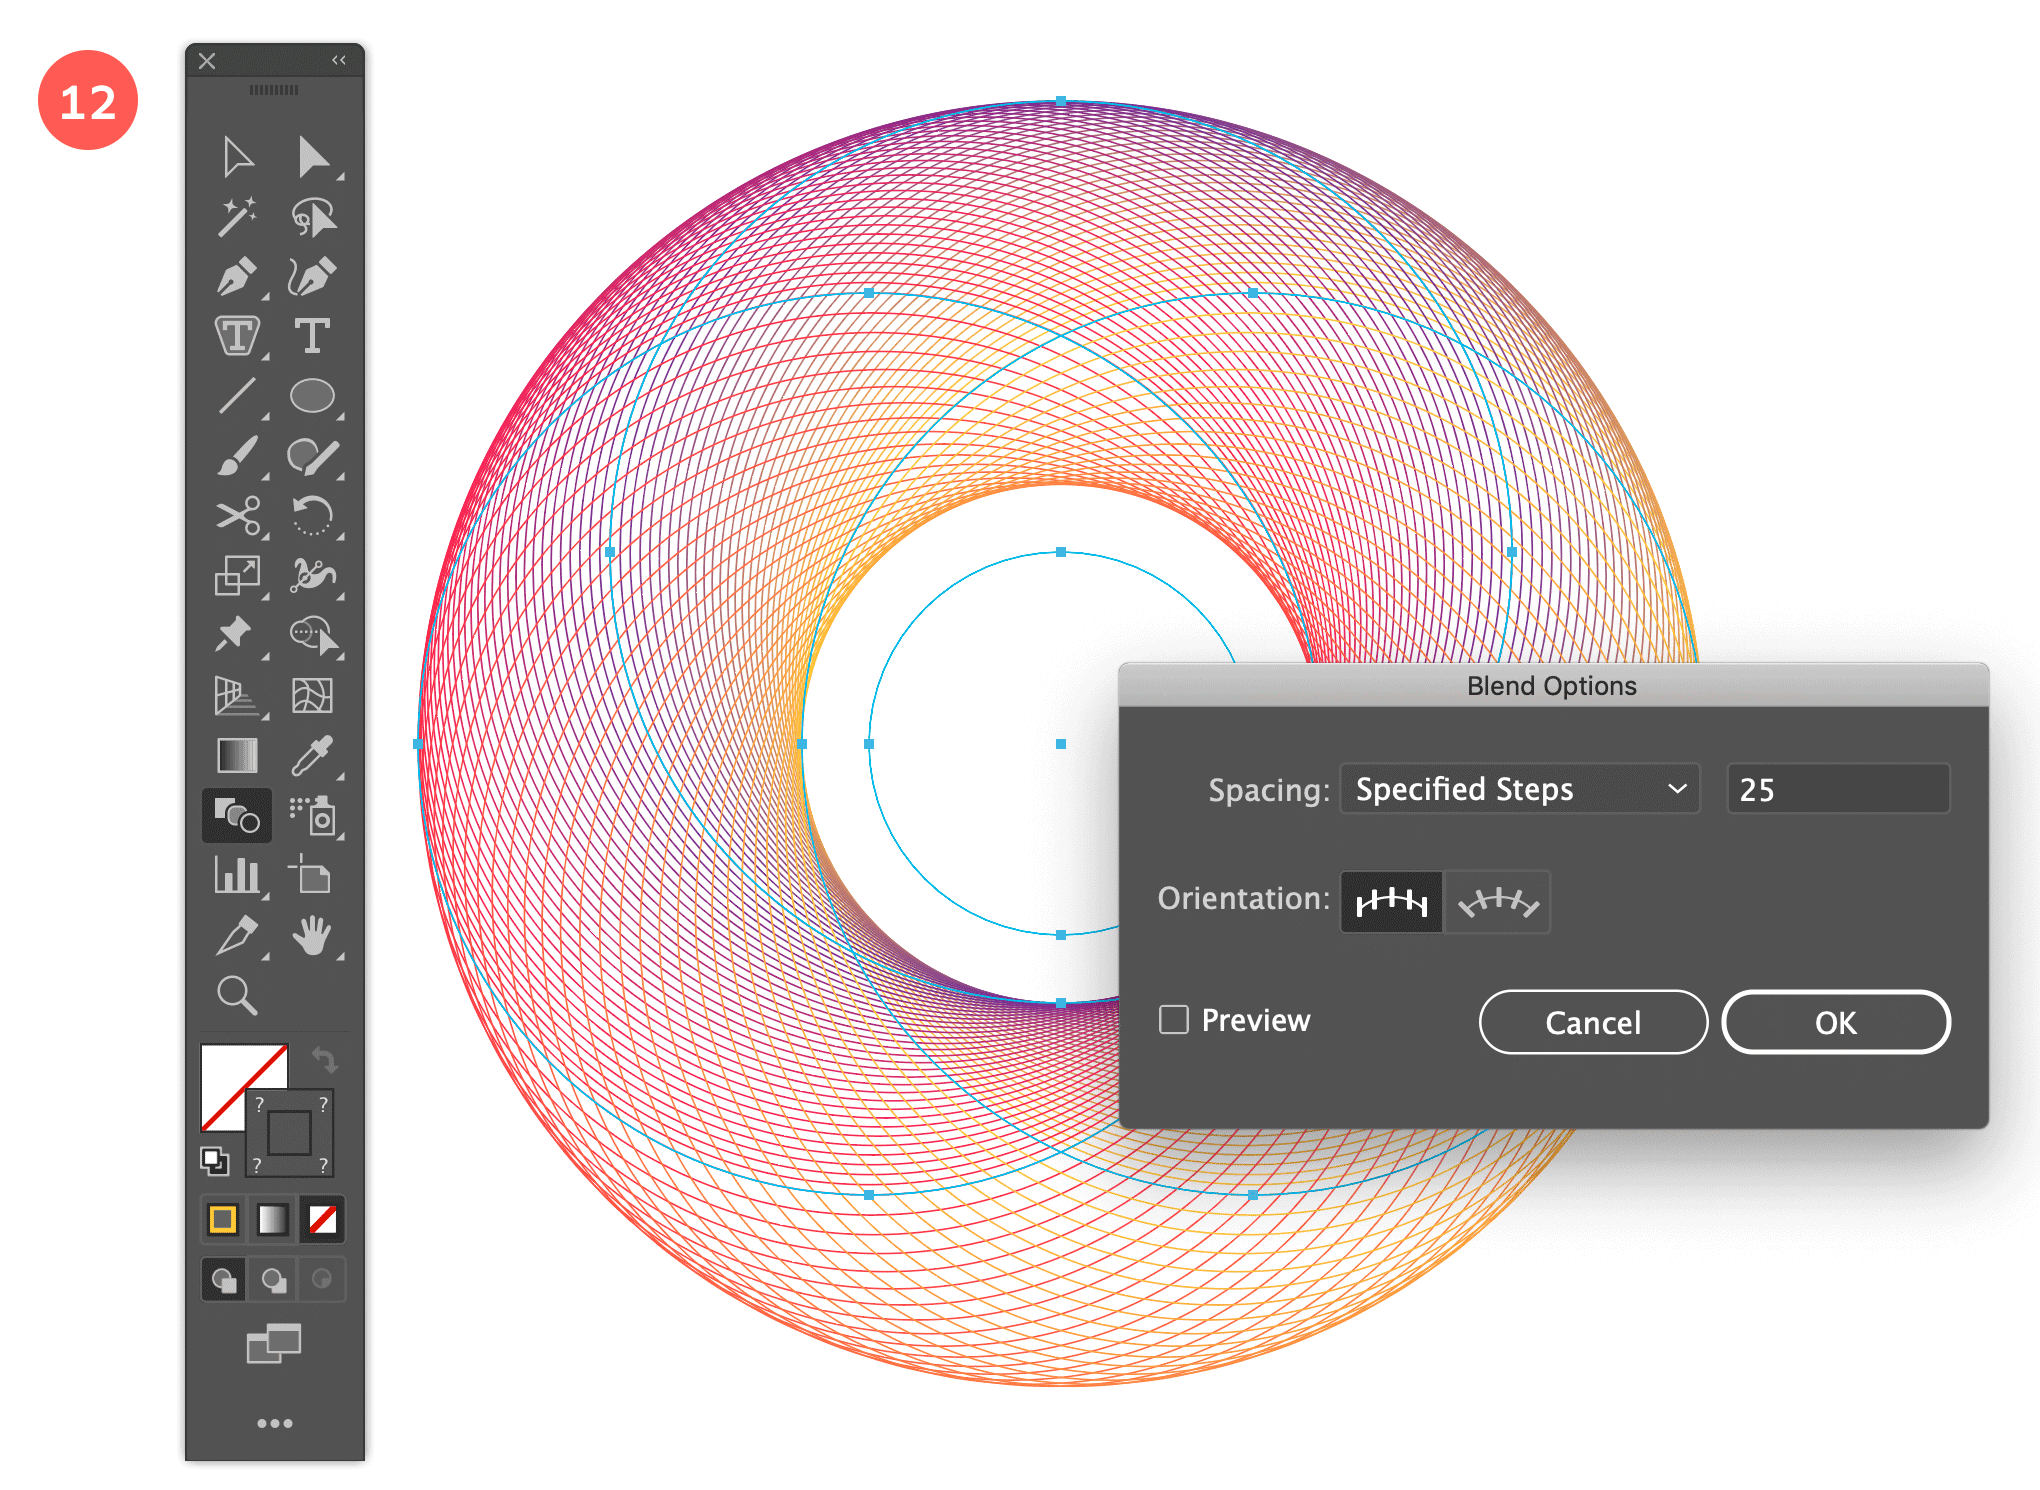
Step 12: Create a Wireframe Result
13. Experiment
Once you have this blend object you can keep on changing the results on the fly. You can change the color of the circles. In my example here I changed the red one to magenta, and the yellow one to light blue.
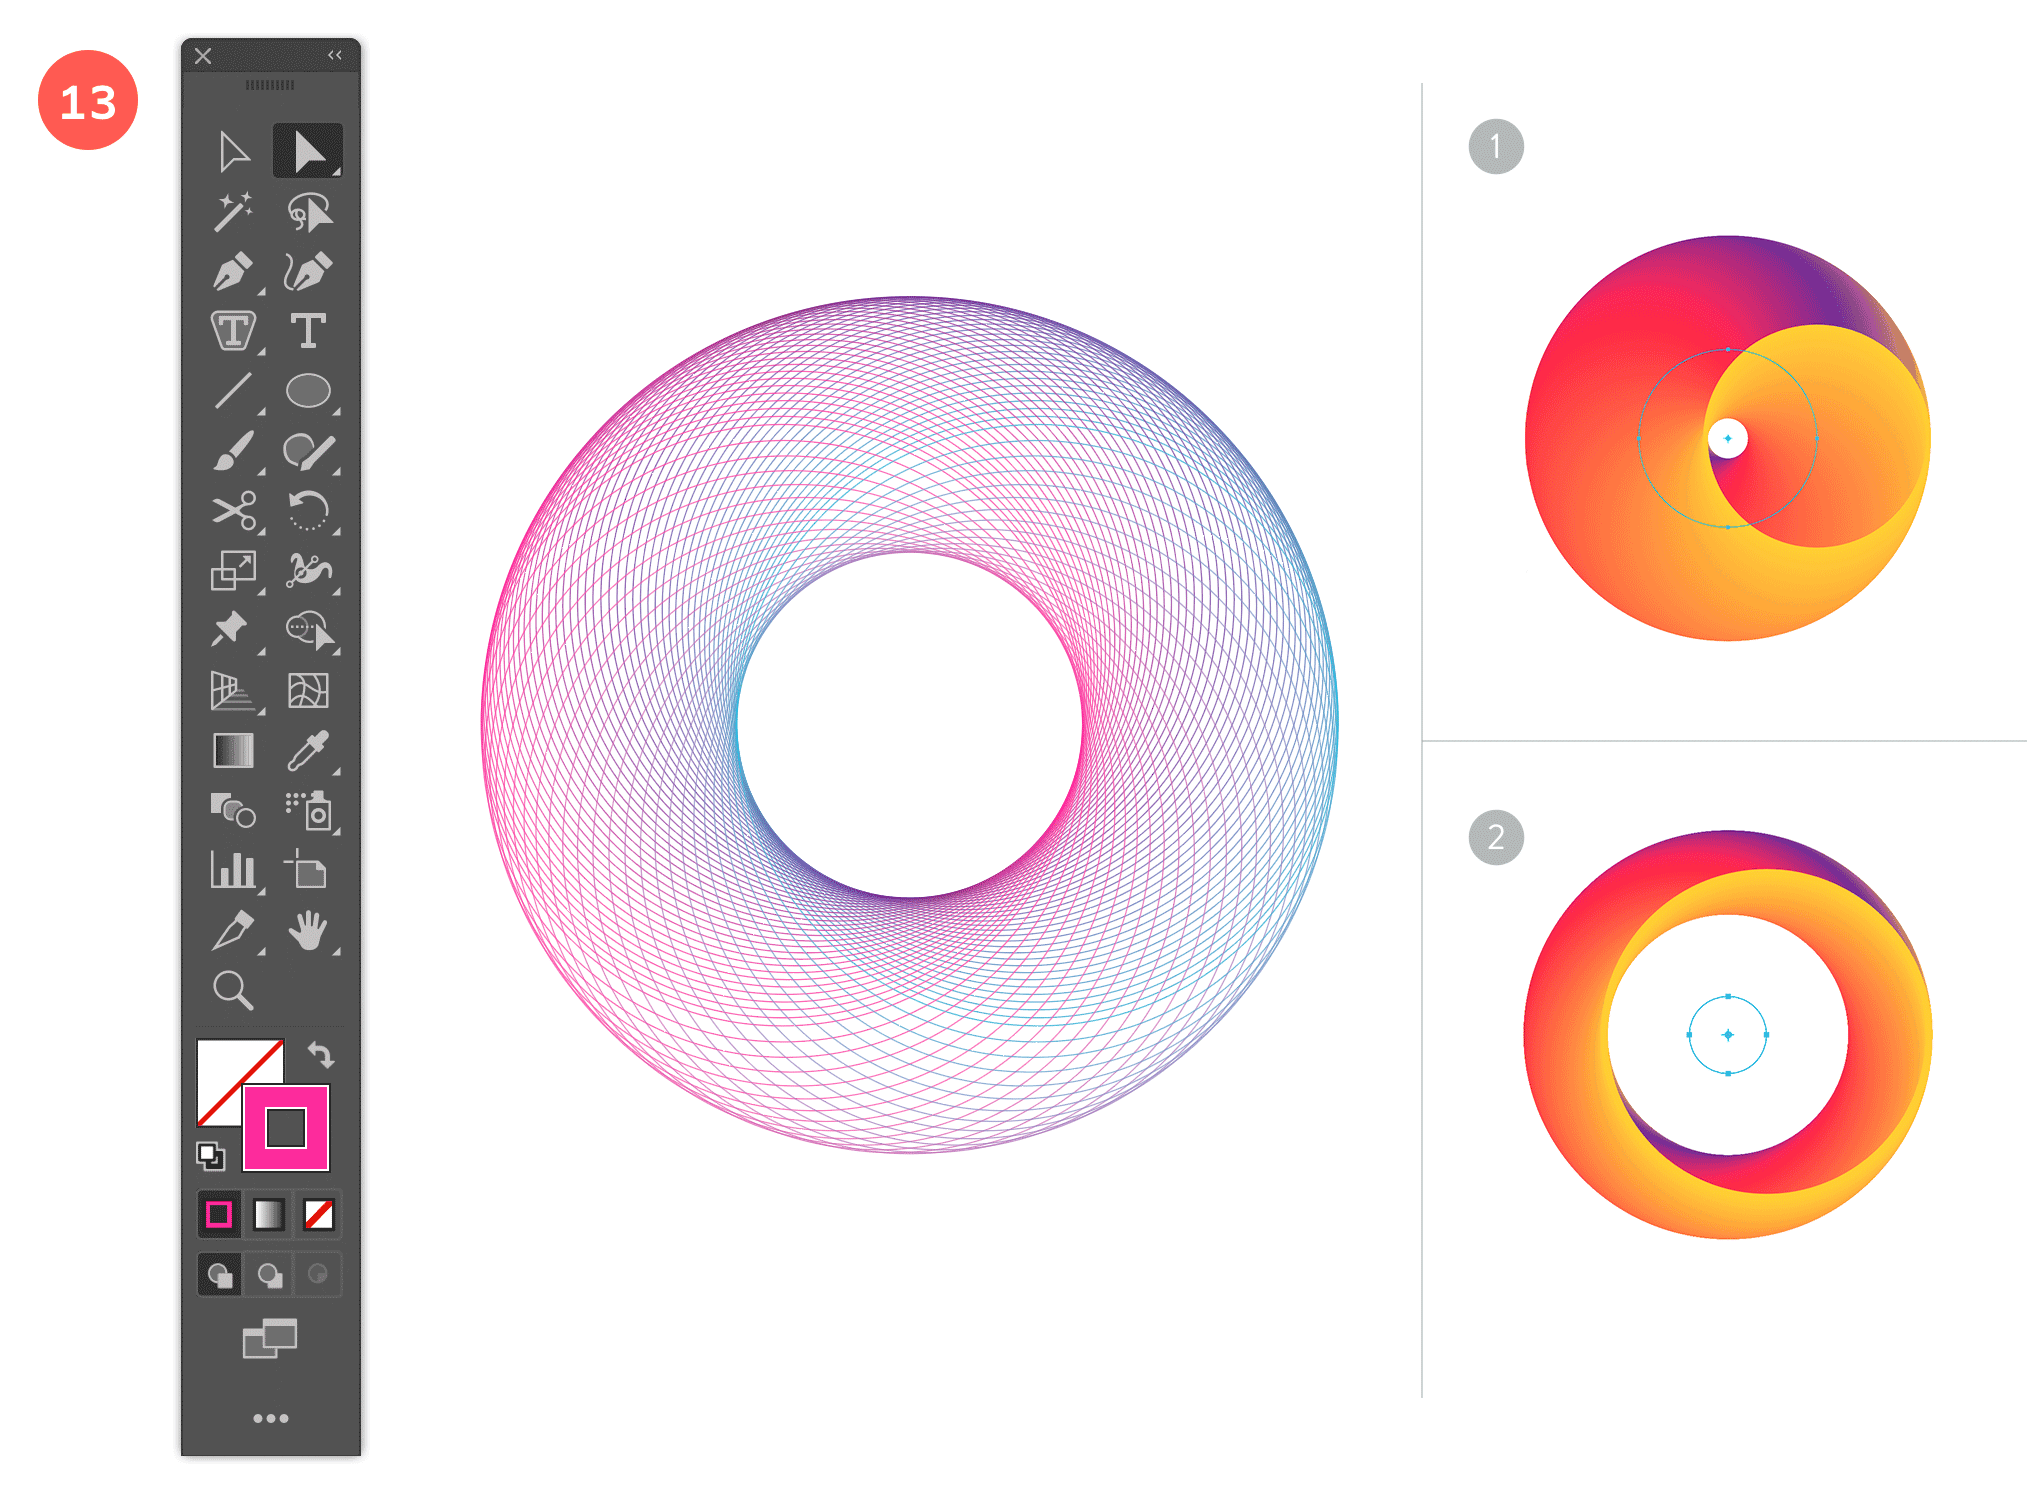
Step 13: Experiment
Another thing you can do is tweaking the size of the spine circle. Making the spine bigger will result in a smaller gap 1, making it smaller results I a bigger gap 2. If you make it the same size as the other circles, the gap will disappear.
14. Play Around
Try out some other shapes to start from, and play with the Blend tool options. Here are just a couple ideas to get you on your way:
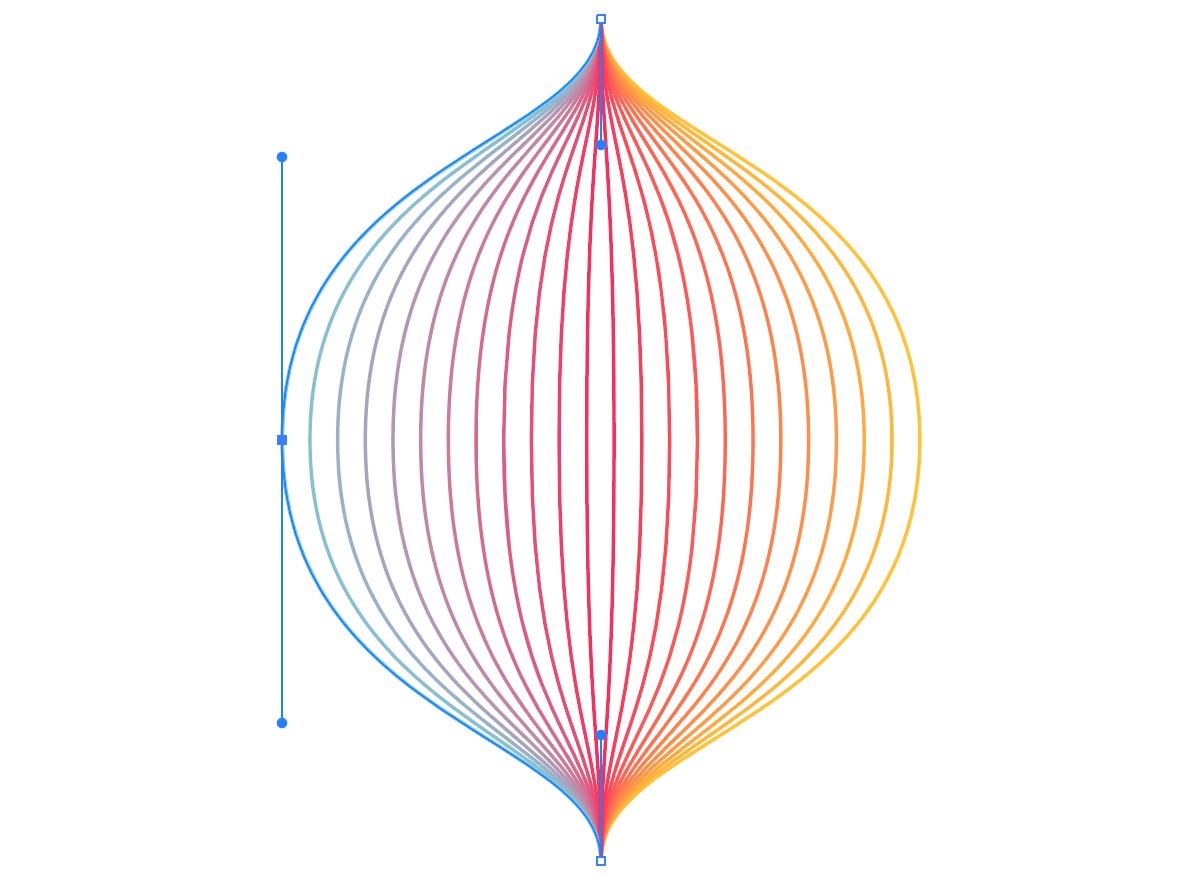
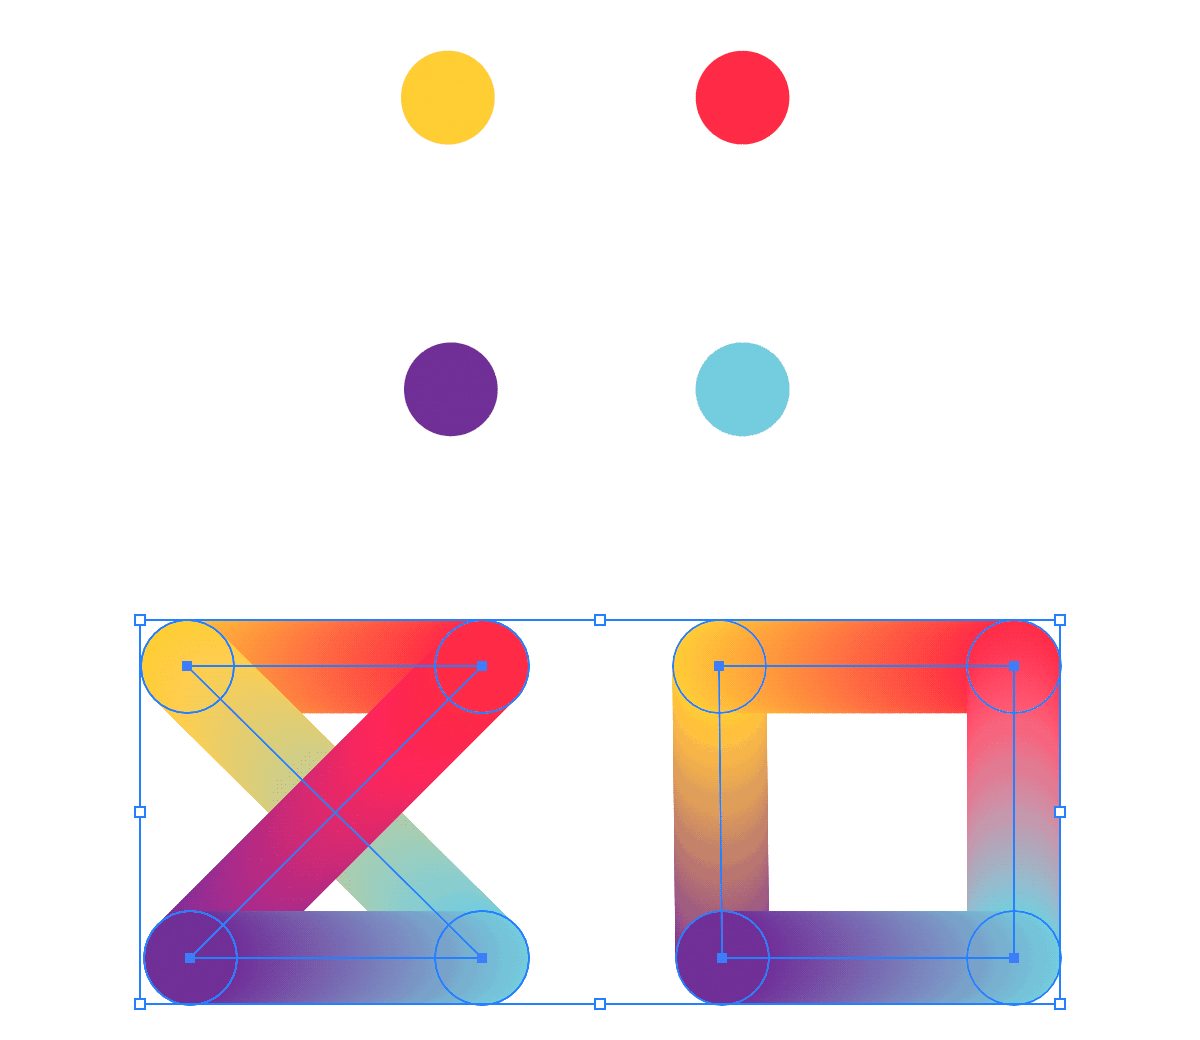
I started by drawing a curved line using the Pen Tool, holding down the shift tool while dragging the handles, to have them perfectly vertical. I drew only the top part of the most right (selected) blue line first. In other words, only the top and middle anchor point. Then I copy mirrored this segment vertically down (using the Reflect Tool). This way top and bottom part are perfectly equal. Next I joined both parts (Object > Path > Join or Cmd/Ctrl + J), and I copy pasted this line in front (Cmd/Ctrl + F). Then I resized this line by dragging the resize handles towards the center. I gave this stroke a bright red color and blended both lines in exact 10 steps. Next, I copy mirrored this blended object horizontally to the right, and made the most right line yellow.
Here I experimented with 4 different colored circles, placed in each corner of a square. By trying out a different order of bending steps between the 4 circles, I ended up with these 2 different results. For this blending I used the (default) smooth blending option. Looking at these 2 examples and the example above, plus our tutorial, it's clear that the things you can do with this tool are endless. Just give it a go. Maybe you have already something on your mind that you want to try out. Give it a go and see if it works out as expected. But also dare to try the most crazy things. It will probably result in something you totally didn't expect, and it might even look very weird, but who cares. As long as you have fun! :)
In case you've missed the previous 2 spirograph tutorials, make sure to check them both out:
