
Create a Beach Illustration in Adobe Illustrator
Another step-by-step tutorial
Article written on Friday, 26 Jul 2024
- Requirements
- Adobe Illustrator
- Level
- beginner
- Download
- Ai Template File
Did you also have fun creating the cityscape or lighthouse illustration? Well, I have good news for you. With summer in full swing, I thought, why not create a beach illustration? Here is another extended tutorial for you. This detailed, step-by-step guide will show you how to create a simple 2D composition featuring a beach ball, an umbrella, a bucket with a shovel, a blue sky with some tiny clouds, and a sandy beach.
General Setup
Below is an image displaying the final illustration along with the Layers panel. Each object is organized into a separate sublayer, arranged in the correct stacking order: the sky and sea at the bottom, followed by the umbrella, beach ball, bucket with shovel, the clouds, and the beach in front. Notice that the beach layer is positioned in front of other objects to allow the beach ball to appear partially buried in the sand.

The final illustration shown in detail with the Layers showing the stacking order of the different objects.
Preparation
Just like before, I decided to give you a little help to get started. I’ve saved a template file that includes the required color Swatches, document dimension, and a horizontal guide to help position the elements of your illustration. There is also a separate swatches ASE file included.
Choosing The Right Color Palette
People often ask how I choose the color palette for my artwork, and it's challenging to provide a straightforward answer. Generally, I select colors intuitively and somewhat randomly, based on what I feel complements the subject or brand. For this illustration, I avoided flashy colors typically associated with the sun, beach, sea, and beach balls. Instead, I opted for a limited, vintage-inspired palette: the blue isn't quite blue, the red is more orange, and the yellow and white have a muted tone.
When lacking inspiration, extracting colors from a photo can be helpful. I usually choose one or two bright colors that contrast well together, along with a light and a dark color. They can be complementary but don't necessarily have to be; they should create a harmonious effect. However, good color choices alone don't guarantee a beautiful design or artwork. The way you apply your color palette is equally important, along with many other factors. This topic could fill a book, but for now, let's not get too sidetracked and move on. 😊
Creating The Beach Ball
We'll go object by object, starting with the beach ball. There are several ways to draw a beach ball, but I chose to keep it very simple.
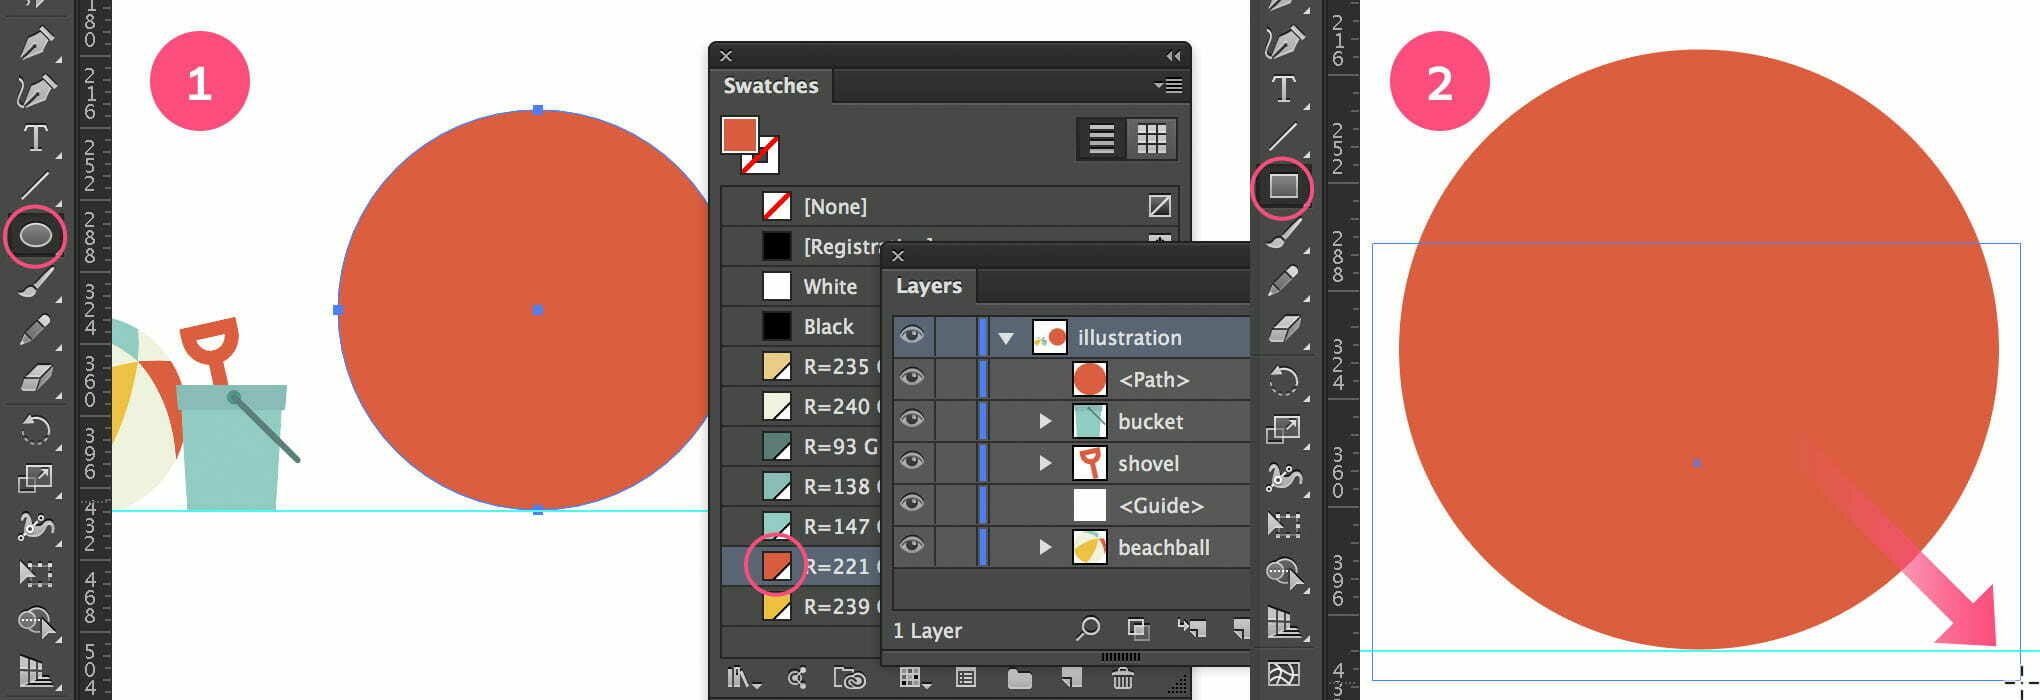
1. Draw a Circle
Start by drawing a circle of 100 x 100 px. Select the Ellipse tool, click the canvas, and enter 100 as pixel value in both fields. You can also drag a circle with Smart Guides on so you can see the width and height values, while holding down the Shift key, and stop dragging when you have reached a value of 100 pixels. Apply the off-white swatch as fill.
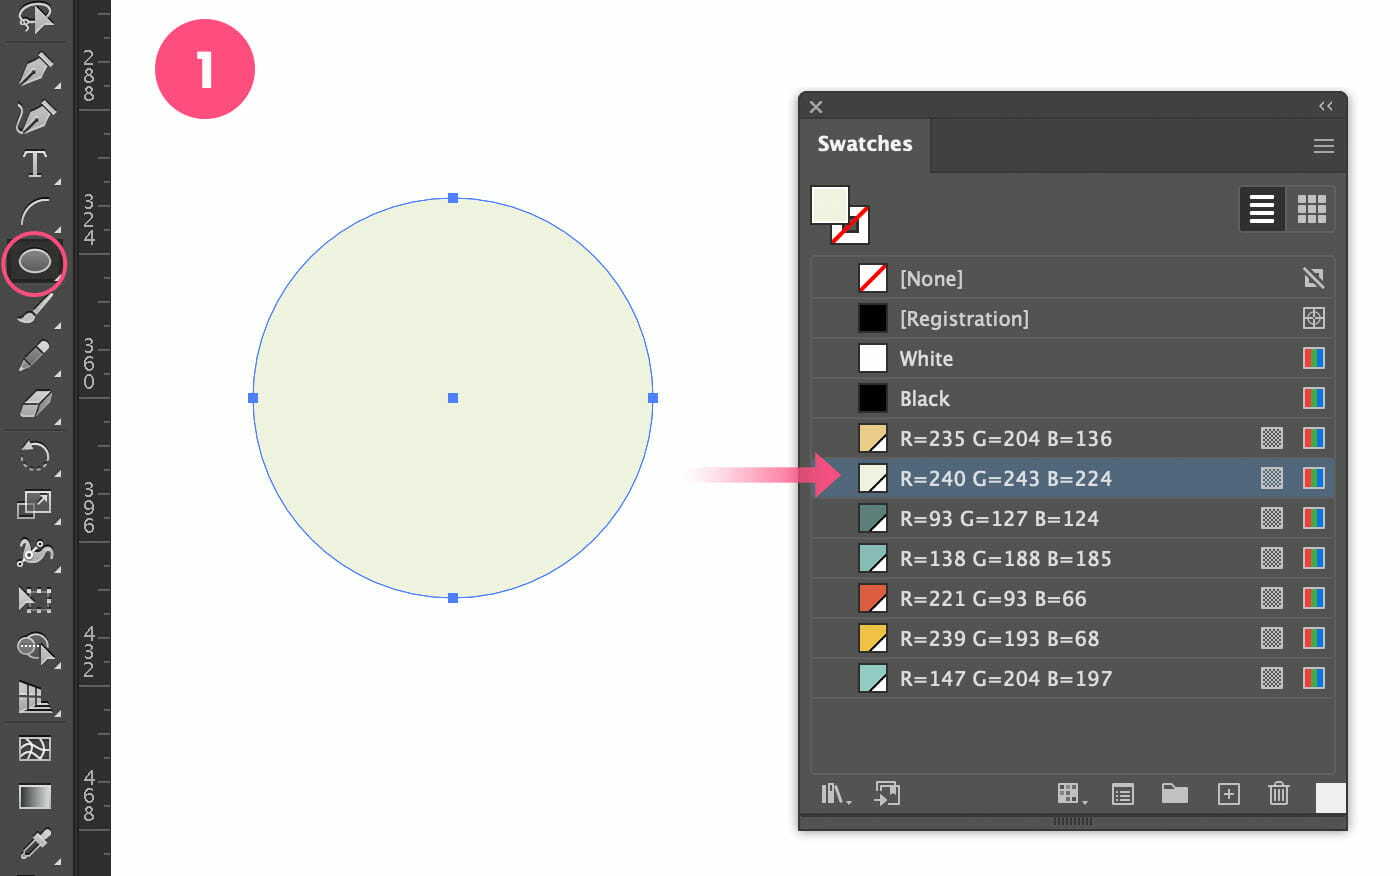
Draw a circle of 100 x 100px using the Ellipse tool.
2. Draw 2 Straight Lines
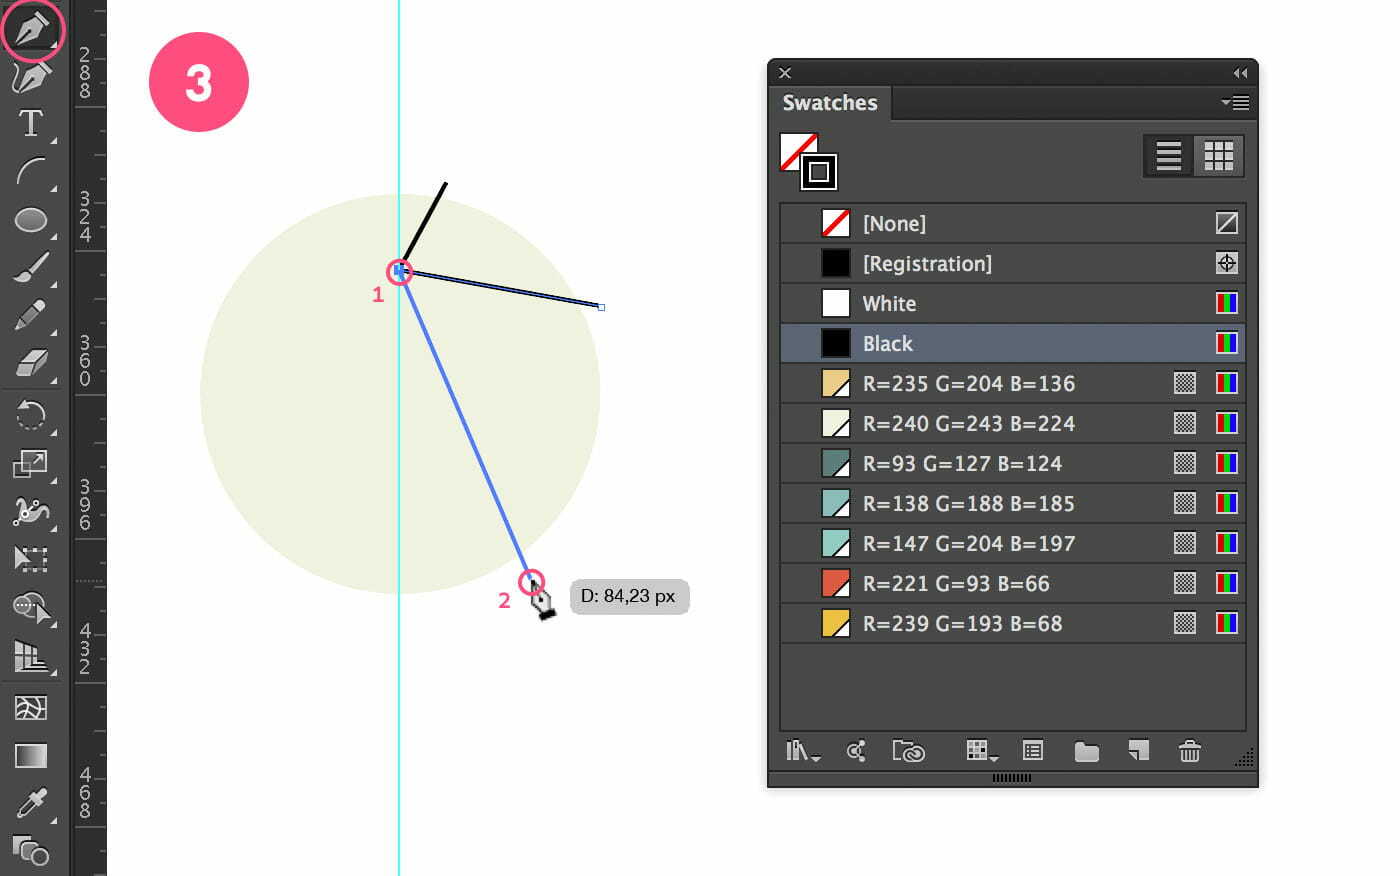
Add a vertical guide on the center of the circle: drag out from the Rulers. If the Rulers aren’t visible, go to View > Rulers > Show Rulers or hit Cmd/Ctrl + R. Before proceeding to the next step, change the Fill and Stroke swatches at the bottom of the Toolbar. Click the Fill swatch in the Toolbar, and select the No Fill swatch (the one with diagonal red line). Then click the Stroke swatch and choose black.
Now select the Pen tool and draw 3 straight thin black lines as followed: Make sure to start outside the circle, and make 3 clicks in the order and approximate place as shown in the illustration below, with the 2nd click exactly on the vertical guide. After the 3rd click, when you have drawn the first 2 lines (which are connected to each other), hold down the Cmd/Ctrl key and click once on your canvas. This will break the connection for the next click, allowing you to create the last line as a separate object, rather than connecting it to the two lines you've already drawn.

Draw 2 straight black lines onto the circle using the Pen tool.
3. Draw a 3rd Straight Line
Now draw the 3rd line by clicking at the corner point of line 1 and 2 first, and the 2nd click somewhere bottom right outside the circle as shown in the image below.
Draw the 3rd black line onto the circle.
4. Copy Reflect
Select the 3 lines using the Selection tool (black arrow), use the Shift key to select the 3rd line. Go to the Toolbar and choose the Reflect tool (located under the Rotate tool). Click in the intersection point on the vertical guide as shown in the image below, choose Vertical Axis, and hit the Copy button.
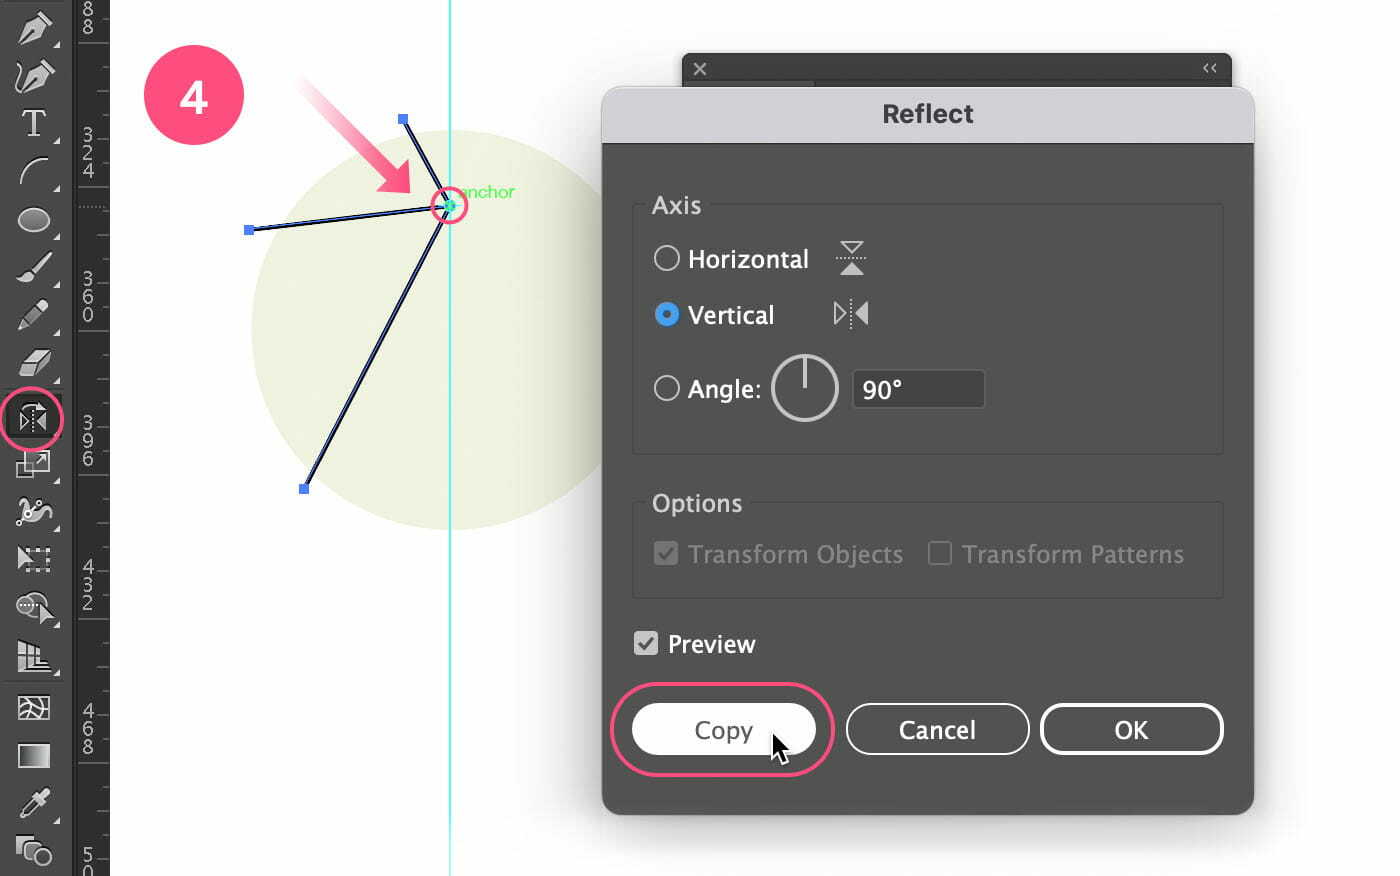
Copy and reflect the 3 black lines to the other side of the circle.
5. Make With Warp
Select all the black lines, and go to Object > Envelope Distort > Make with Warp…. In the Warp Options window that appears, choose Arch from the dropdown menu, choose Horizontal, and put the Blend slider to 50%. Check Preview to check out the result. If things look more or less similar as shown in the image below, click OK.
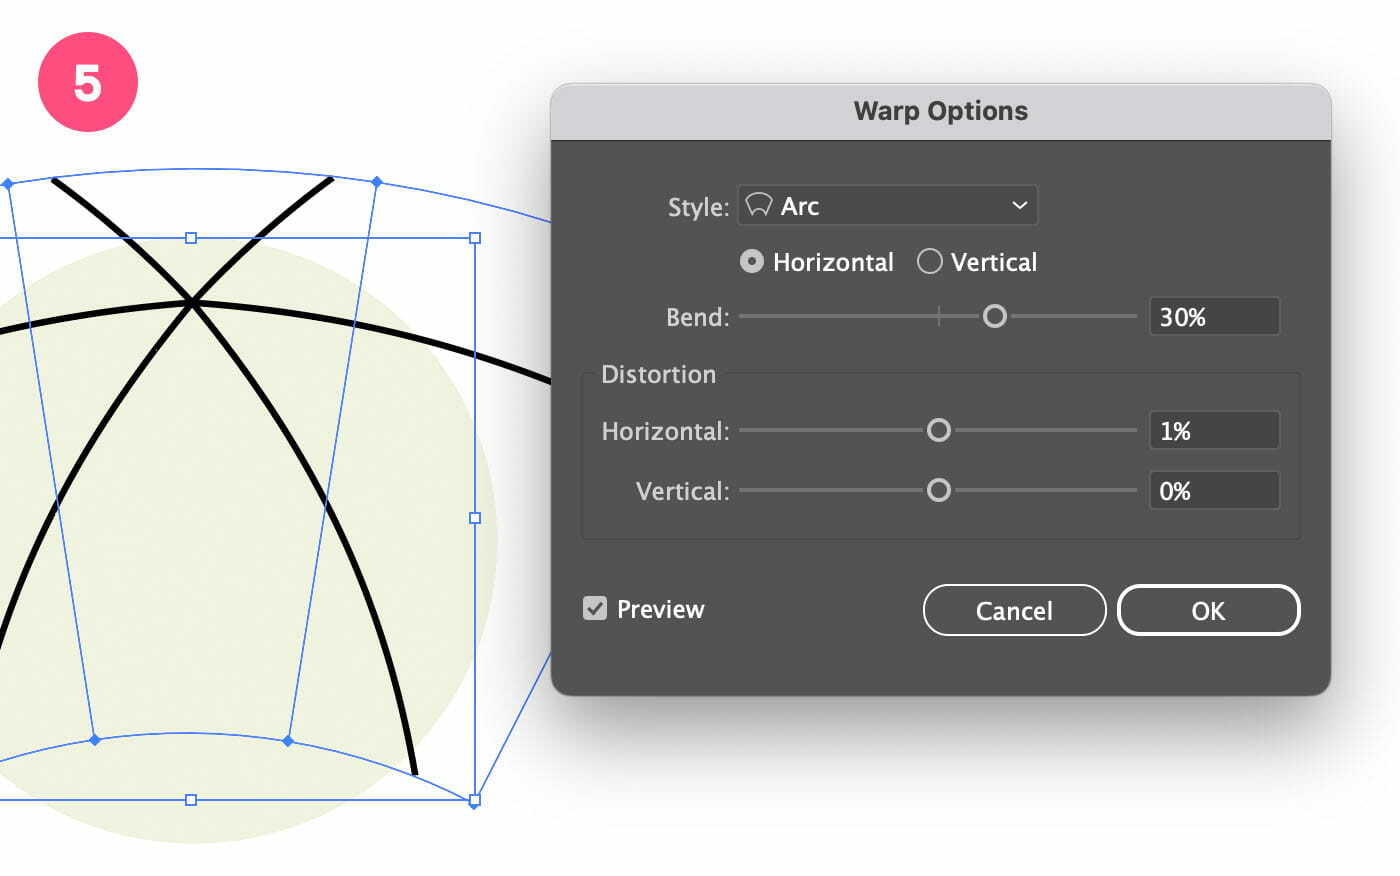
Apply an arch effect to the black lines using Make with Warp
6. Align Lines and Circle
Select the warp object and make it a bit less wide. Move the object down if needed.Ensure that all black lines extend outside the circle and that the object and the circle are horizontally center aligned with each other. If Smart Guides are on you should get visual clues on when the object is perfectly centered, but if in doubt, you can select both objects and choose the Horizontal Align Center option from the Control bar at the top (Window > Control) or via the Properties panel.
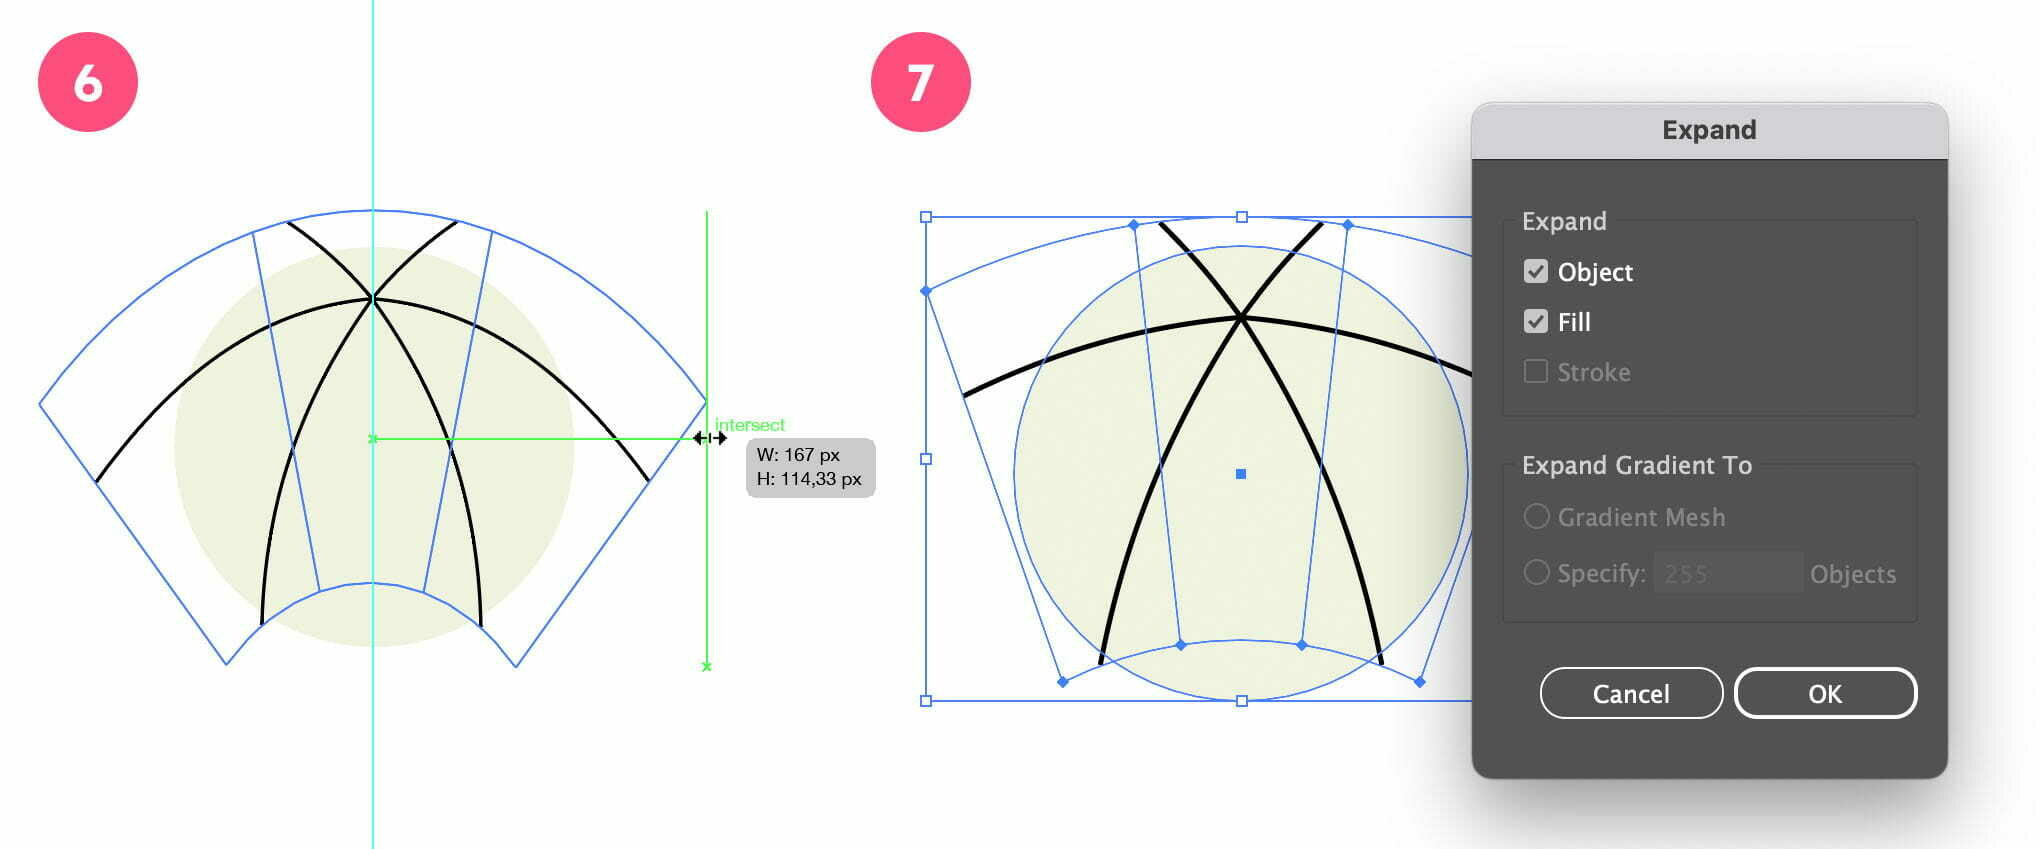
Align the lines on the circle and expand the arch effect.
7. Expand
Select the warp object and go to Object > Expand… In the Expand window leave the settings as is (Object and Fill are selected) and click OK.
8. Divide
Select both the circle and the lines, go to the Pathfinder panel and select the Divide option. This will divide the circle into sections, allowing each part to be colored appropriately.
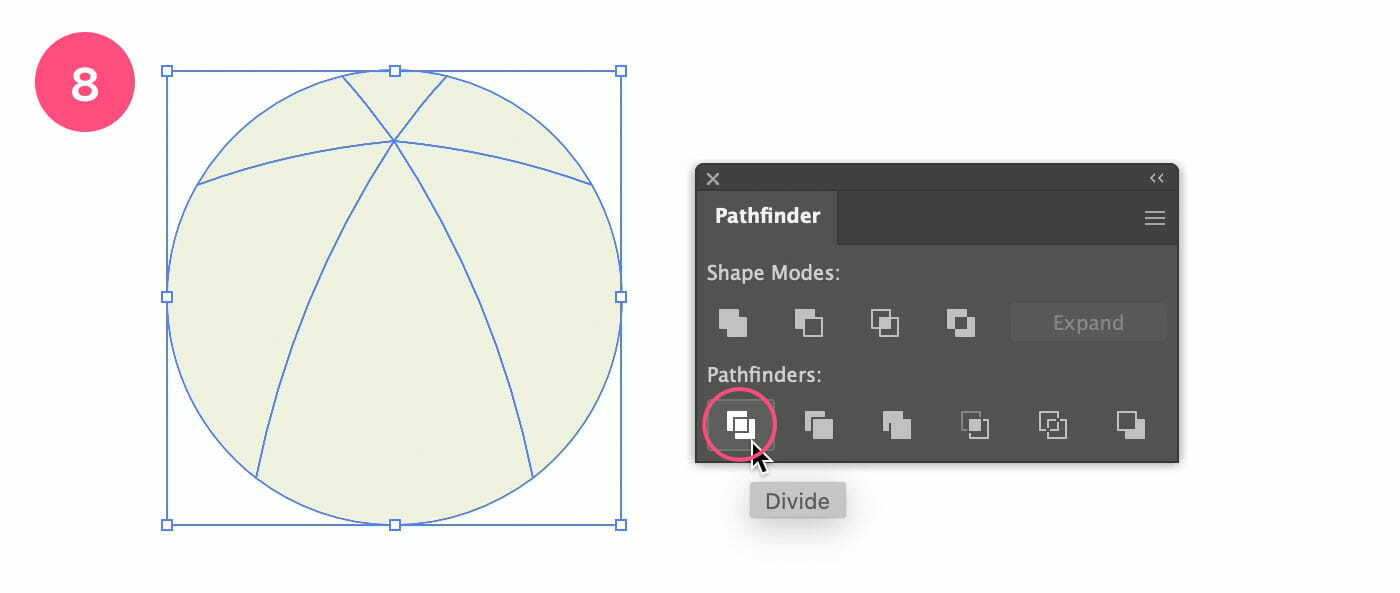
Divide the circle into separate path segments
9. Apply Colors
The object is now grouped. To select part by part to apply a color, we need to double click the object first. This takes us into Isolation mode. Notice the grey bar at the top of your document. Normally, all other objects would be faded out, but since we only created this one, you won't see this effect. Now you can select each section individually and apply the appropriate color fill. See the image below for guidance.
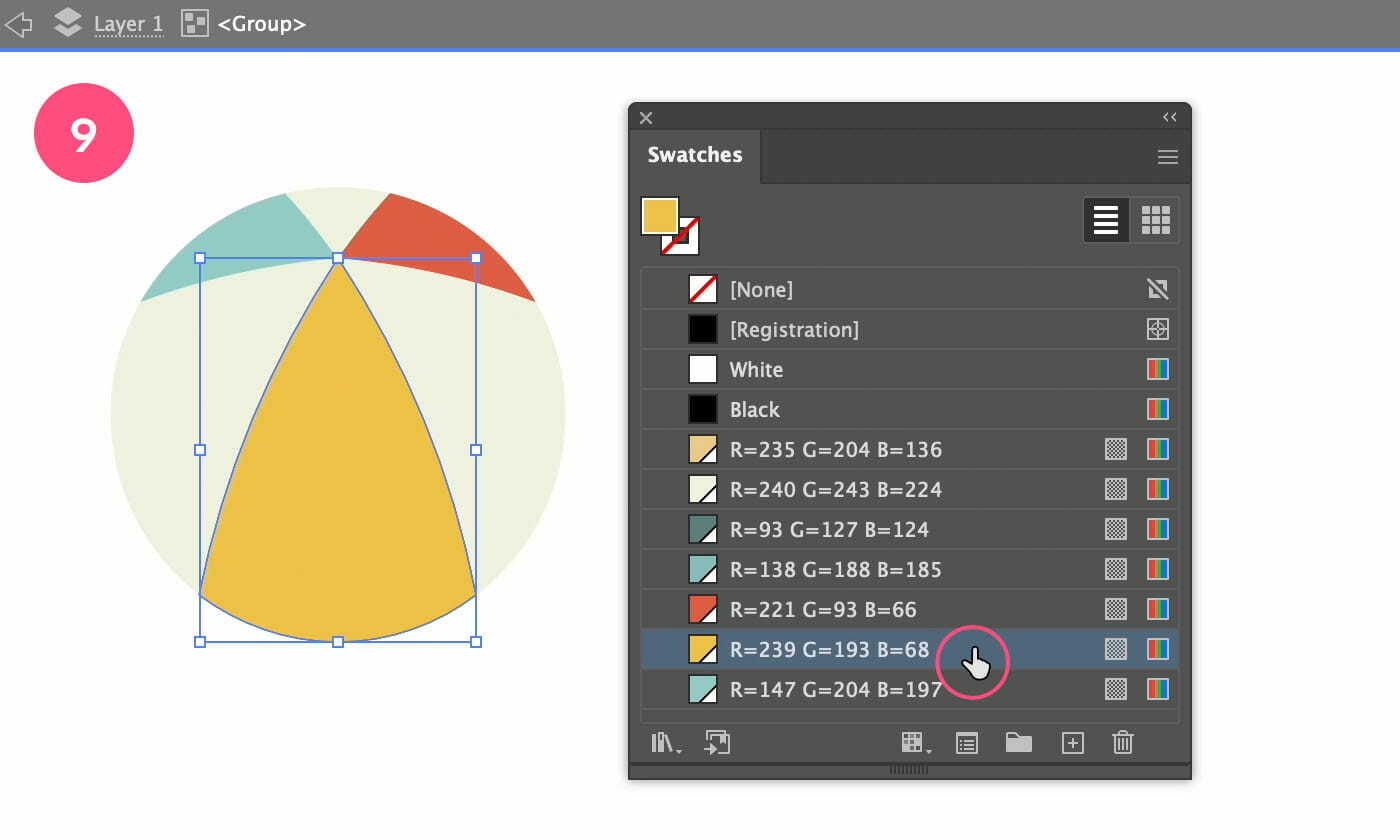
Add the colors to the beach ball.
10. Rotate The Beach Ball 45º
The only thing left to do is to rotate the beach ball 45°. To do this, go out of Isolation mode first. You can do this by clicking the arrow button at the top, or by simply hitting the Escape key. Select the beach ball using the Selection tool (black arrow). Hover your cursor over one of the object's corners until it changes into rotation arrows. Then, start dragging to the right to rotate the object, and hold down the Shift key to snap the rotation to exactly 45° (see image below). Release the mouse. Lastly move the beach ball into position, so the bottom anchor touches the horizontal guide, then use the down arrow key on your keyboard twice to move the ball a little bit more down.
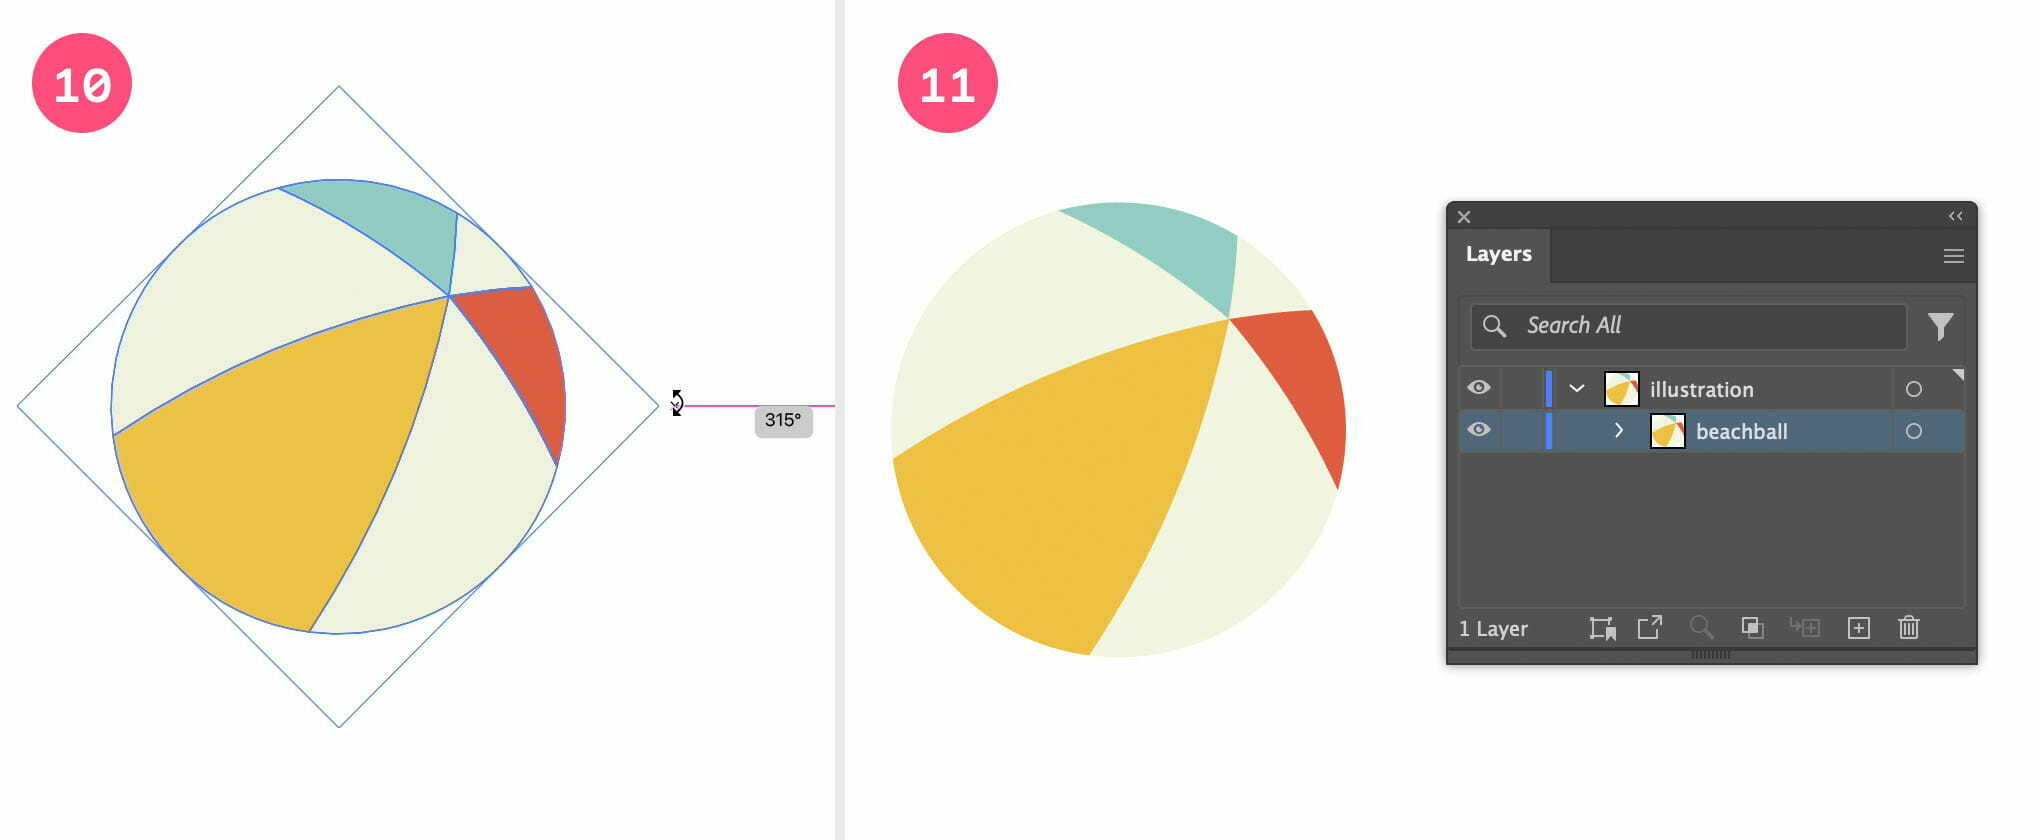
Rotate the beach ball into position, and name and organise the layers.
11. Organize
Next step: name & organize your layers. It’s important to keep your file clean so you can save time in a later stage in case your illustration becomes complex. It might feel ridiculous to do this at this stage and for such a simple illustration as this. It's of course up to you to decide if this is valuable. Click the triangle next to the layer name in the Layers panel, double click in the text field of the object, and rename it to beach ball.
The Bucket & Shovel
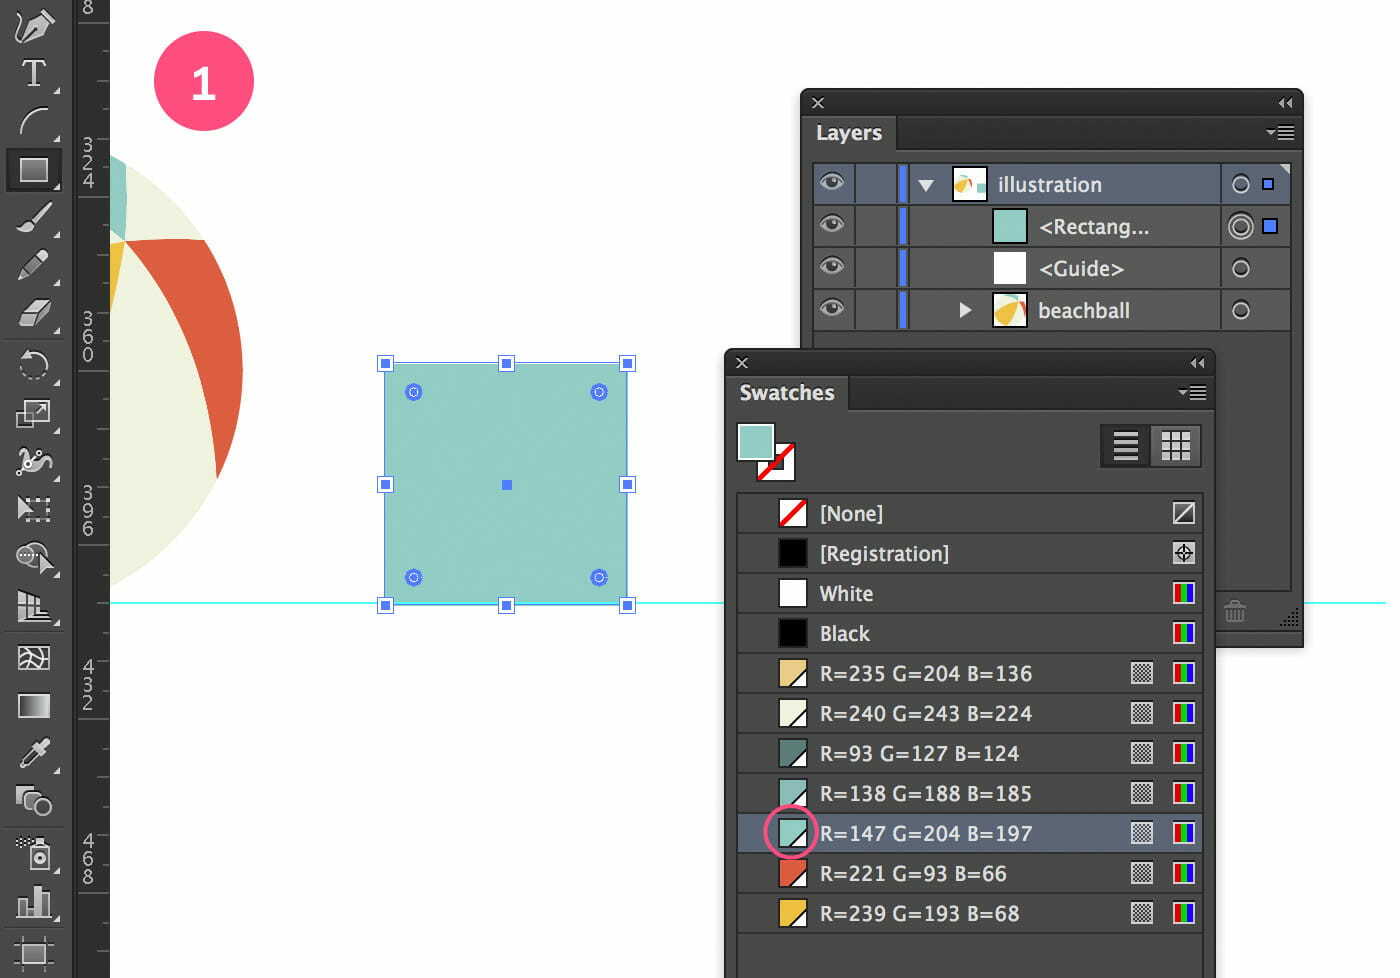
1. Draw a Square
Select the Rectangle tool and draw a square of 50 x 50 px. Apply the lightest teal fill. Move the square to the left of the beach ball, and into position so the bottom anchor points touch the horizontal guide.
Draw the body part of the bucket.
2. Draw a Rectangle
Draw a slightly wider rectangle above the square, ensuring that its bottom edge aligns with the top edge of the square. You'll notice a visual cue—a green line will appear, indicating the alignment. Once aligned, apply the slightly darker teal fill to the rectangle. Select both the square and the rectangle, and choose the Vertical Align Center option from the Options bar.
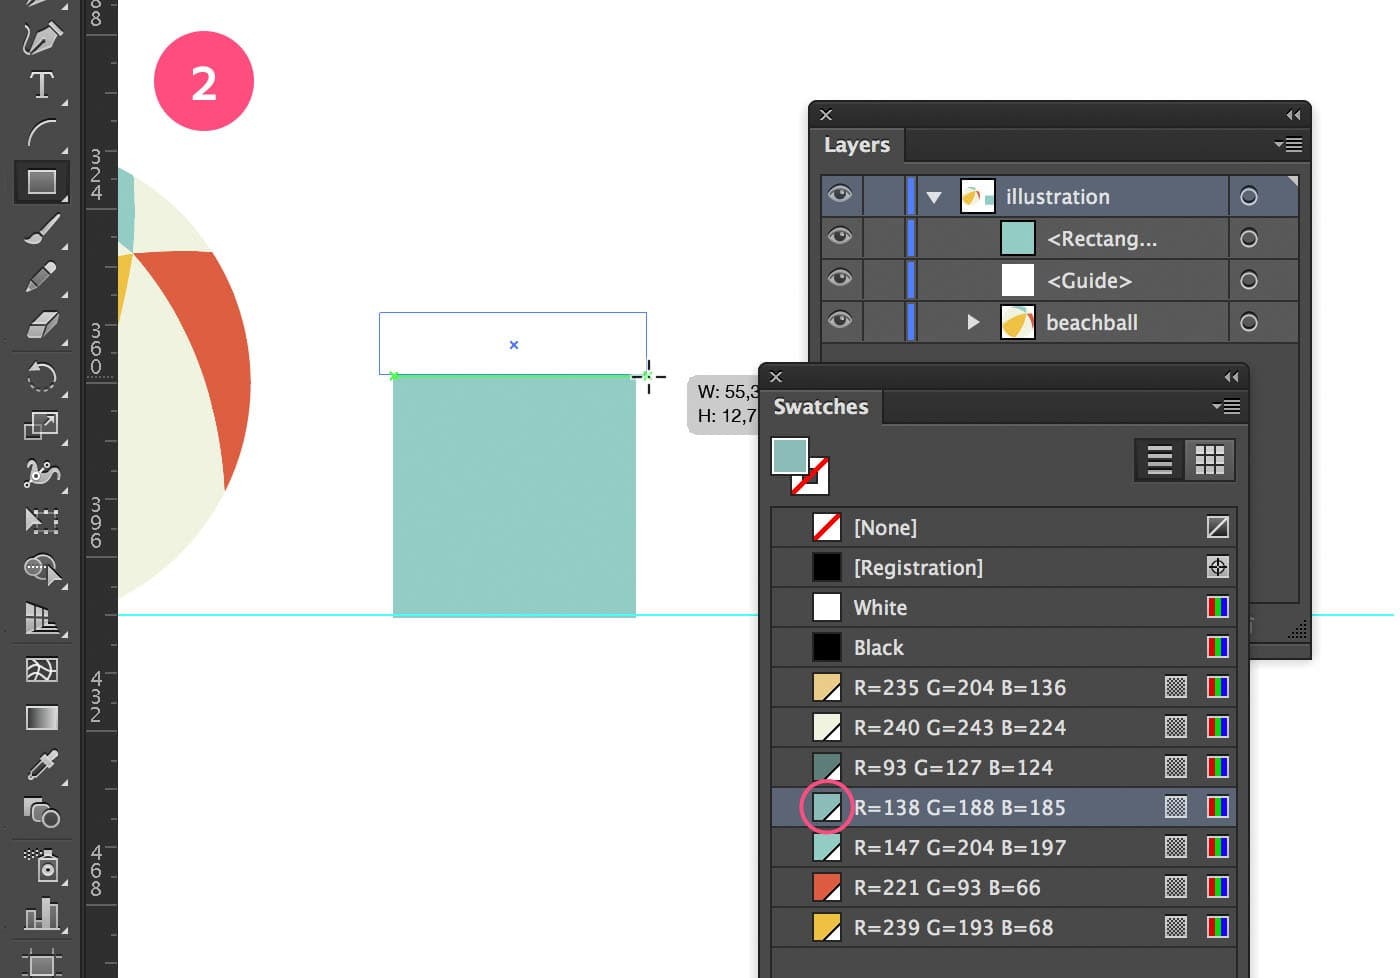
Draw the top part of the bucket.
3. Move Bottom Anchor Points Inwards
Select the Direct Selection tool (white arrow), and select the left bottom anchor point of the square and the rectangle. Hit the right arrow key twice. Now select the right bottom anchor point of the square and the rectangle, and hit the left arrow key twice.
Finalise the body of the bucket.
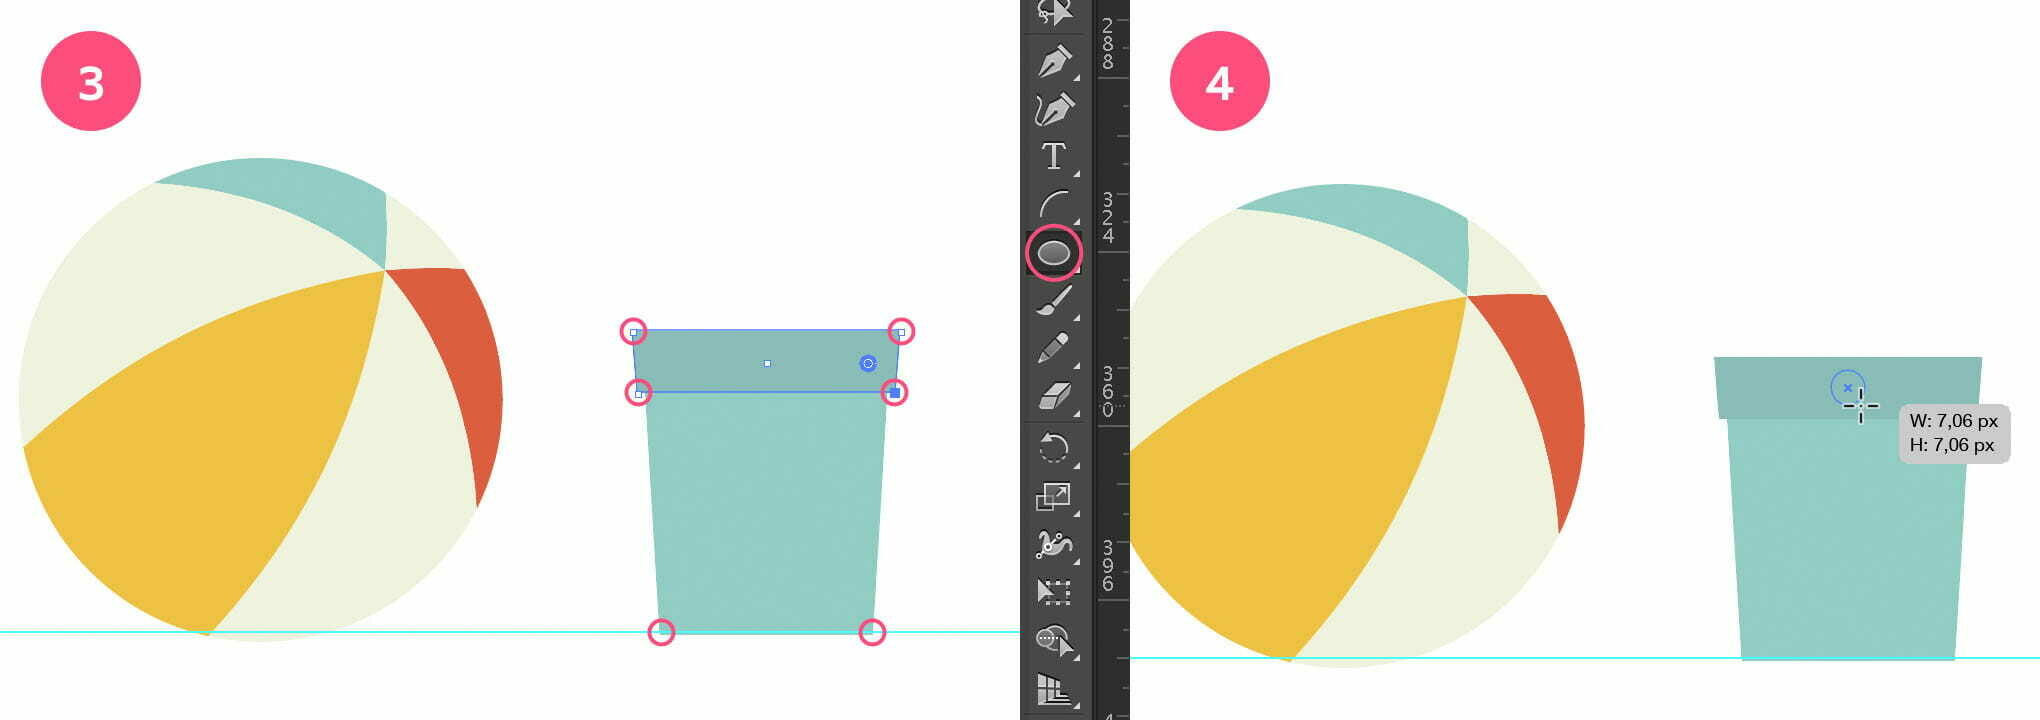
4. Draw a Tiny Circle
Select the Ellipse tool, and draw a small circle (7 x 7 px) in the center of the rectangle. Since this is a small circle make sure to zoom in a little bit first. Draw this circle from the center out. To do this, first hover with your cursor over the center point to find it. You should see the word ‘center’ in small (magenta) colored type. Hold down the Option/Alt key first, click and start to drag, then hold down the Shift key as well. When you’ve reached the size, release the keys first, then the mouse. If this seems hard to do you can select both the rectangle and the circle, and use the align tools to center align them both vertically and horizontally. Then select the circle, rectangle and square, and align all 3 objects vertically.
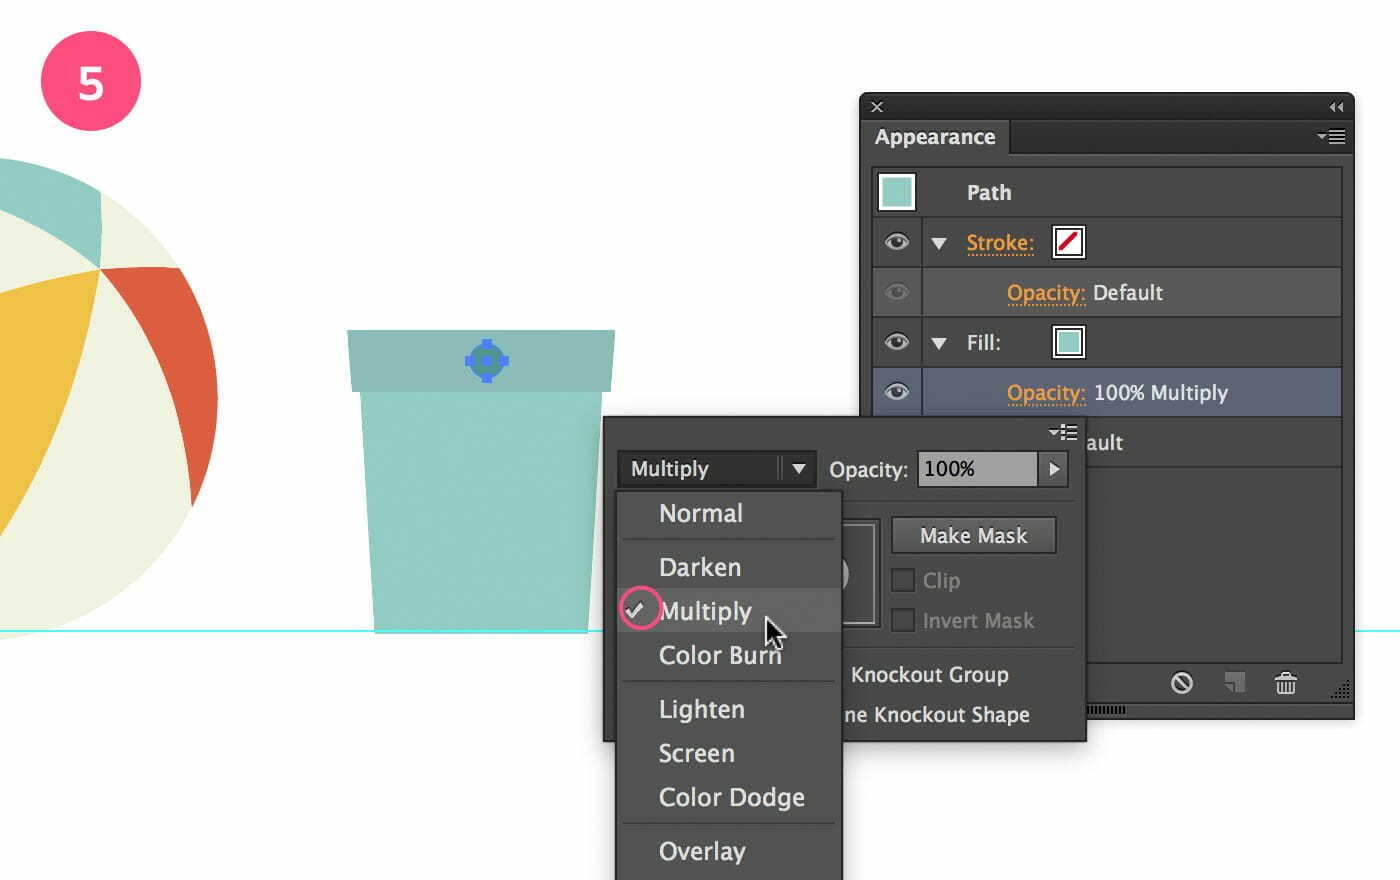
5. Apply Fill
Apply the light teal fill to the small circle, and change the fill opacity blending mode to Multiply, to darken it al little bit.
Apply the proper fill to the start of the bucket handle.
6. Draw The Bucket Handle
Select the Line tool and draw a diagonal line starting from the center point of the small circle. While drawing (by click dragging) the line, hold down the Shift key to draw a perfect diagonal line.
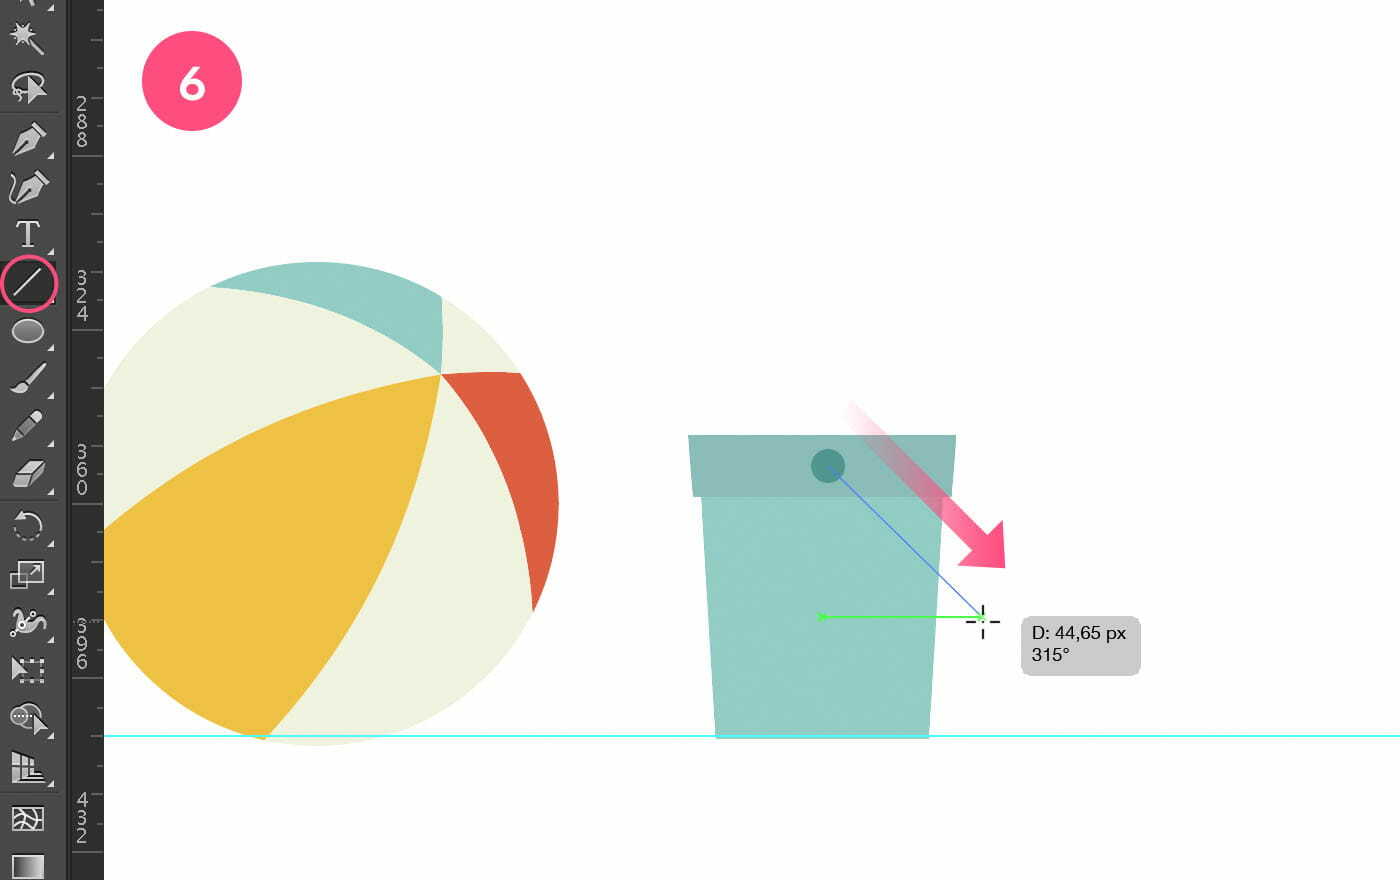
Draw the bucket handle using the Line tool.
7. Apply Stroke Color, Weight and Style
Apply the darkest teal as stroke color, and select the value of 3 pt from the Weight dropdown. Then also choose the Round Cap option. Select all bucket shapes and hit Cmd/Ctrl + g to group the object.
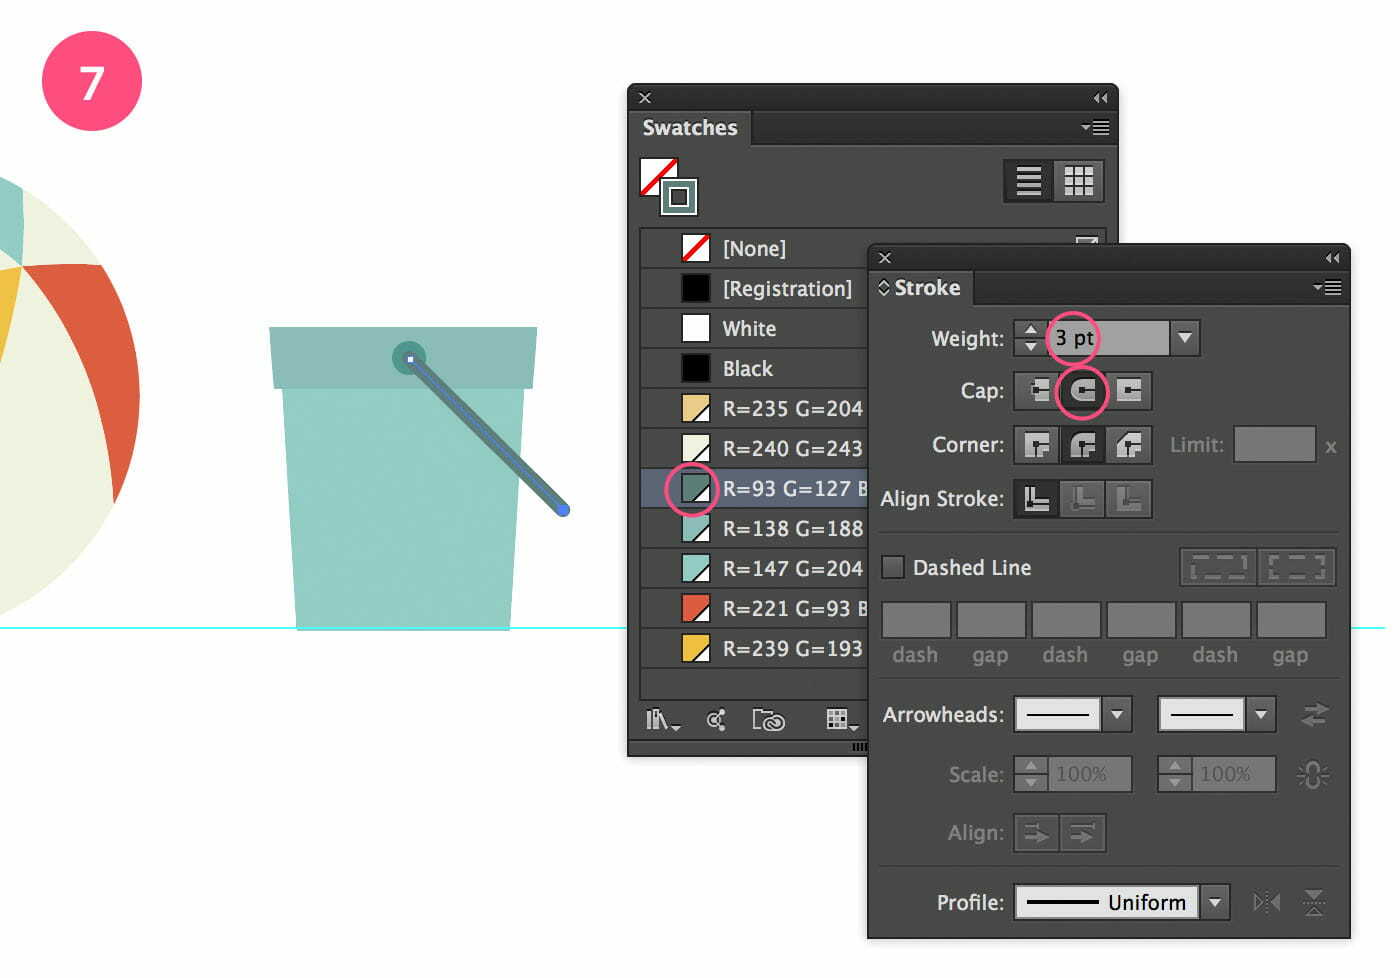
Finalise the bucket handle.
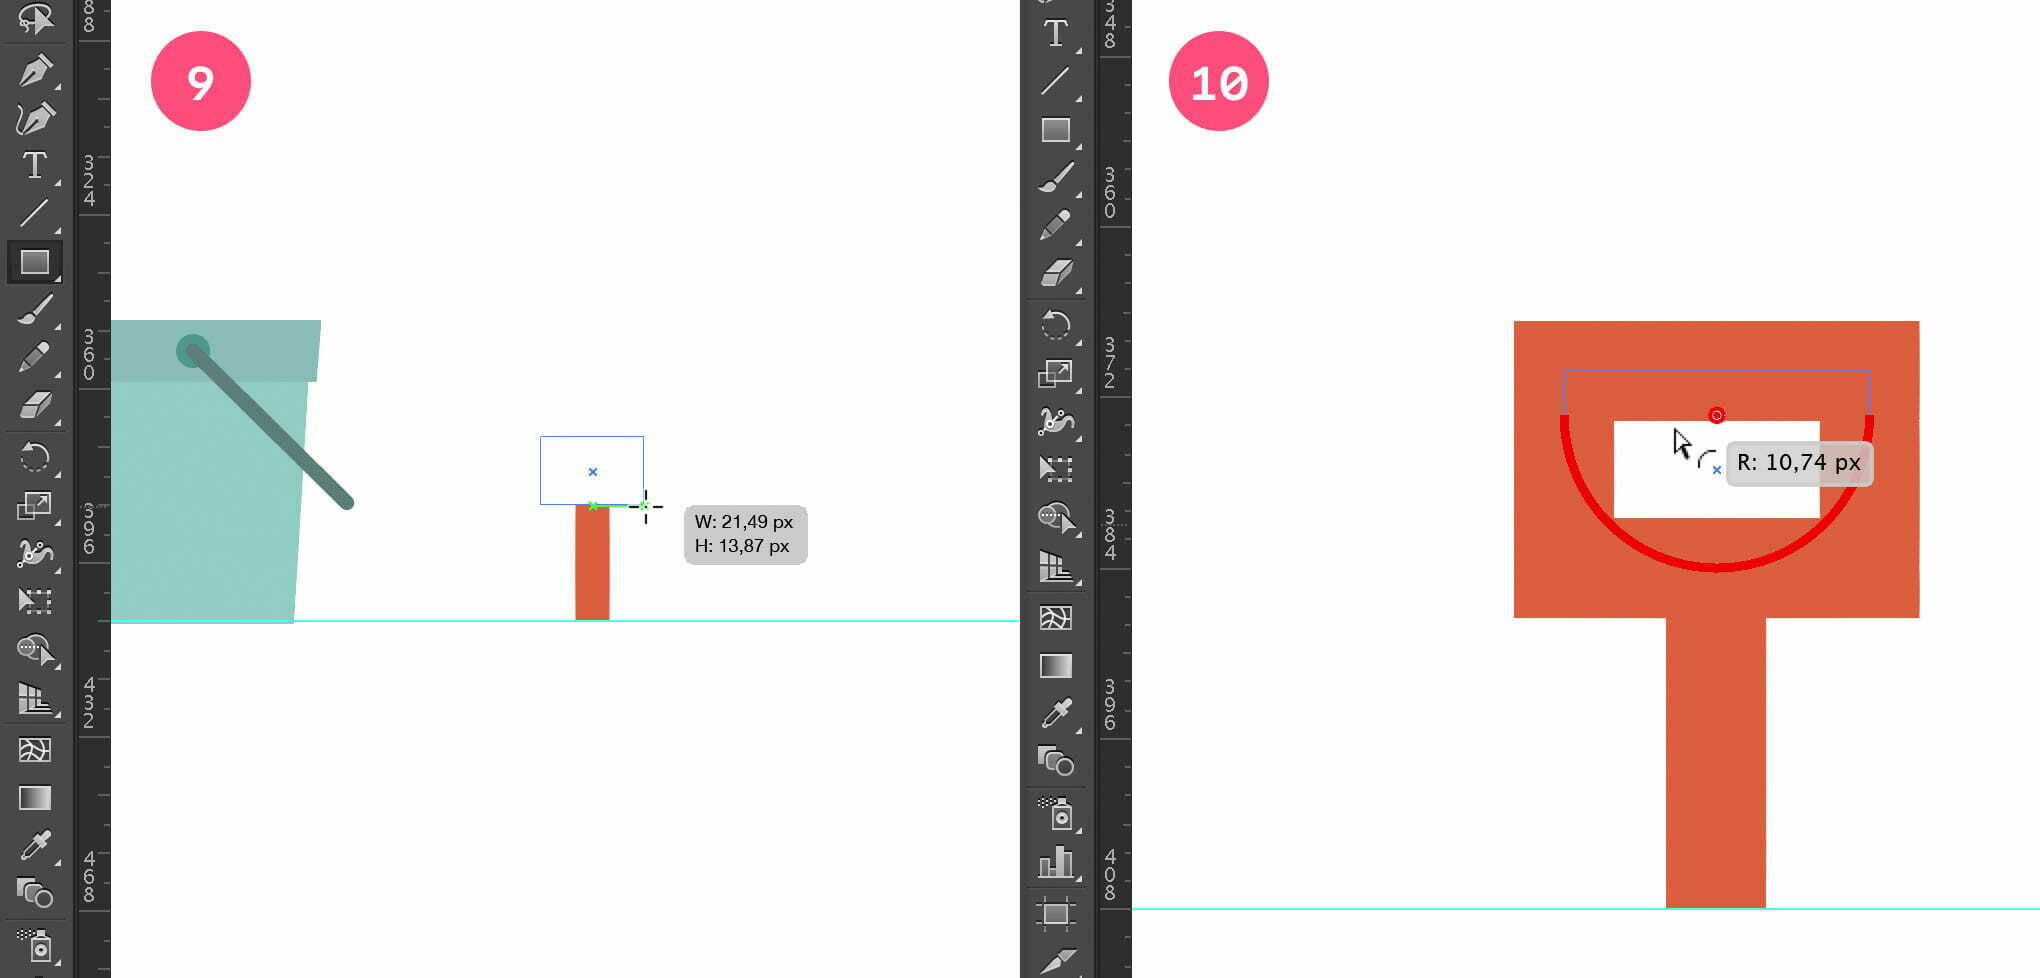
8. Draw The Stem of The Shovel
Draw a short vertical line (see image below), and apply a Weight of 7 pt tick. Give it the orange color, and make sure the line has a Straight cap.

Draw the stem of the shovel.
9. Draw The Shovel Handle
Select the Rectangle tool and draw a small horizontal rectangle right above the vertical line (see image below) for the handle of the shovel, using the same stroke width and color as the stroke. Select both objects and choose Vertically Center Align from the Options bar at the top or from the Properties panel.
Draw the shovel handle using the Rectangle tool and rounded corner feature.
10. Apply Rounded Corners
Select the Direct Selection tool (white arrow), and select the 2 bottom anchor points of the rectangle. 2 small circles should appear. Click into one of them and start dragging inwards to the end so the bottom part becomes fully rounded.
11. Organize Layers
Select both objects and group them together (Cmd/Ctrl + g). Go to the Layers panel and name your sublayers (see image below): drag the ’shovel’ layer into position. Move it under the ’bucket’ layer.
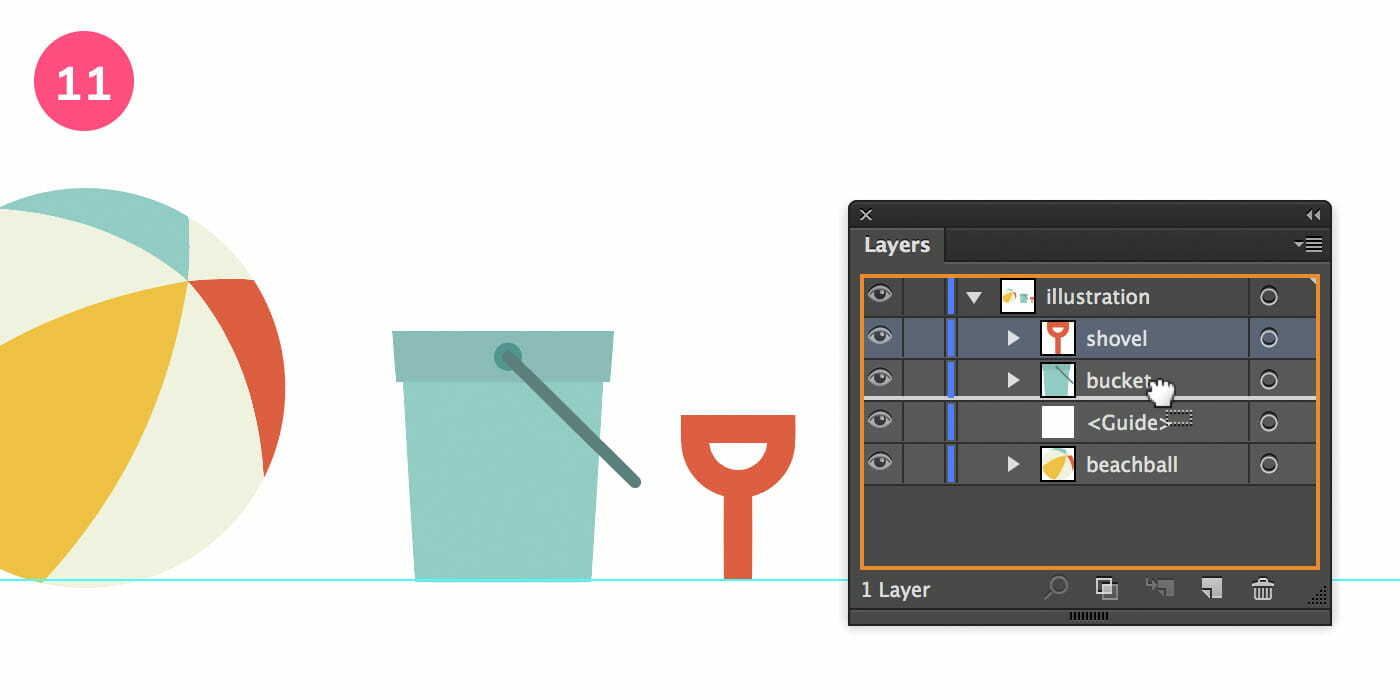
Move the shovel layer below the bucket
12. Rotate The Shovel
Select the shovel and move it into place as shown in the image below. Rotate it a little to the left, just as you learned before using the Selection tool, but this time you don’t need to hold down the Shift key since you only need to rotate a few degrees to the left.
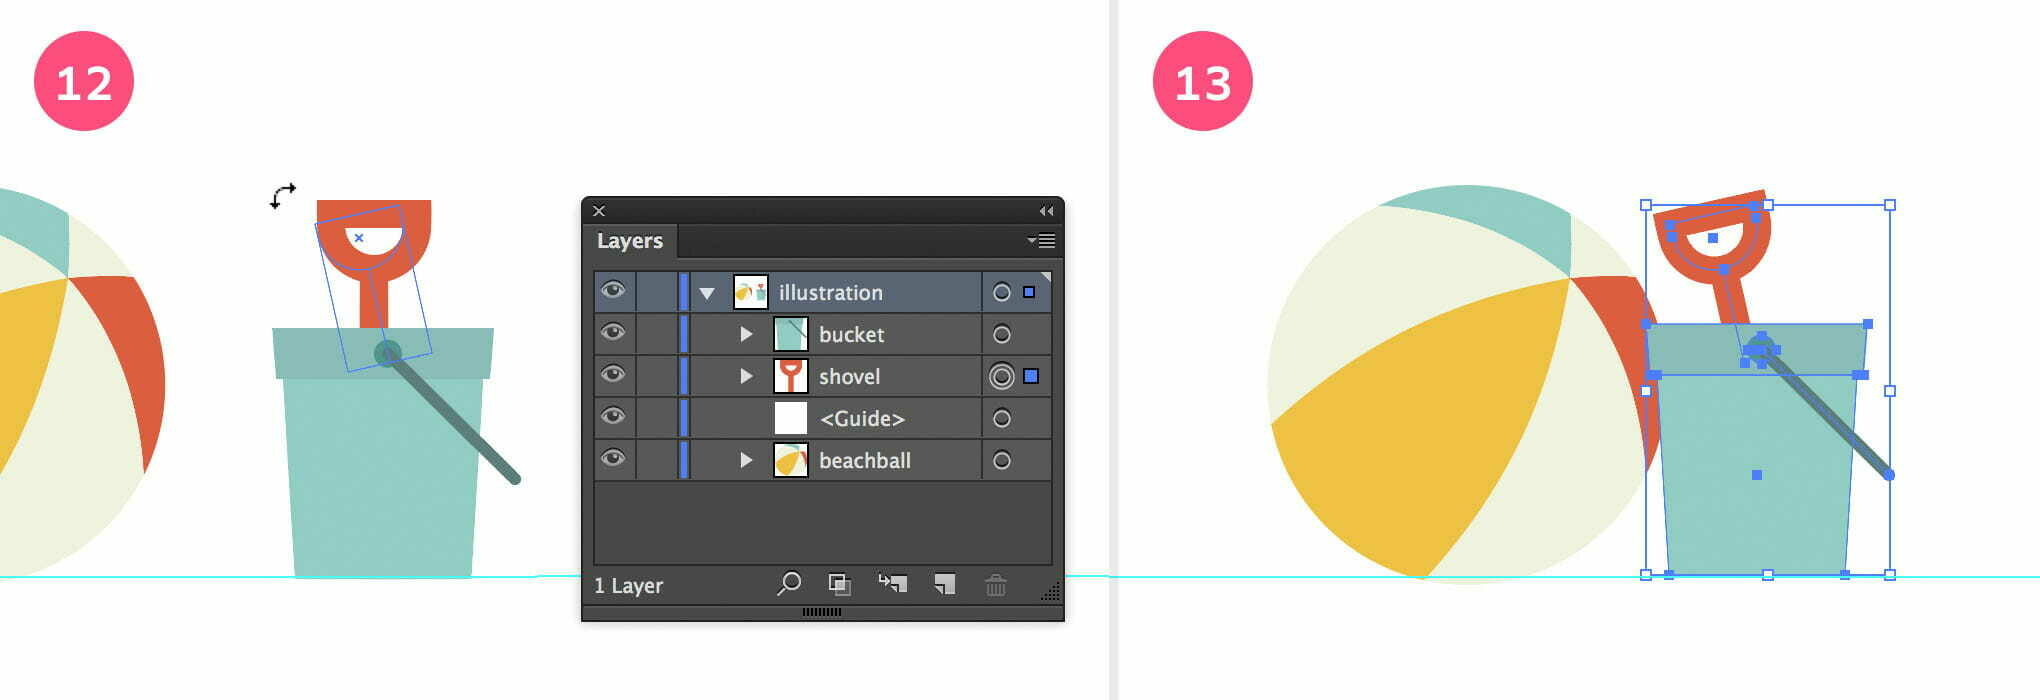
Finalise the shovel & bucket.
13. Move Shovel & Bucket Into Place
Select both the bucket and the shovel and move them into position as shown in the image above.
The Umbrella
1. Draw a Red Circle
Select the Ellipse tool and draw a circle of about 200 x 200 px size. Give the circle the orange fill.
Create the base shape of the rain cover of the umbrella.
2. Draw a Rectangle
Select the Rectangle tool and draw a rectangle on top covering about 2/3 of the circle, as shown in the image below. Make sure the rectangle is also wider than the circle.
3. Minus Front
Select both objects, go to the Pathfinder or Properties panel and choose Minus Front from the Shape Modes.
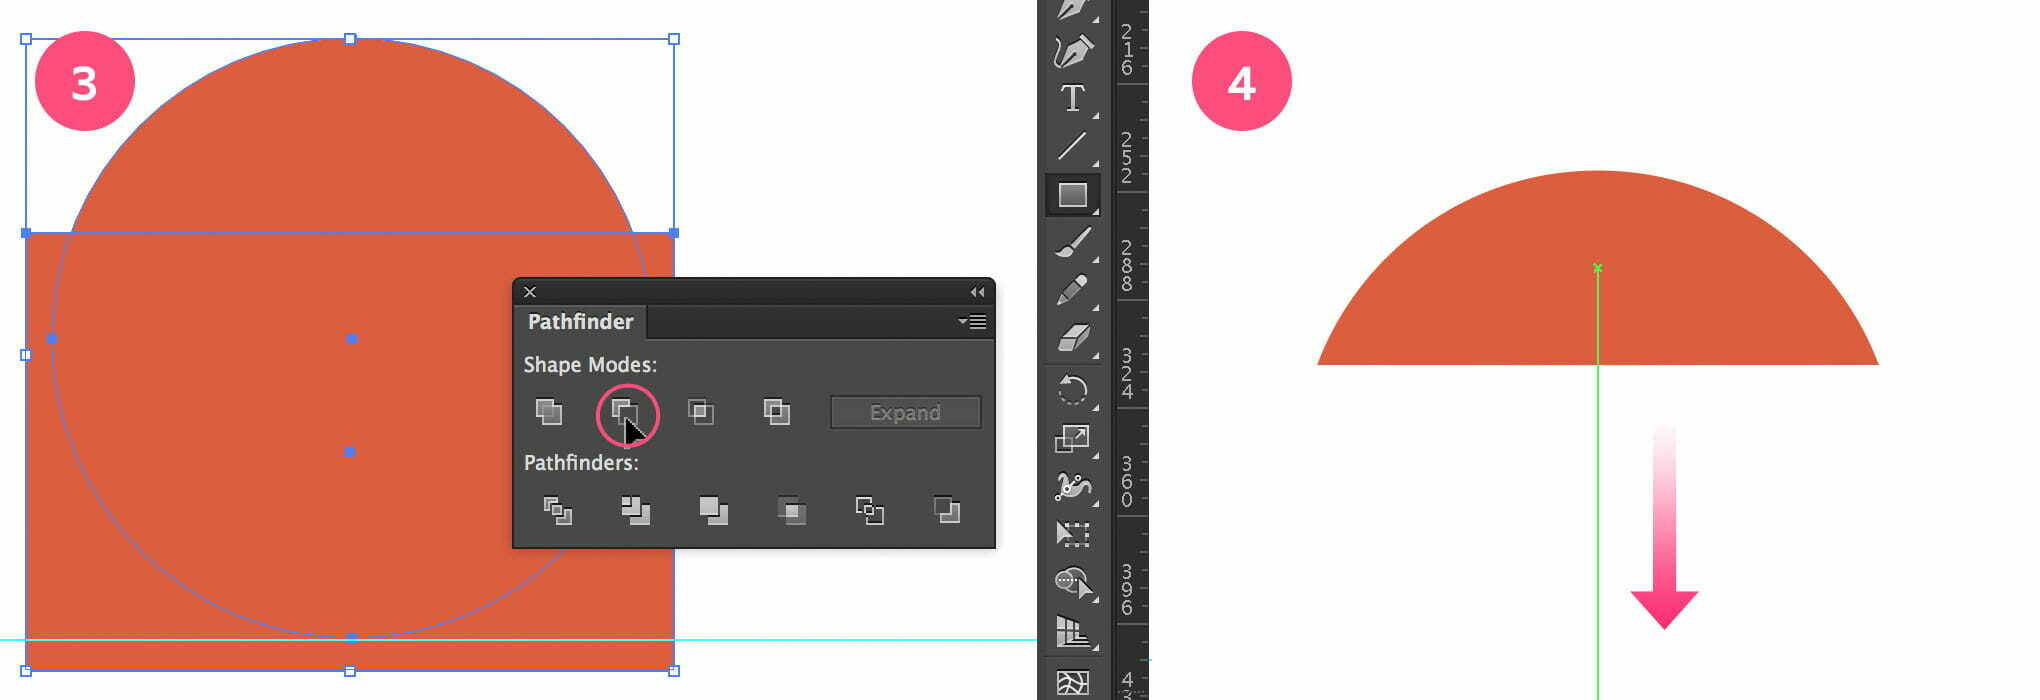
Finalise the base of the rain cover and other part of the umbrella.
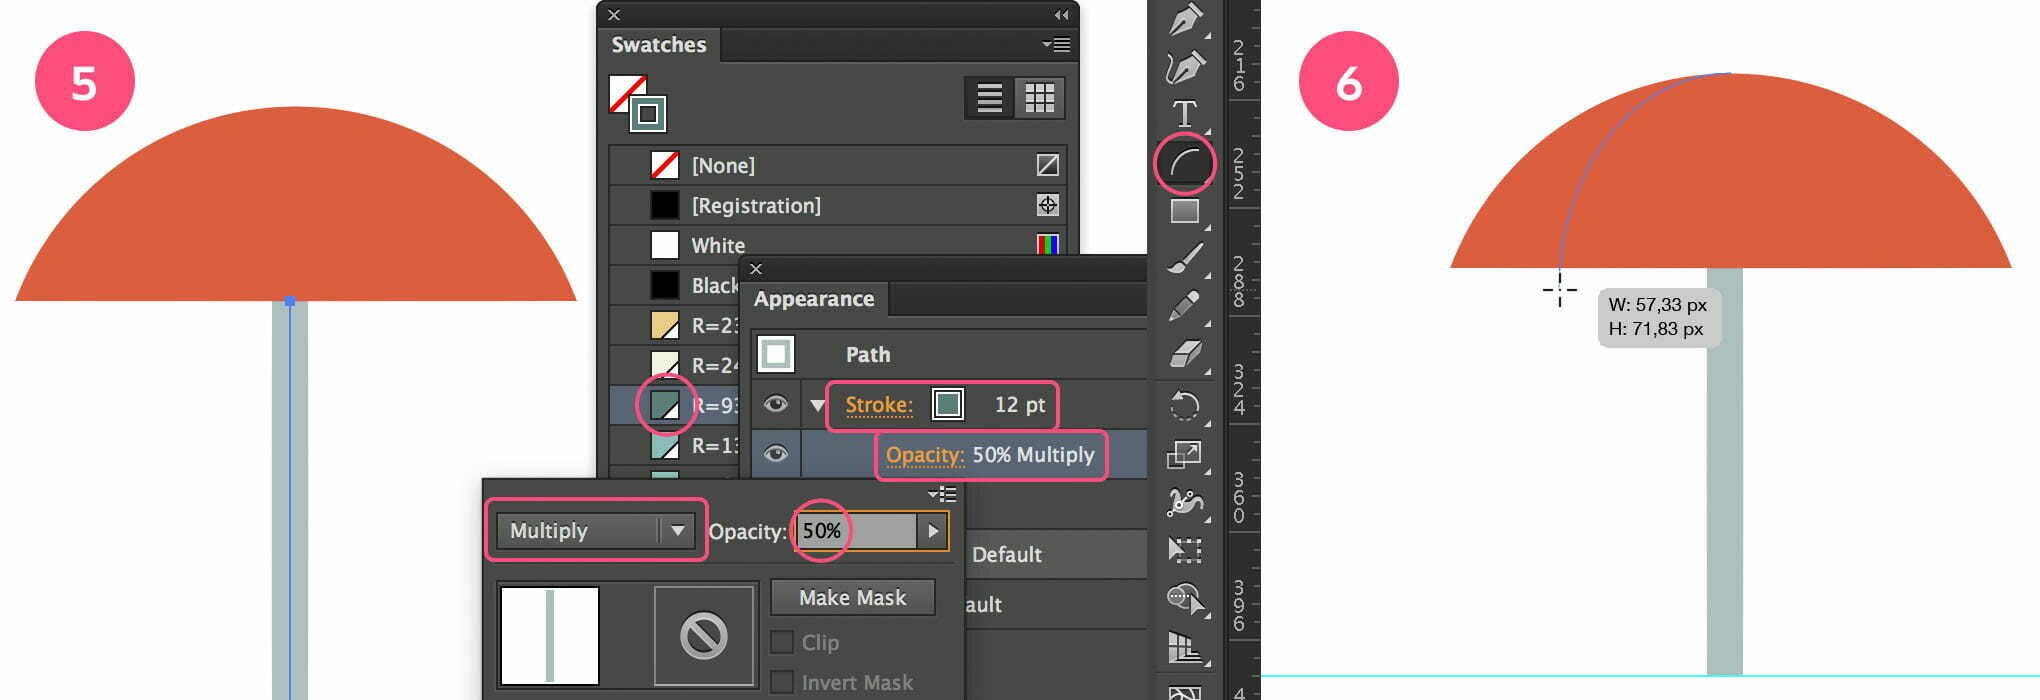
4. Draw a Line
Select the Line tool, and draw a vertical line right in the center of the shape (the vertical green line that appears in the center should be your visual clue). Draw the line from top to bottom while holding down the Shift key to keep the line perfectly vertical (see image above).
5. Apply Stroke Color
Apply 12 pt as Weight, and give it the dark teal swatch color stroke. In the Appearance panel select Multiply as blending mode at 50% Opacity.
Add the stroke color and the 1st arch to start dividing the rain cover.
6. Draw Arches
Double click the Arch tool. In the Options window that appears, set the Base Along to the Y-Axis. Next make sure your fill swatch is set to no fill, and your stroke swatch is set to black (or any other color, it doesn’t matter really). Now draw the 1st arch starting from the top center point of the umbrella going towards the left side. Just click drag like you draw a line. Make sure the arch goes a bit further below the orange part (see image below).
7. Draw The Other Arches
Now draw a 2nd arch to the right of the 1st arch, again starting from the top center point of the umbrella as shown in the image below.
Create the other arches on the rain cover of the umbrella.
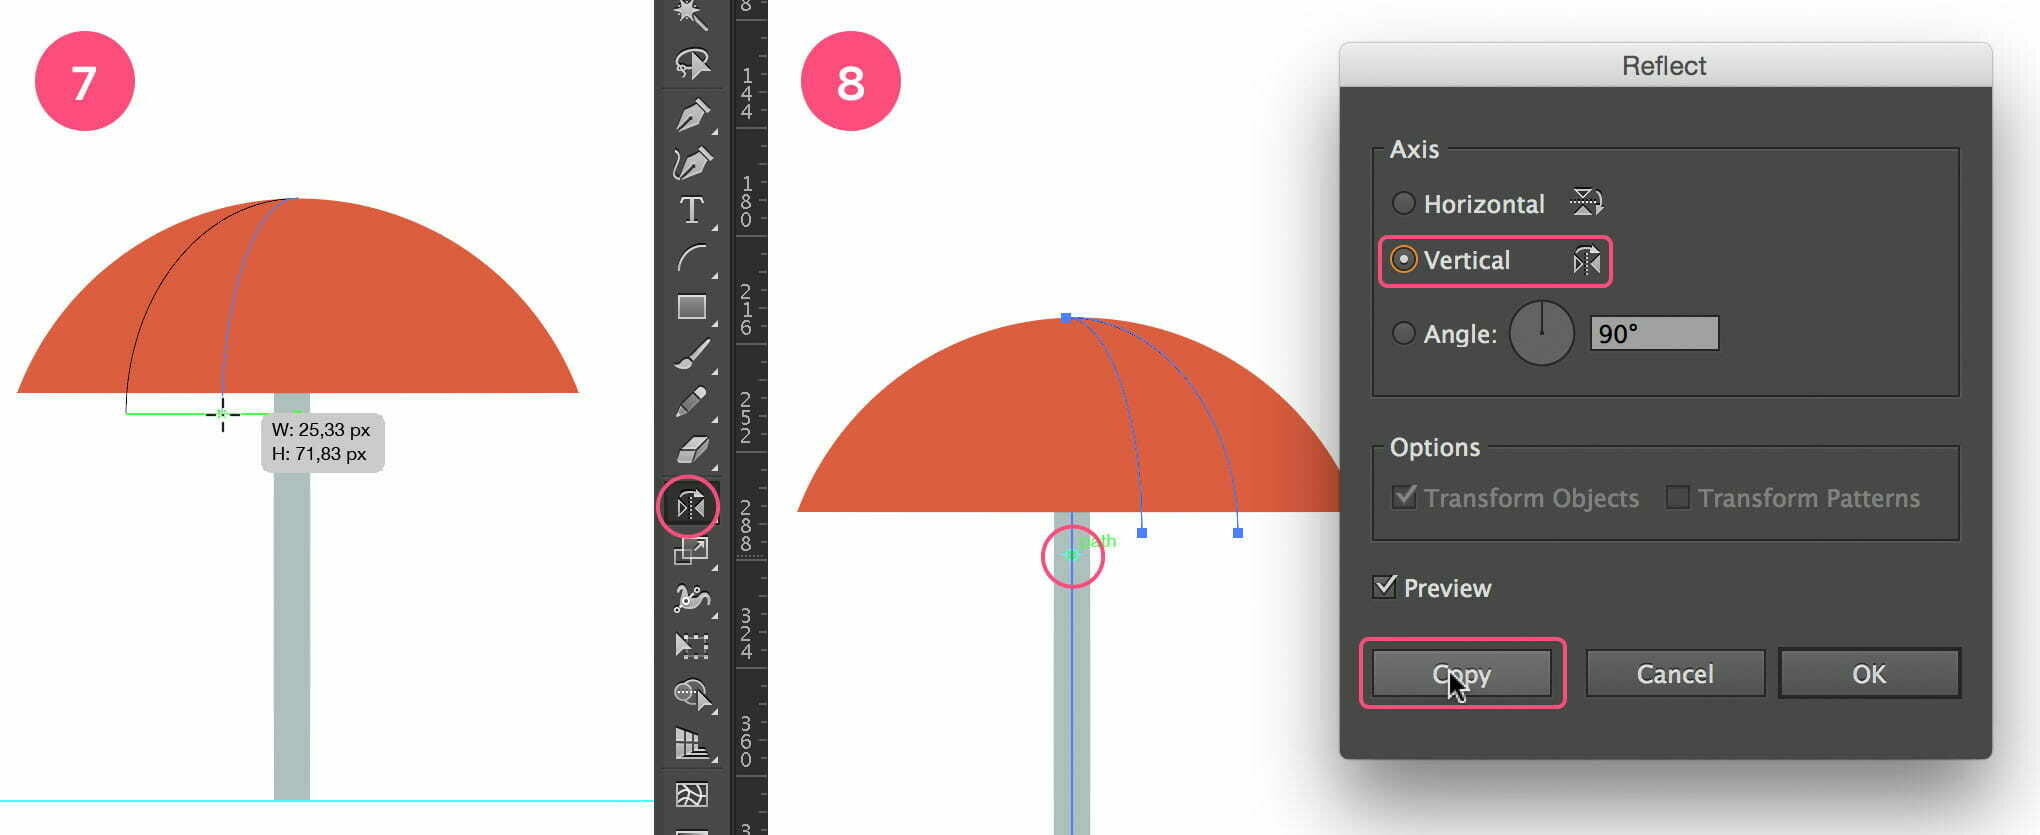
8. Copy Reflect
Select both arches, and select the Reflect tool. Click exactly on the path of the vertical teal stroke. In the Reflect window that appears, select Vertical as Axis. Check the Preview option to see what will happen. Hit the Copy button to copy the arches.
9. Divide
Just like we did for the beach ball, we will cut the umbrella into segments so we can apply a color to each segment. Select the arches and the orange shape. Go to the Pathfinder or Properties panel and select the Divide option.
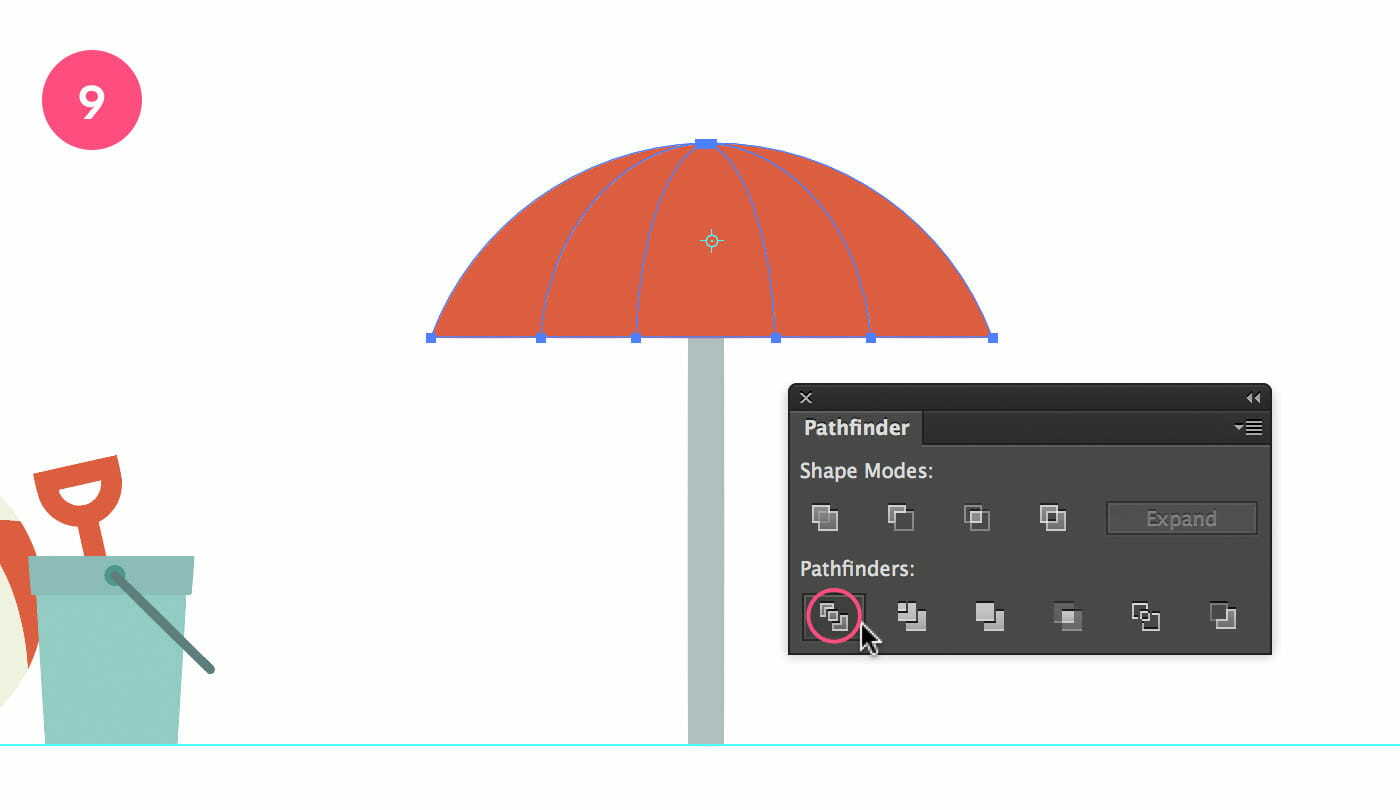
Divide the rain cover of the umbrella into separate path segments.
10. Add Color
As with the beach ball, the divided segments are now grouped into a single object. Double-click it to enter Isolation Mode, allowing you to apply a different color to each segment. Give the 2nd and 4th part the off-white color. Hit the Escape key to leave Isolation Mode.
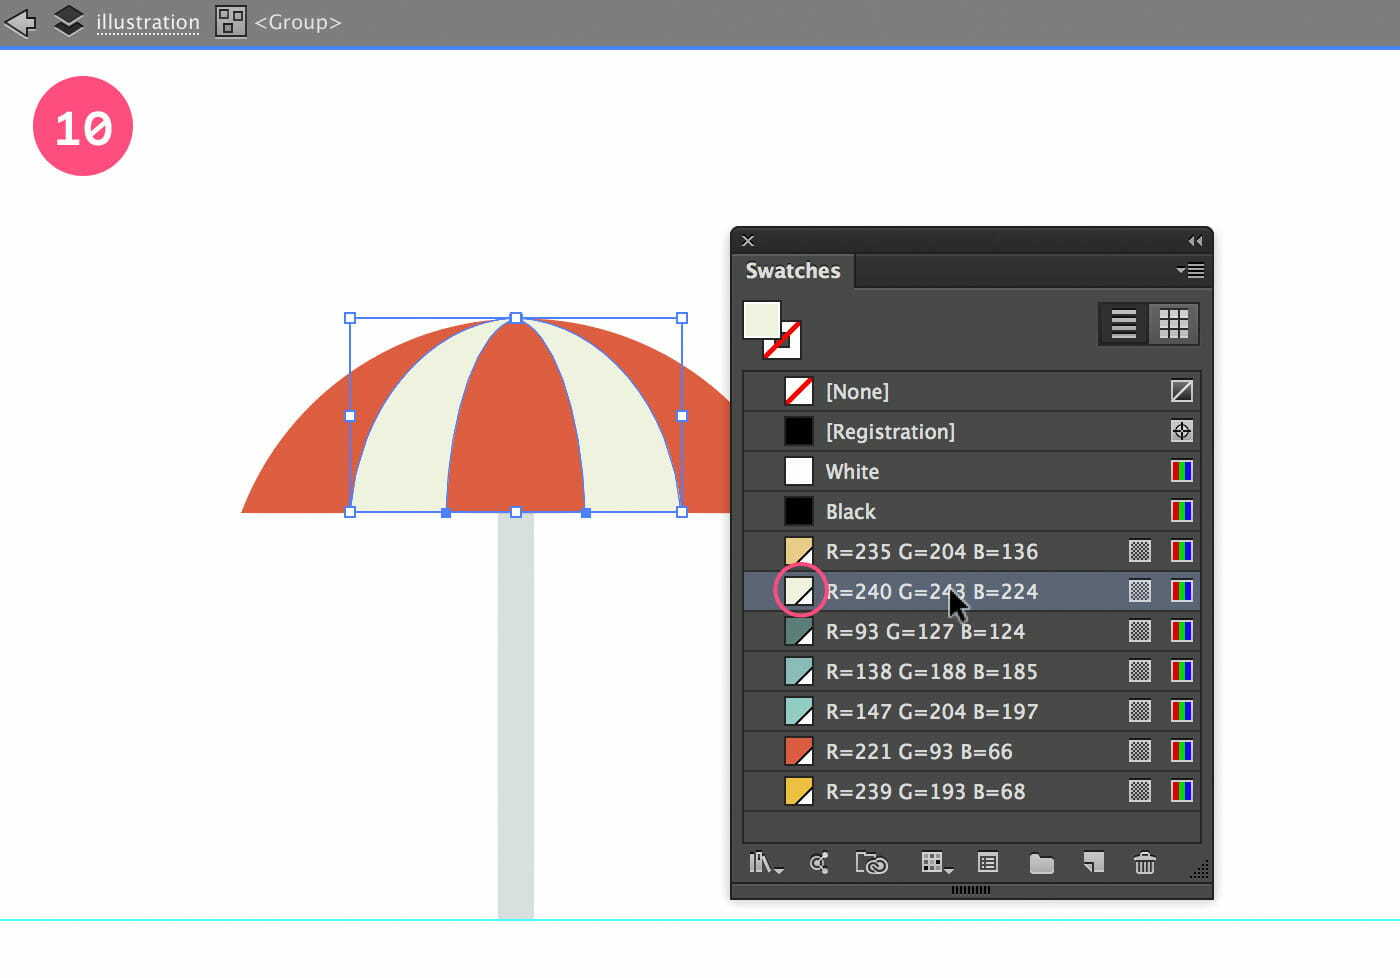
Add color to the rain cover of the umbrella.
11. Organize
Group the umbrella objects together (Cmd/Ctrl + g), and give the sublayer a name (’umbrella’). Move the sublayer into place, below the beach ball.
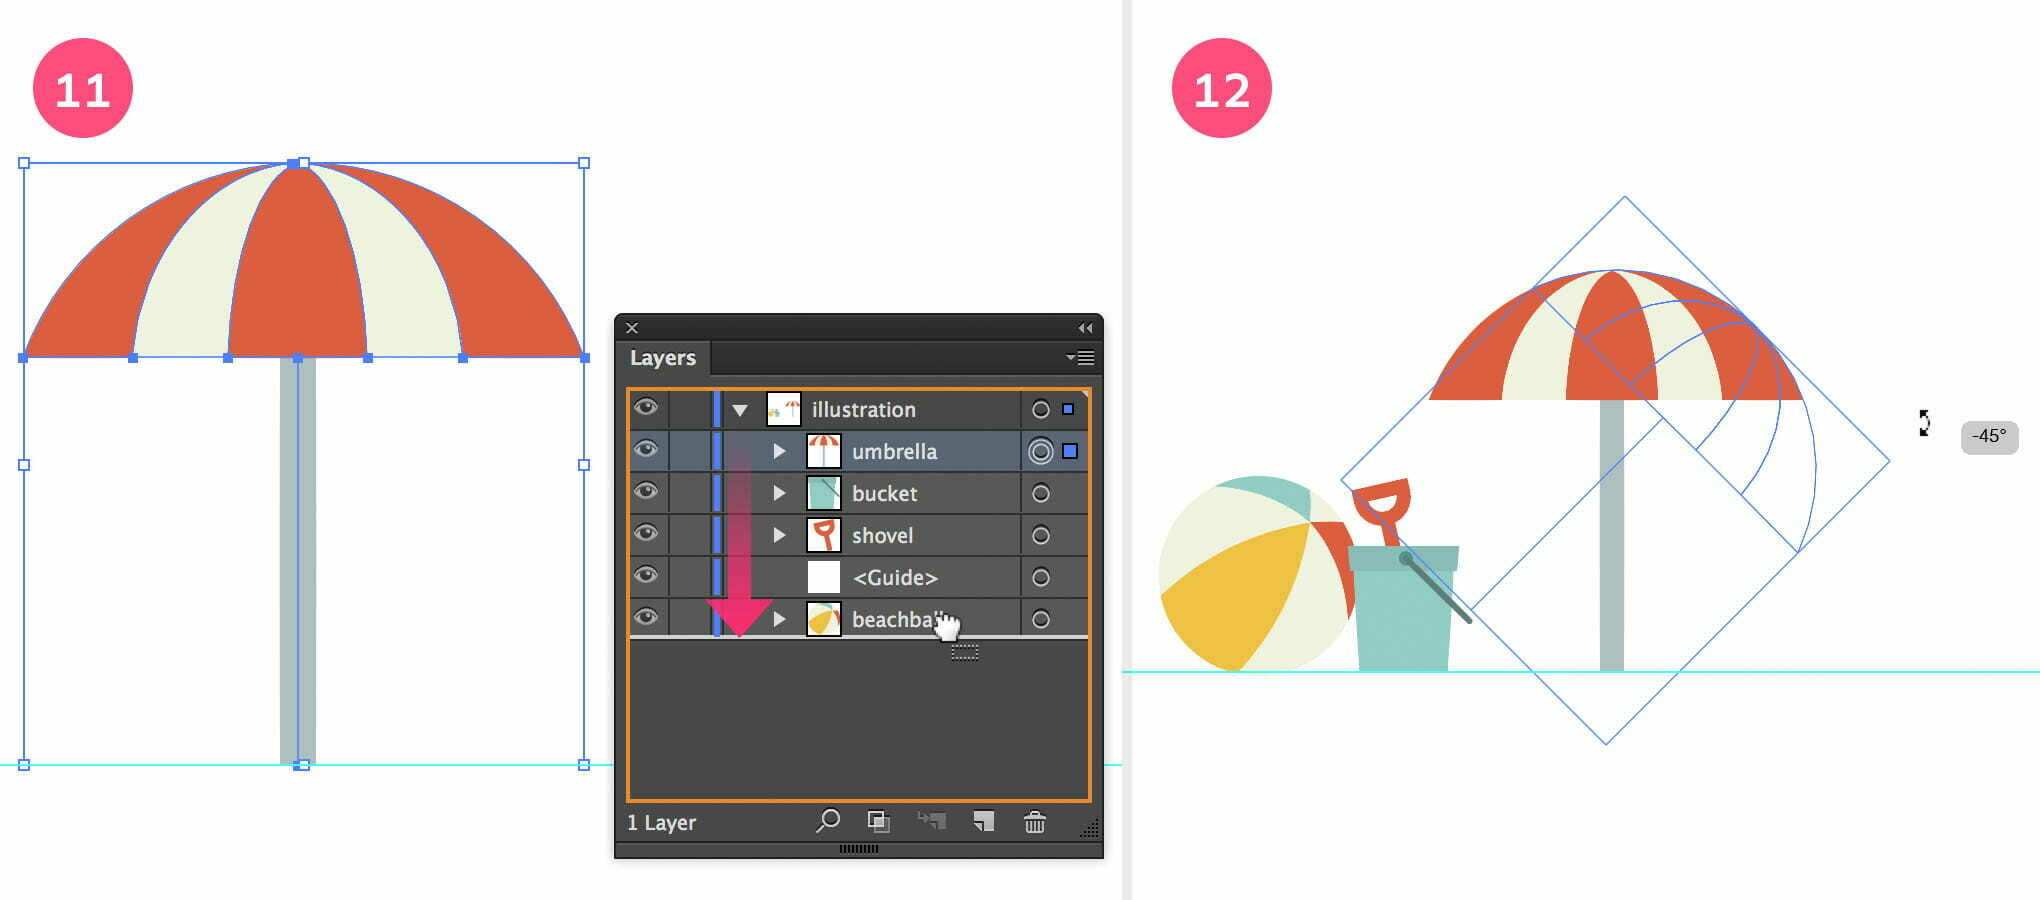
Organise the layers and rotate the umbrella.
12. Create Composition
Create a perfect composition by rotating the umbrella 45° to the right. Hold down the Shift key while rotating.
13. Move Into Place
Move the umbrella into the right position as shown in the image below.
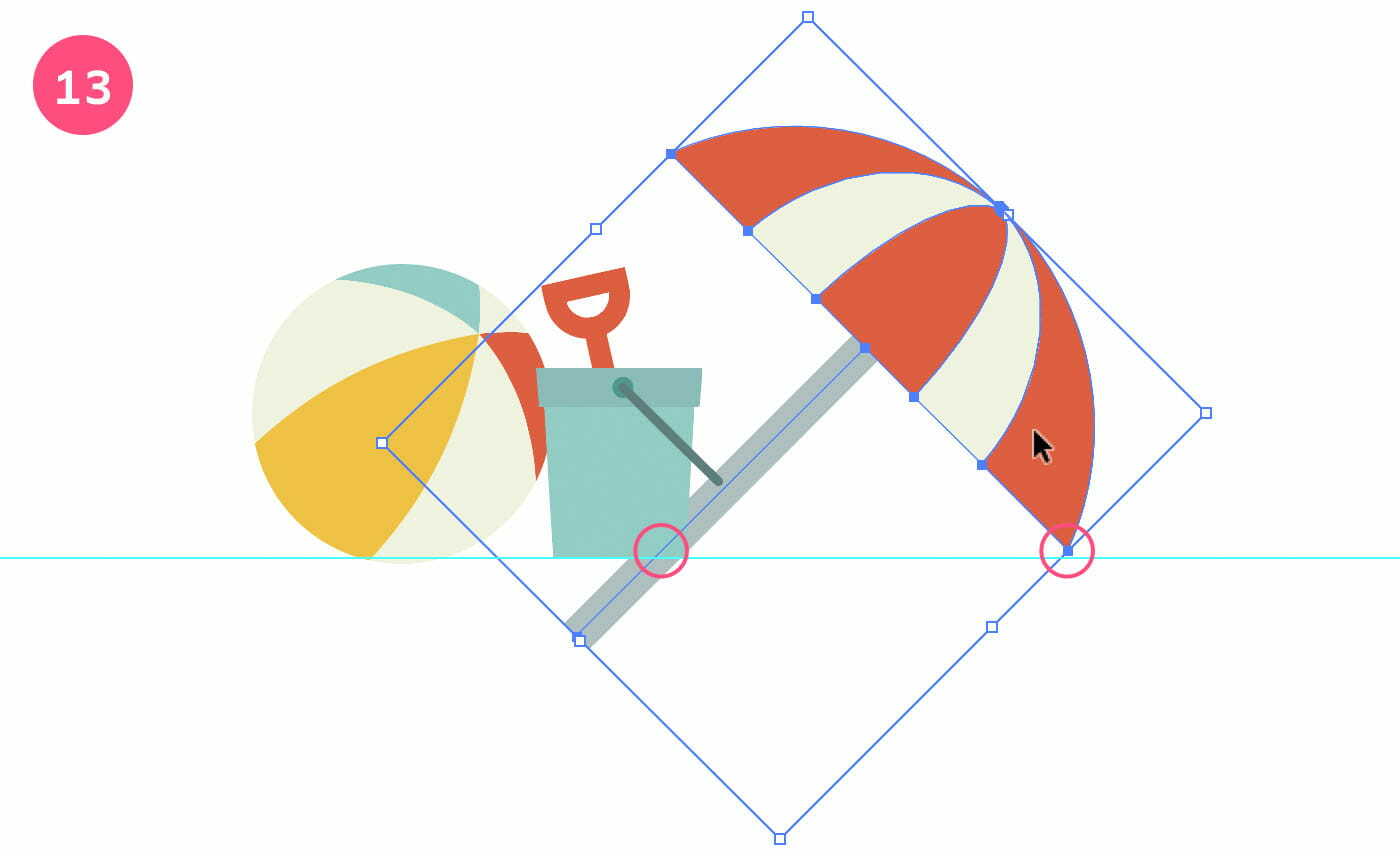
Move the umbrella into position for a perfect composition.
Complete The Beach Scene
1. Create The Beach
Select the Rectangle tool and draw a yellow sandy rectangle below the horizontal guide on top of the 3 objects (so the bottom of the beach ball is slightly hidden).
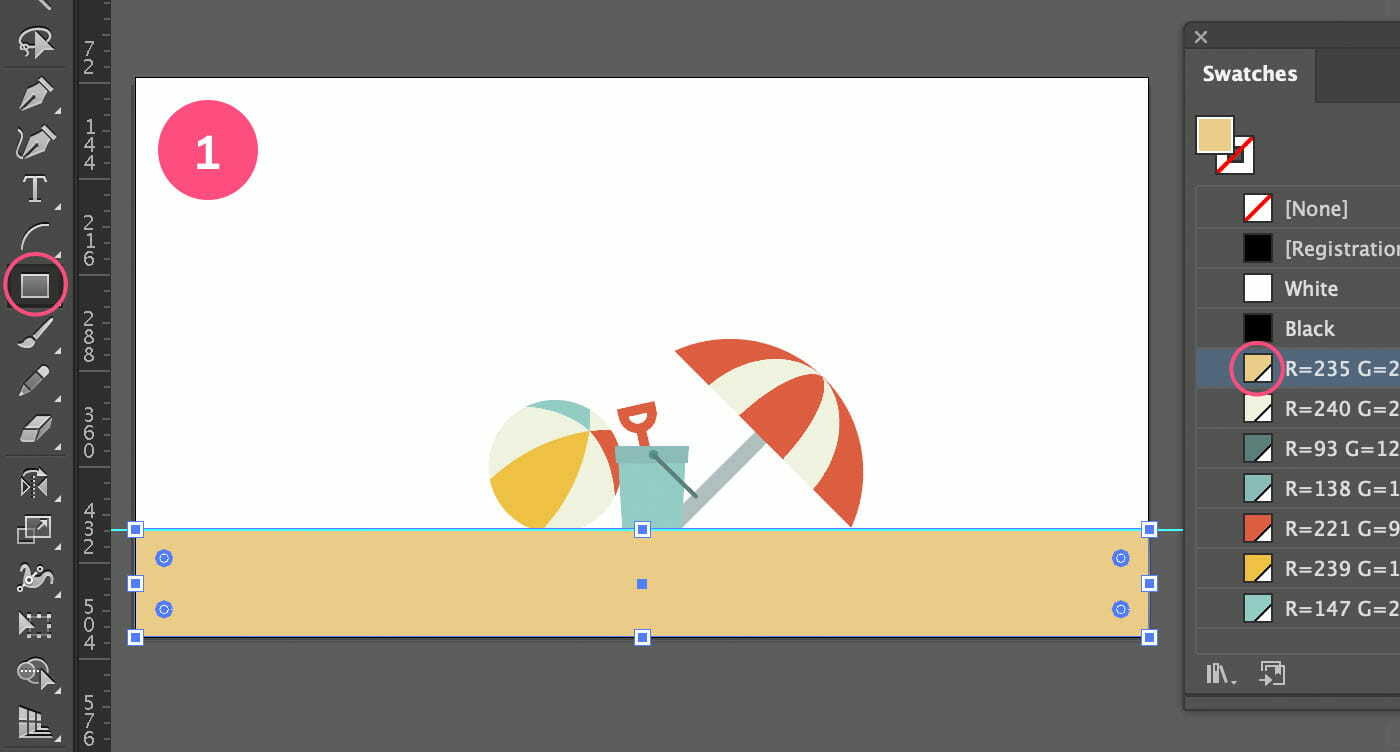
Create the beach using the Rectangle tool.
2. Create The Sky
With the Rectangle tool still selected, draw a light blue rectangle above the beach.

Create the sky by using the Rectangle tool.
3. Organize The Layers
Organise your layers again by naming the object's name and by moving them into place in the Layers panel. The sky should be moved down below all other layers.
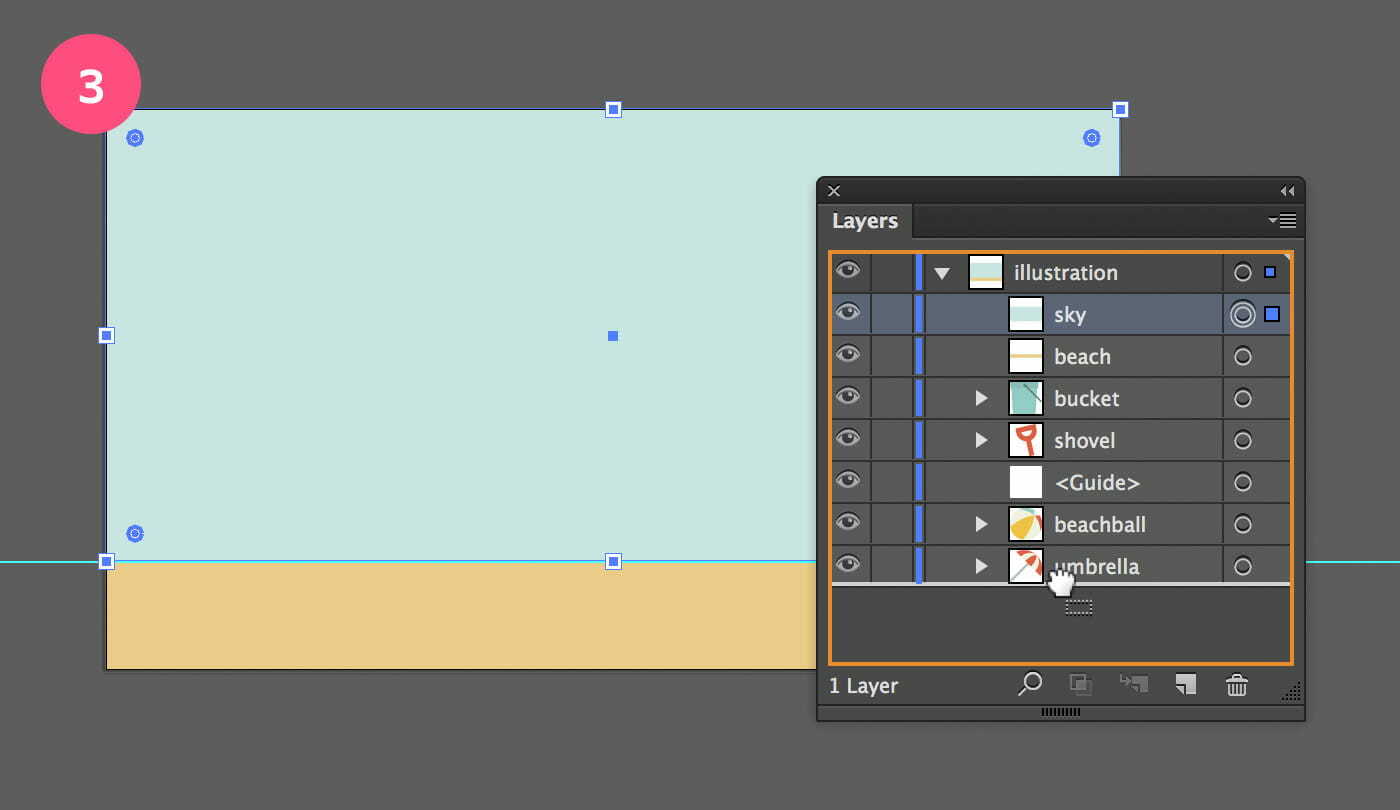
Organize the layers.
4. Create a Cloud
Next we’ll create some clouds. Select the Ellipse tool and draw a couple of slightly overlapping circles next to each other that resembles the shape of a cloud as shown in the image below. You can use a white fill for each circle. Ensure they overlap slightly and are roughly aligned at the bottom..
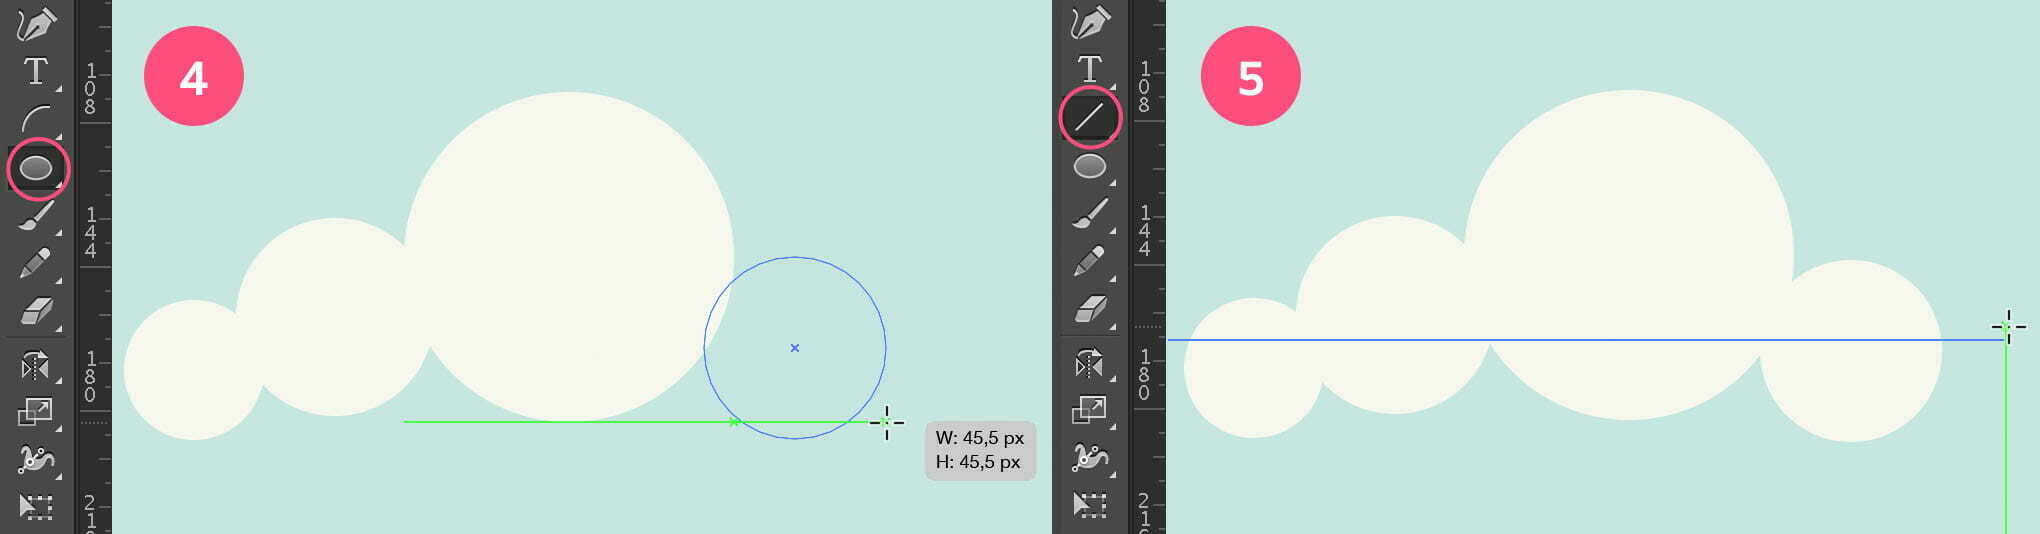
Draw a cloud using the Ellipse and line tool.
5. Draw a Line
Select the line tool, ensuring the fill swatch in the toolbar is set to 'no fill' and the stroke swatch is set to a color. Now draw a horizontal line on top of the circles (hold down the Shift key). Make sure the line doesn’t touch the blue sky as it crosses the circles, and make it wider than the circles.
6. Divide
Select the circles and the line and choose Pathfinder > Divide just like before.
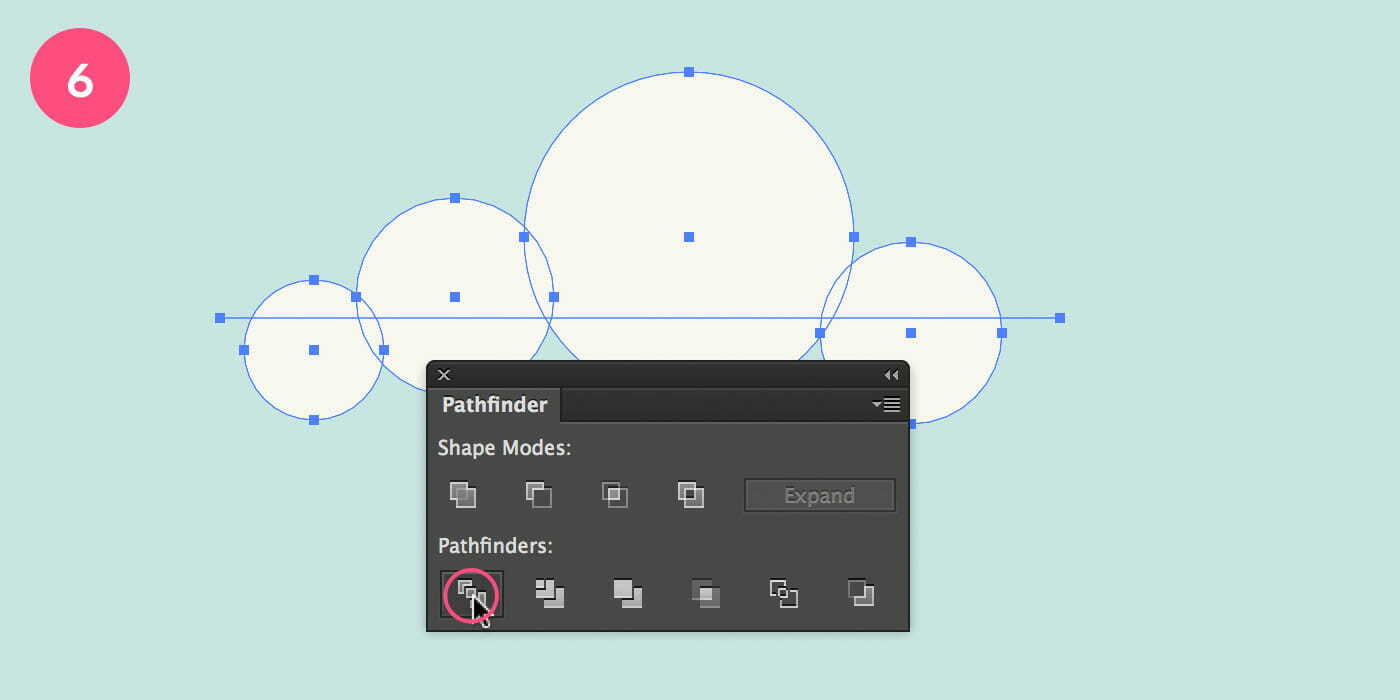
Divide the circles.
7. Remove Unnecessary Parts
Select the Shapebuilder tool from the toolbar, and remove the unnecessary parts by clicking the shapes one by one while holding down the Alt/Option key. A minus should appear in your cursor as shown in the image below.
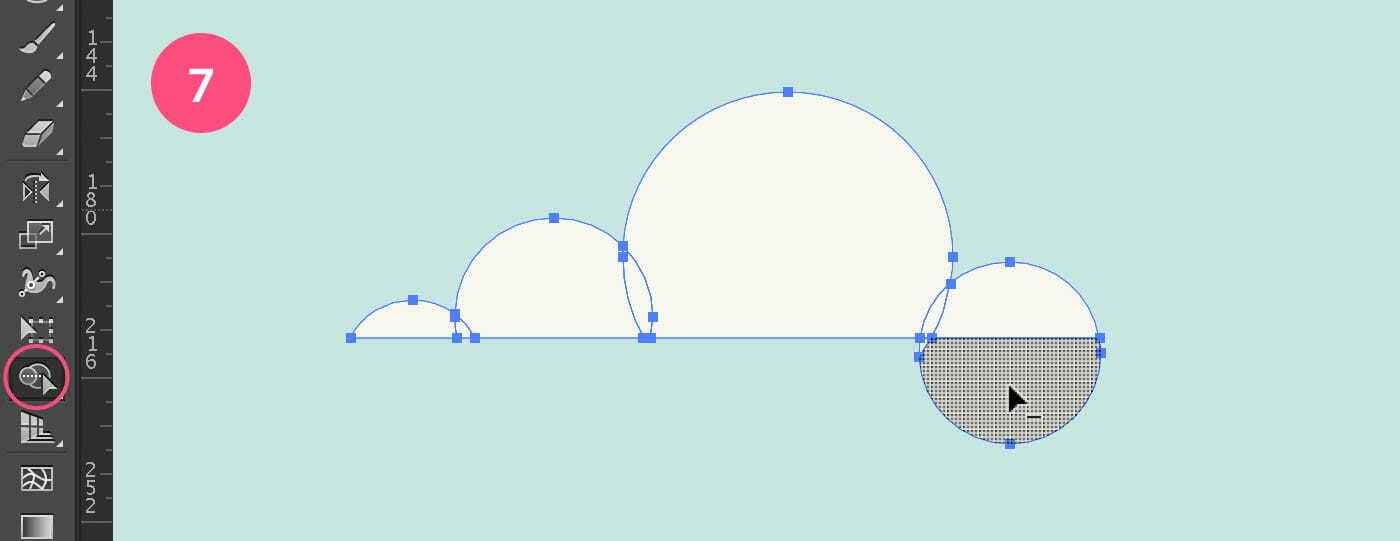
Remove the unnecessary parts of the cloud.
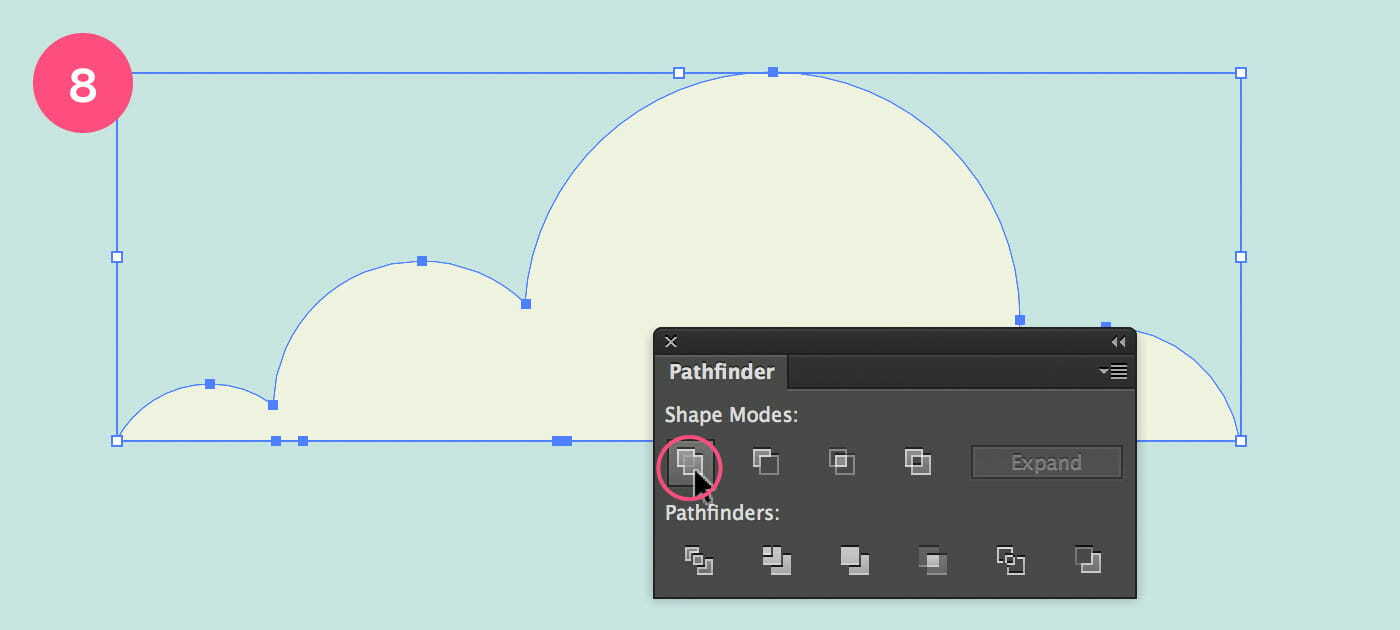
8. Unite
With the object still selected Go to Pathfinder > Unite.
Unite all shapes to complete the cloud.
9. Clean Up The Path
This step is optional, but I’m meticulous about clean paths and dislike unnecessary anchor points. If you agree, you can clean up the cloud path by removing any unnecessary anchor points you find. Select the Delete Anchor Point tool from the toolbar and click in the anchor points that should be removed.
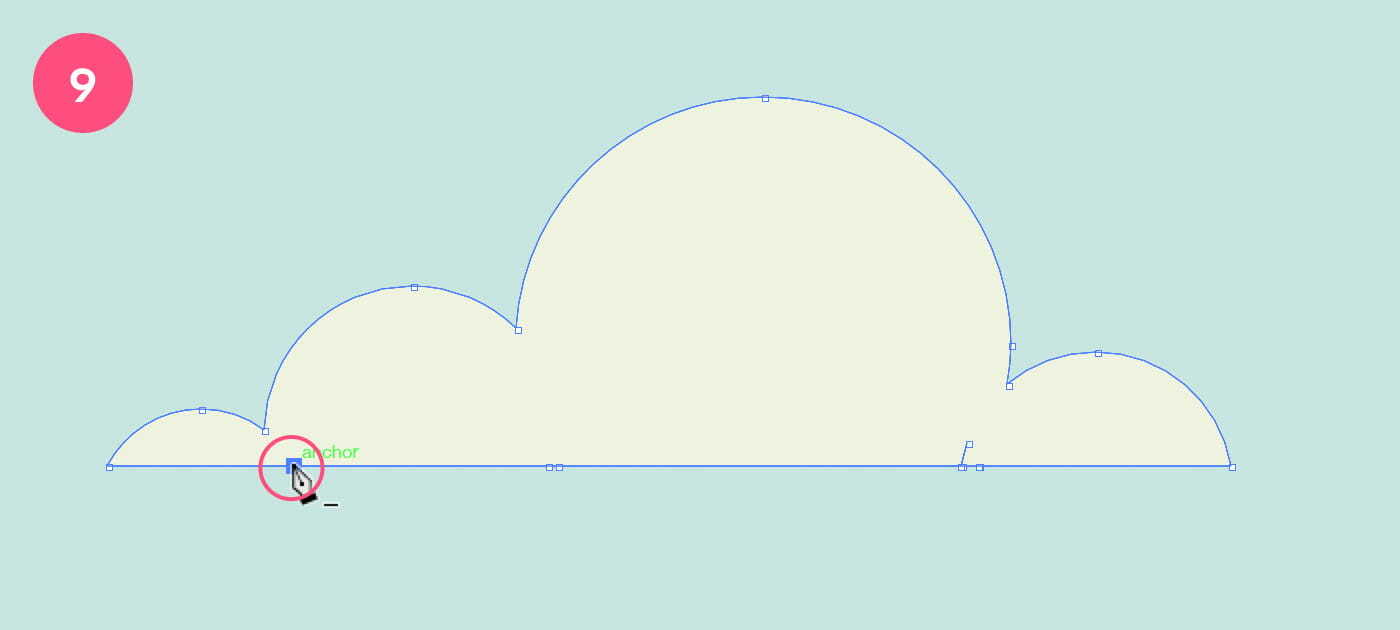
Clean up the anchor points if needed.
10. Add More Clouds
To add a couple of more clouds, repeat the steps to create a cloud, or copy reflect and resize the one you’ve created. When you are ready, select all the clouds and apply the off-white color swatch as fill, but only for 50%, by moving the slider in the Color panel to 50% (see image above).
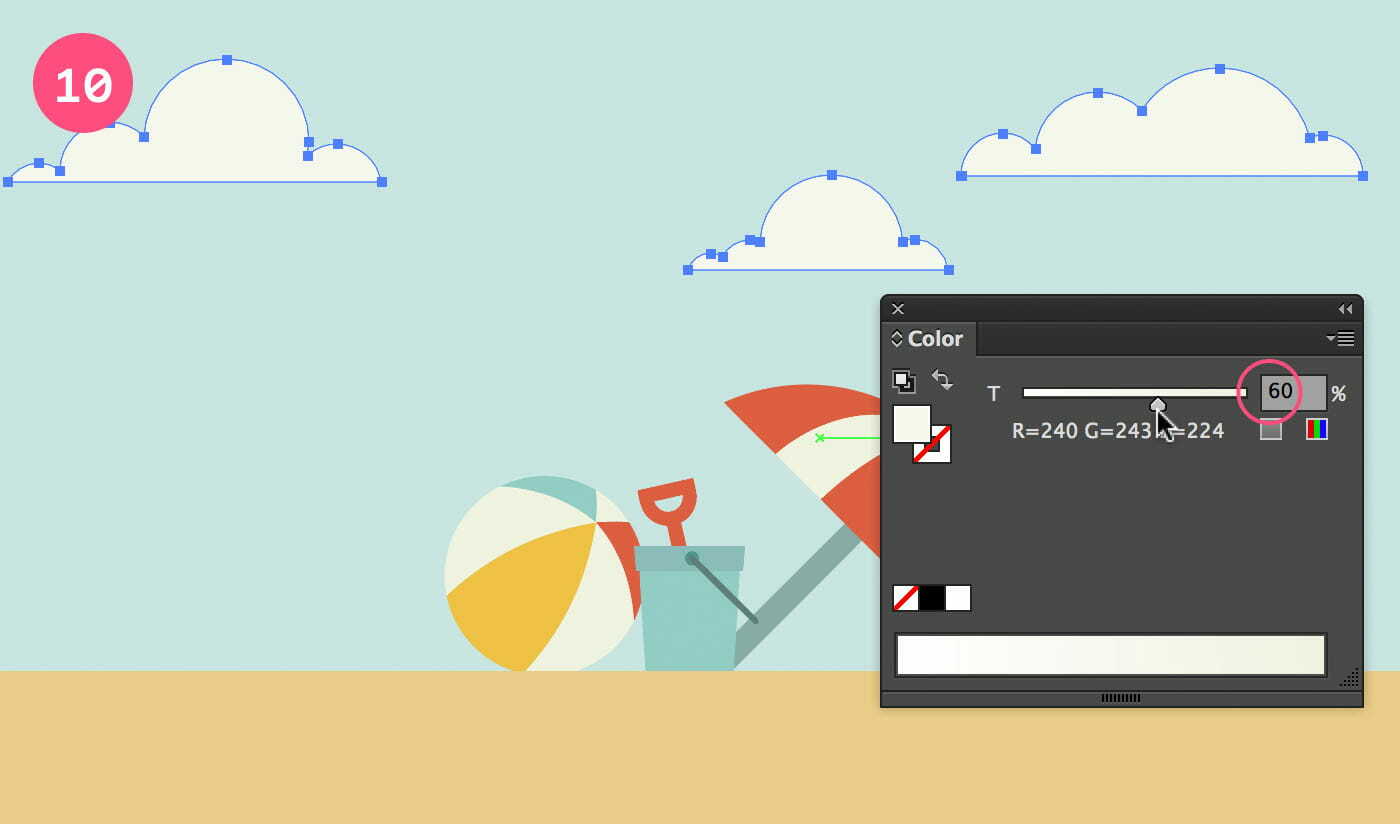
Complete the sky by adding a few more clouds.
11. Create The Sea
Last but not least, we’ll create the sea in the very distance. Select the Rectangle tool and draw another rectangle. Give it the light teal color at 75% (move the color swatch slider 75%). Give the object the name ’sea’ in the Layers panel and move the sublayer into place right above the ’sky’ layer.
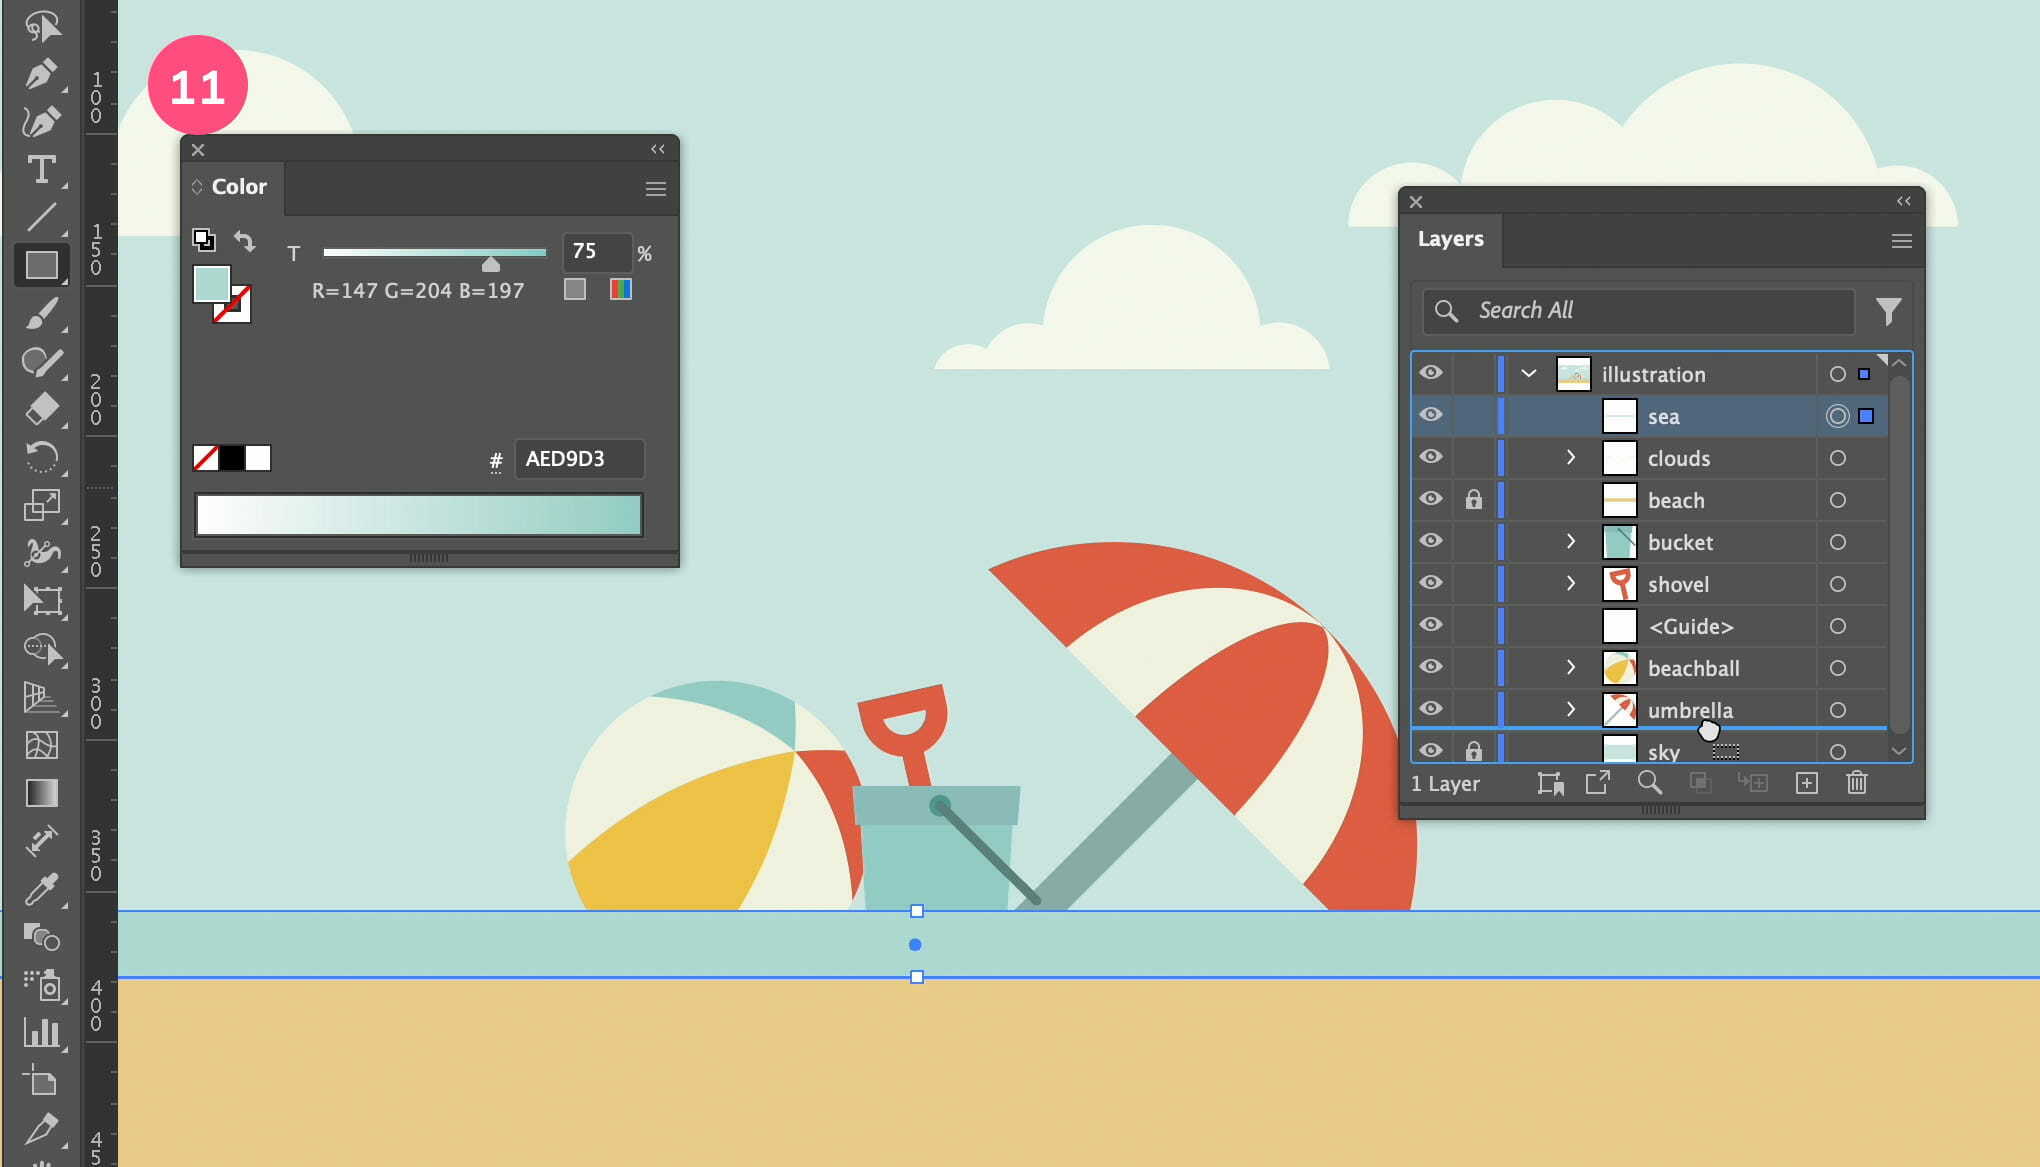
Create the sea using the Rectangle tool.
Finishing Touch
12. Add pattern effect
Your illustration is finished, but you could also decide to add a subtle vector pattern that lays on top of your illustration. By default, Adobe Illustrator offers some nice subtle patterns that you can apply to your artwork. In this illustration I’ve used the pattern ’USGS 22 Gravel Beach’. You can find this pattern by going to the Swatches panel and selecting the Options dropdown menu (the arrow icon at the top right of the panel). In this dropdown choose Open Swatch Library > Patterns > Basic Graphics > Basic Graphics_Textures.
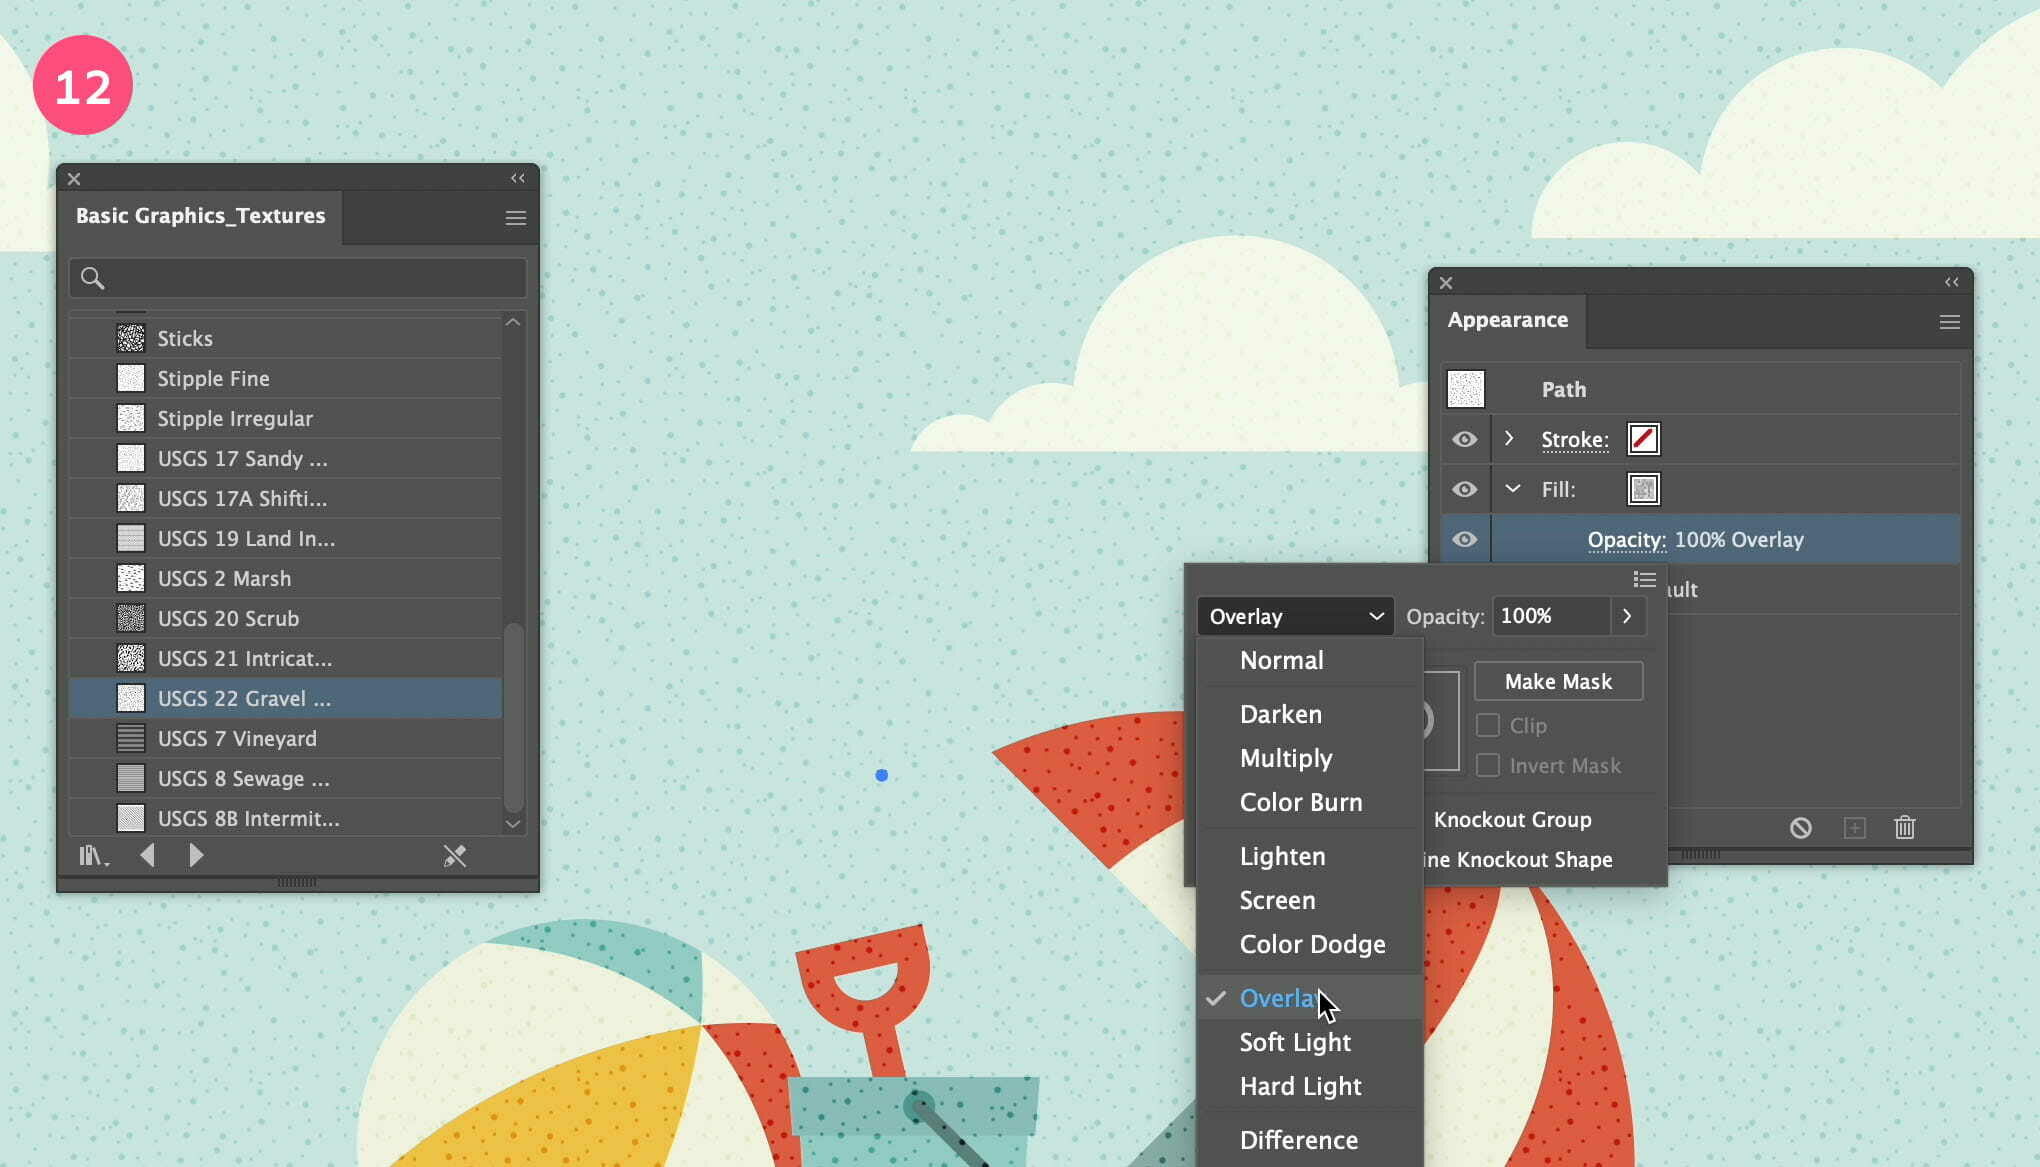
To quickly add a simple pattern effect on your illustration, you can draw a rectangle on top that covers your entire illustration, and give it a pattern fill like ’USGS 22 Gravel Beach’. Then in the Appearance panel you can change the blending mode of the fill to Overlay. You can also play with the Opacity value.
All vector-based
The beauty of these subtly patterns is that they are all vector-based. If you scale your image up to 500% everything will still look crystal sharp. You can also decide to apply different patterns to certain objects, by applying a 2nd fill on top of the color fill. You can also resize the patterns using the Scale tool (and by double clicking the tool to evoke the Scale options window), and by only checking the option Transform Patterns. This way the pattern is resized but not the object itself. The possibilities are endless.
That’s it! I hope you’ve enjoyed this tutorial.
