
Create a Lighthouse in Adobe Illustrator
Another step-by-step tutorial
Article written on Thursday, 06 Jan 2022
- Requirements
- Adobe Illustrator CS6
- Level
- beginner
- Download
- Ai template file
Years ago I created a lighthouse as part of an illustrated header for a web site. However, the illustration didn't get approved by the client. It was one of the first projects I shared a screenshot of on dribbble. Today I'm giving this lighthouse a new home by showing you how to draw this lighthouse scenery in Adobe Illustrator. As always, I'll explain each step along the way. With all these great tools at our disposal, this simple illustration requires you to use the Pen tool only once. So let's get started!
Before Getting Started…
About Using Illustrator Template Files
In this tutorial I'll also show you how you can keep your illustration organised, and how you apply a Clipping Mask. To make it extra easy to follow, I've prepared an Illustrator template file that includes the correct dimensions of the illustration, color mode (RGB), and color swatches. You can download this template here. Illustrator template files are really handy. I have my own small set of template files that I always use to start from. If you create a new document in Illustrator, you always end up with a default set of swatches, brushes, symbols, and graphic styles in the corresponding panels. These are items I never use or need, but they do get stored each time with your document and take up unnecessary file size. So I create my own set of 'empty' documents, with the document settings (dimensions, color mode…) I need one for each purpose (web, print,...), and save them as an .ait file.
About Using Smart Guides
Before getting started, make sure you have Smart Guides enabled. Check this by going to View > Smart Guides. If you see the checkmark, you're all set. You can switch this feature on and off by hitting Cmd/Ctrl + U.
The Lighthouse
1. Draw a Square
Select the Rectangle tool and draw a small square by holding down the shift key while dragging. Apply the dark black grey color as fill, and set the stroke to none (red diagonal line swatch).

Create the top of the tower
2. Rotate 45°
Select the Rotate tool and rotate the square 45° by holding down the shift key. You can also rotate the square by holding down the Cmd/Ctrl key.
3. Change into a Triangle
Select the Pen tool and hover over the bottom anchor point of the square. When you see a minus sign appear at your cursor, click the anchor point to remove it from the path. You should end up with a triangle now.
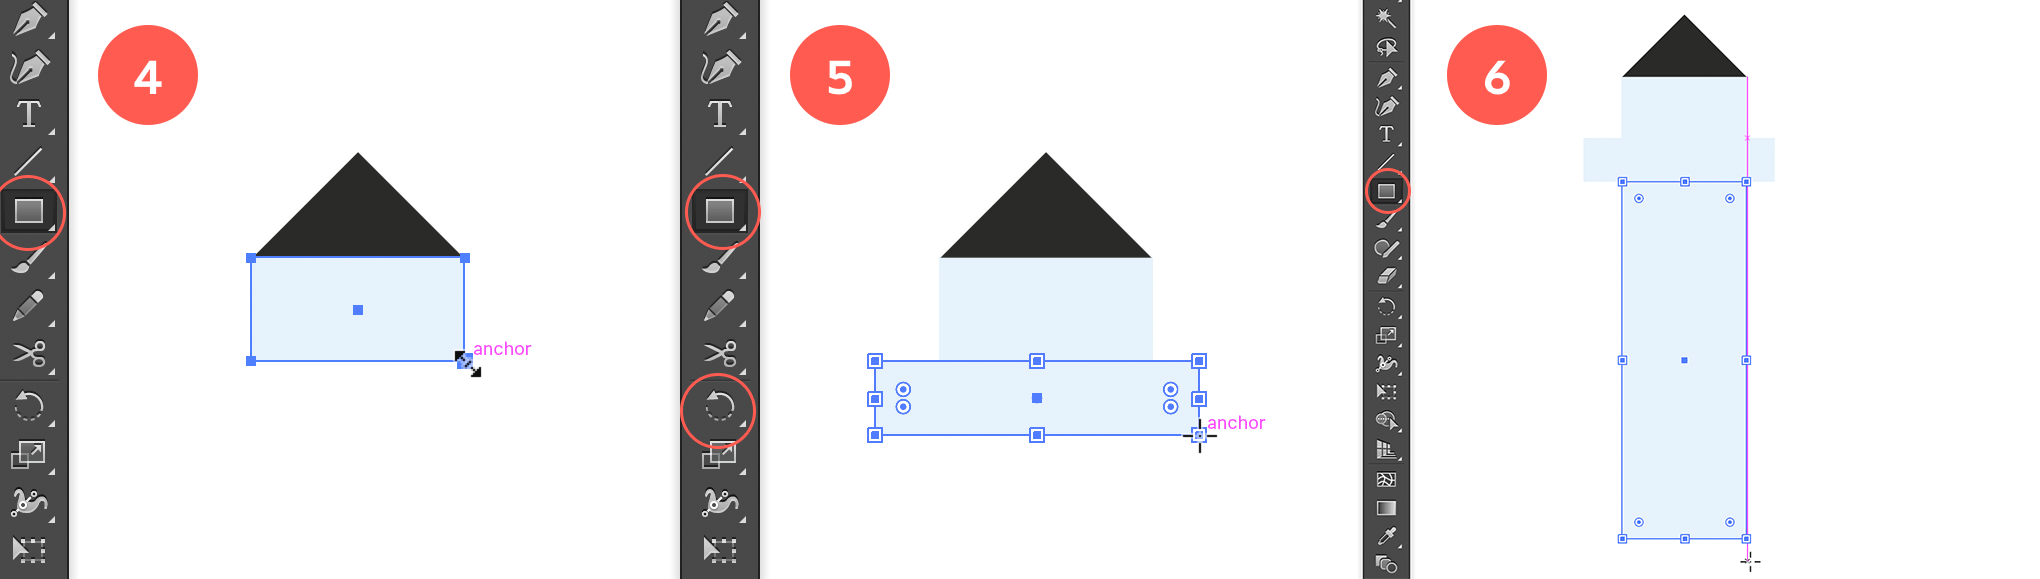
4. Draw a Rectangle
Select the Rectangle tool again and draw a rectangle right below the triangle, keeping the same width of the triangle. The (enabled) Smart Guides should help you with here since the lines should automatically snap to the right spot. Give the rectangle the very soft light blue fill.
Create the tower
5. Draw a Wider Rectangle Below
Draw a second slightly wider and less higher rectangle right below the rectangle using the same light blue fill.
6. Draw a Tall Rectangle Below
Then draw yet another rectangle below it. This time make it the same width as the first one, but make this one very tall. It should have the length of the tower.
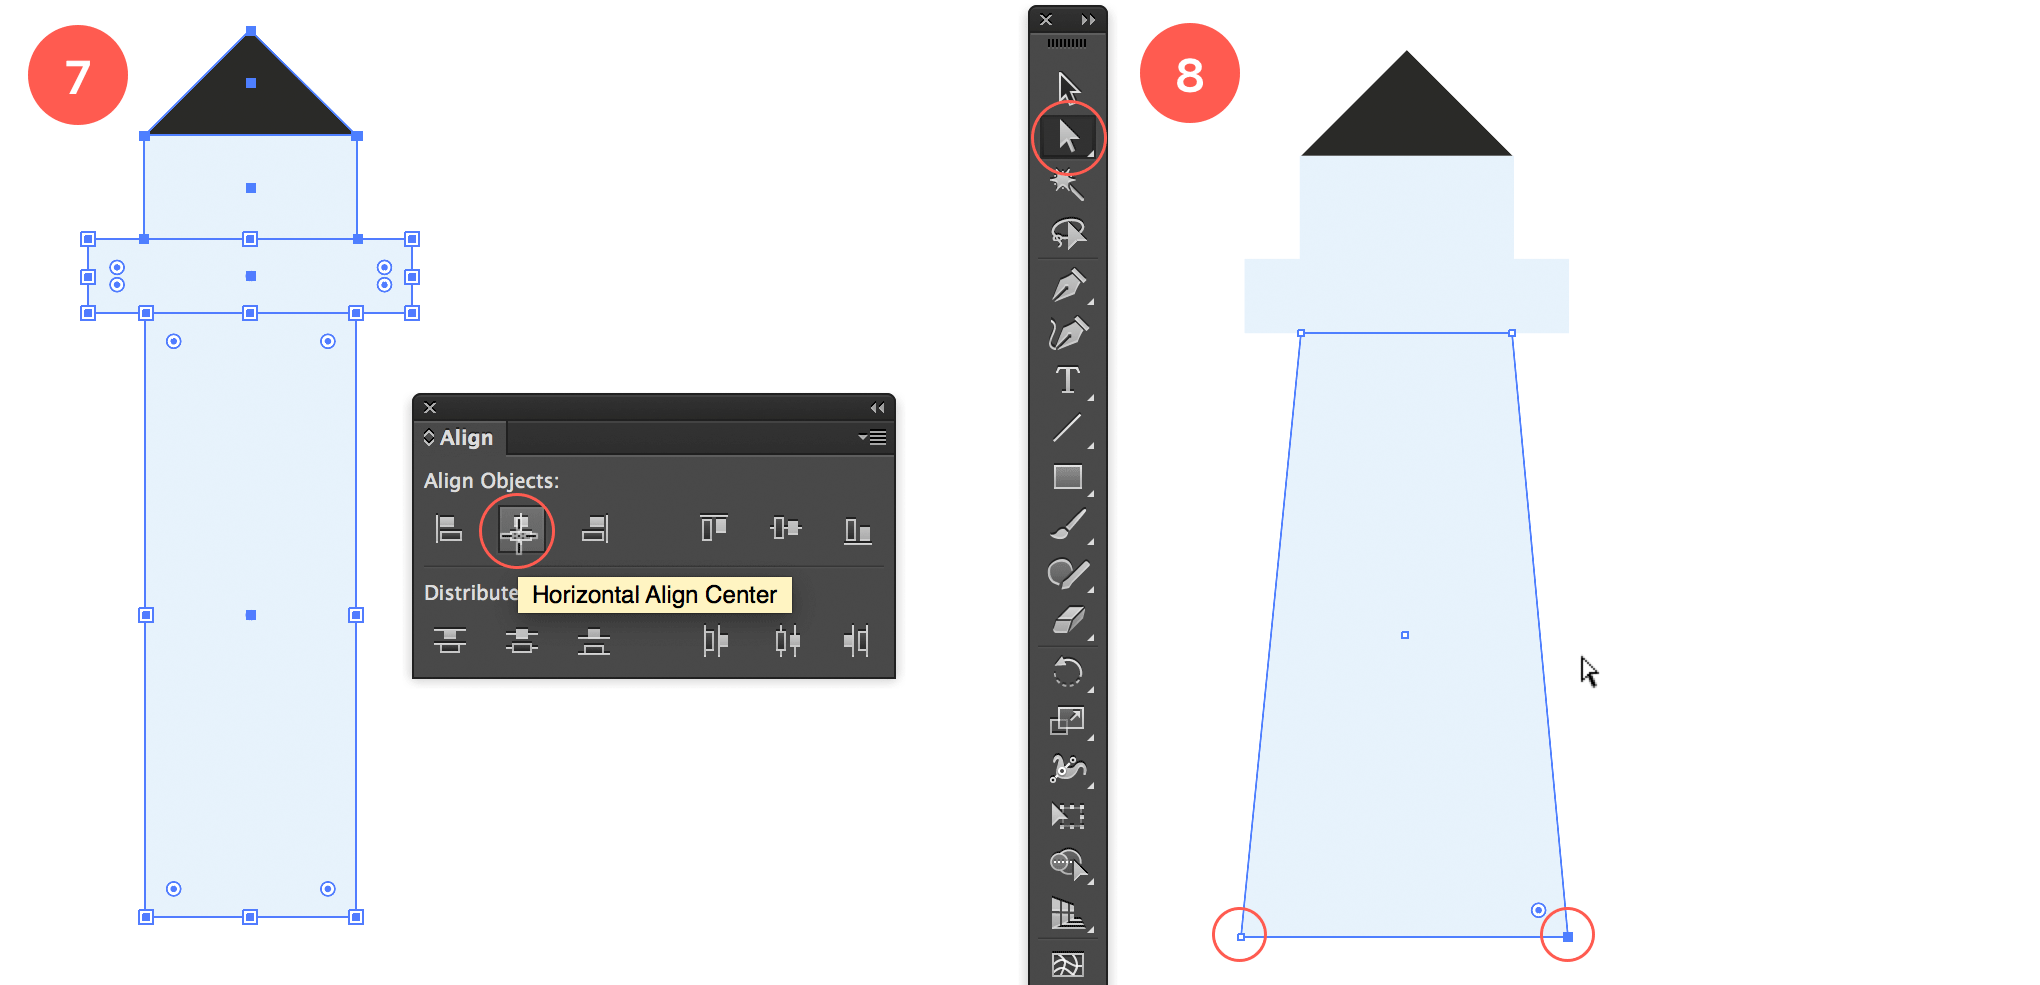
7. Horizontal Align Center
Select all the objects and select the Horizontal Align Center option from the Control bar at the top, or from the Properties or the Align panel.
Align the tower parts
8. Stretch Bottom Anchor Points Out
Select the Direct Selection tool (white arrow) and select the bottom left anchor point of the vertical rectangle (the bottom of the tower). Use the left arrow key on your keyboard to move the anchor point to the left. Use the same count for the bottom right anchor point.
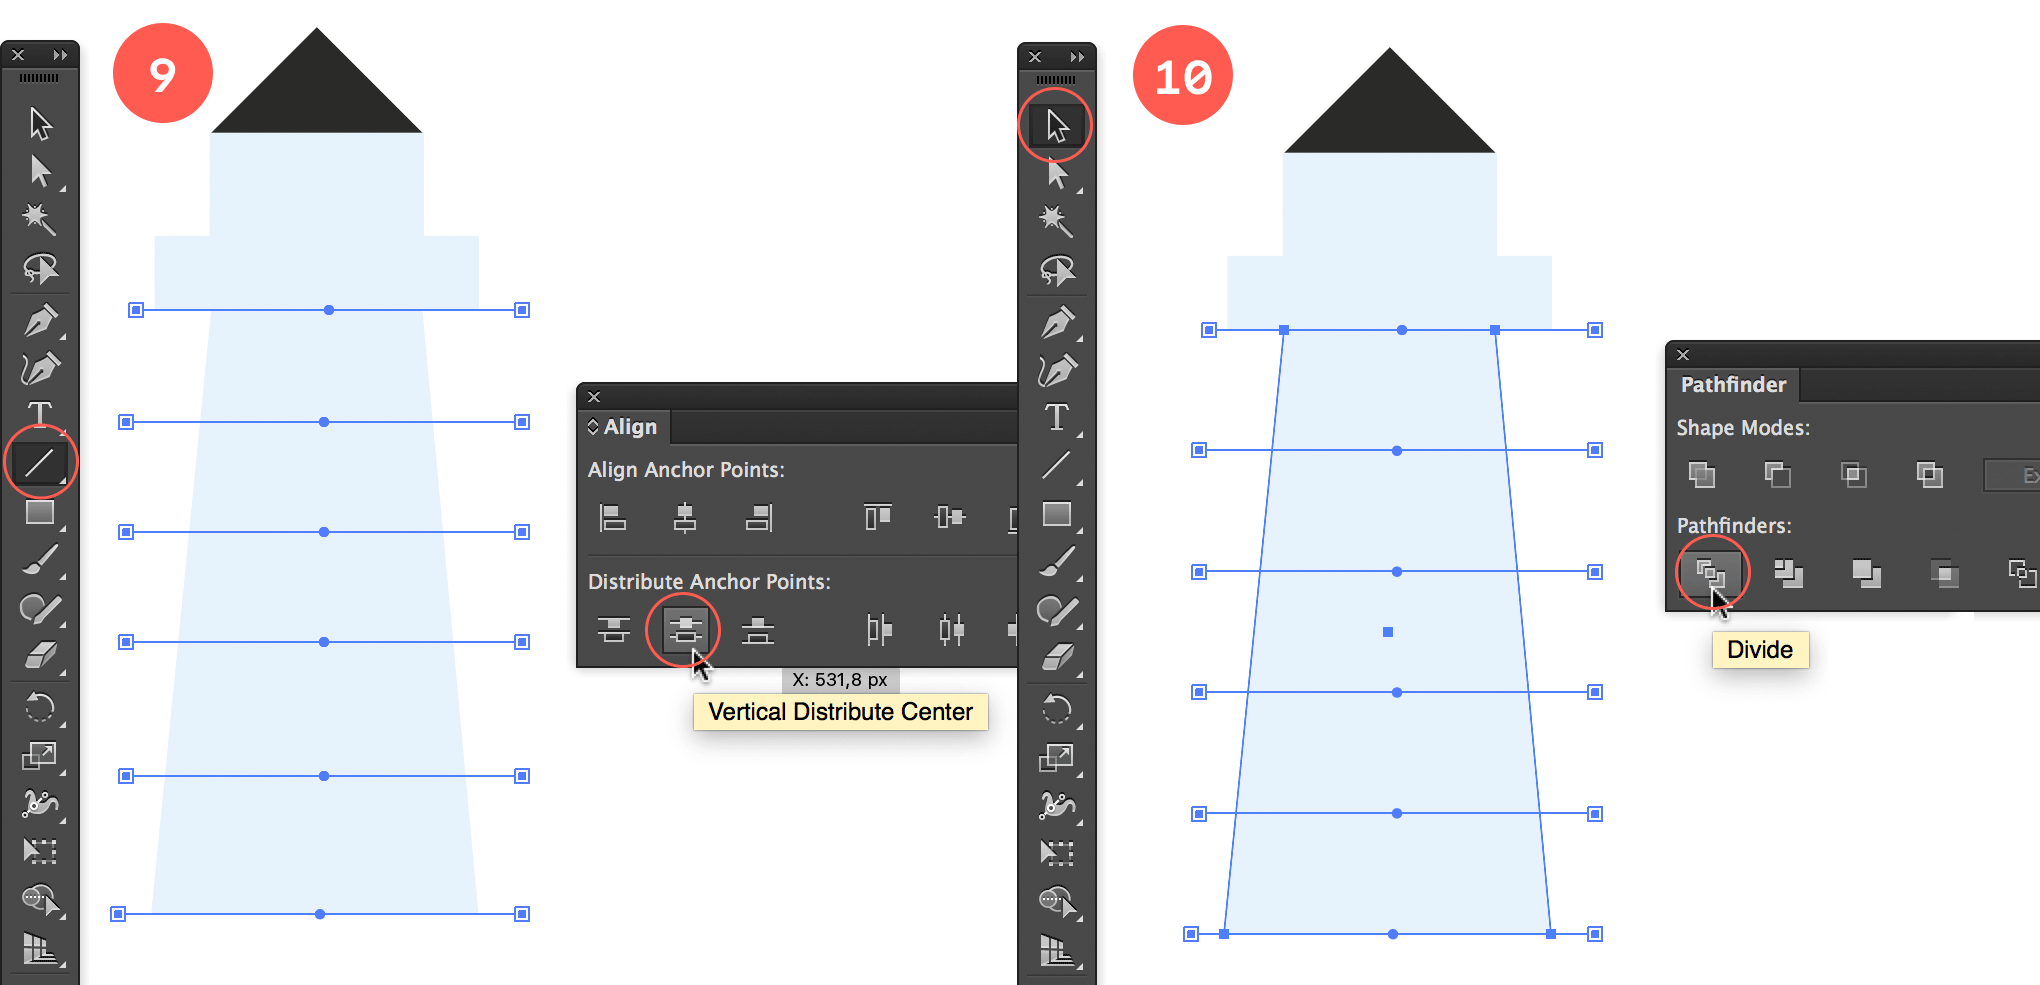
9. Create the Stripes of the Tower
Select the Line tool and draw a horizontal line exactly at the top of the tall (tower) rectangle. Make sure the line is wider than the tower. The Smart Guides feature should give you a clue to align it exactly there. Then draw 4 similar (wide enough) horizontal lines over the vertical length of the tower. Lastly draw a 6th line exactly at the bottom of the tower. Select all 6 lines and select the Vertical Distribute Center option from the Align or Properties panel (or Control bar at the top).
Create the stripes
10. Divide into Pieces
With the 6 lines still selected, select also the vertical tower shape (using the Shift Key), and choose the Divide option from the Pathfinder (or Properties) panel.
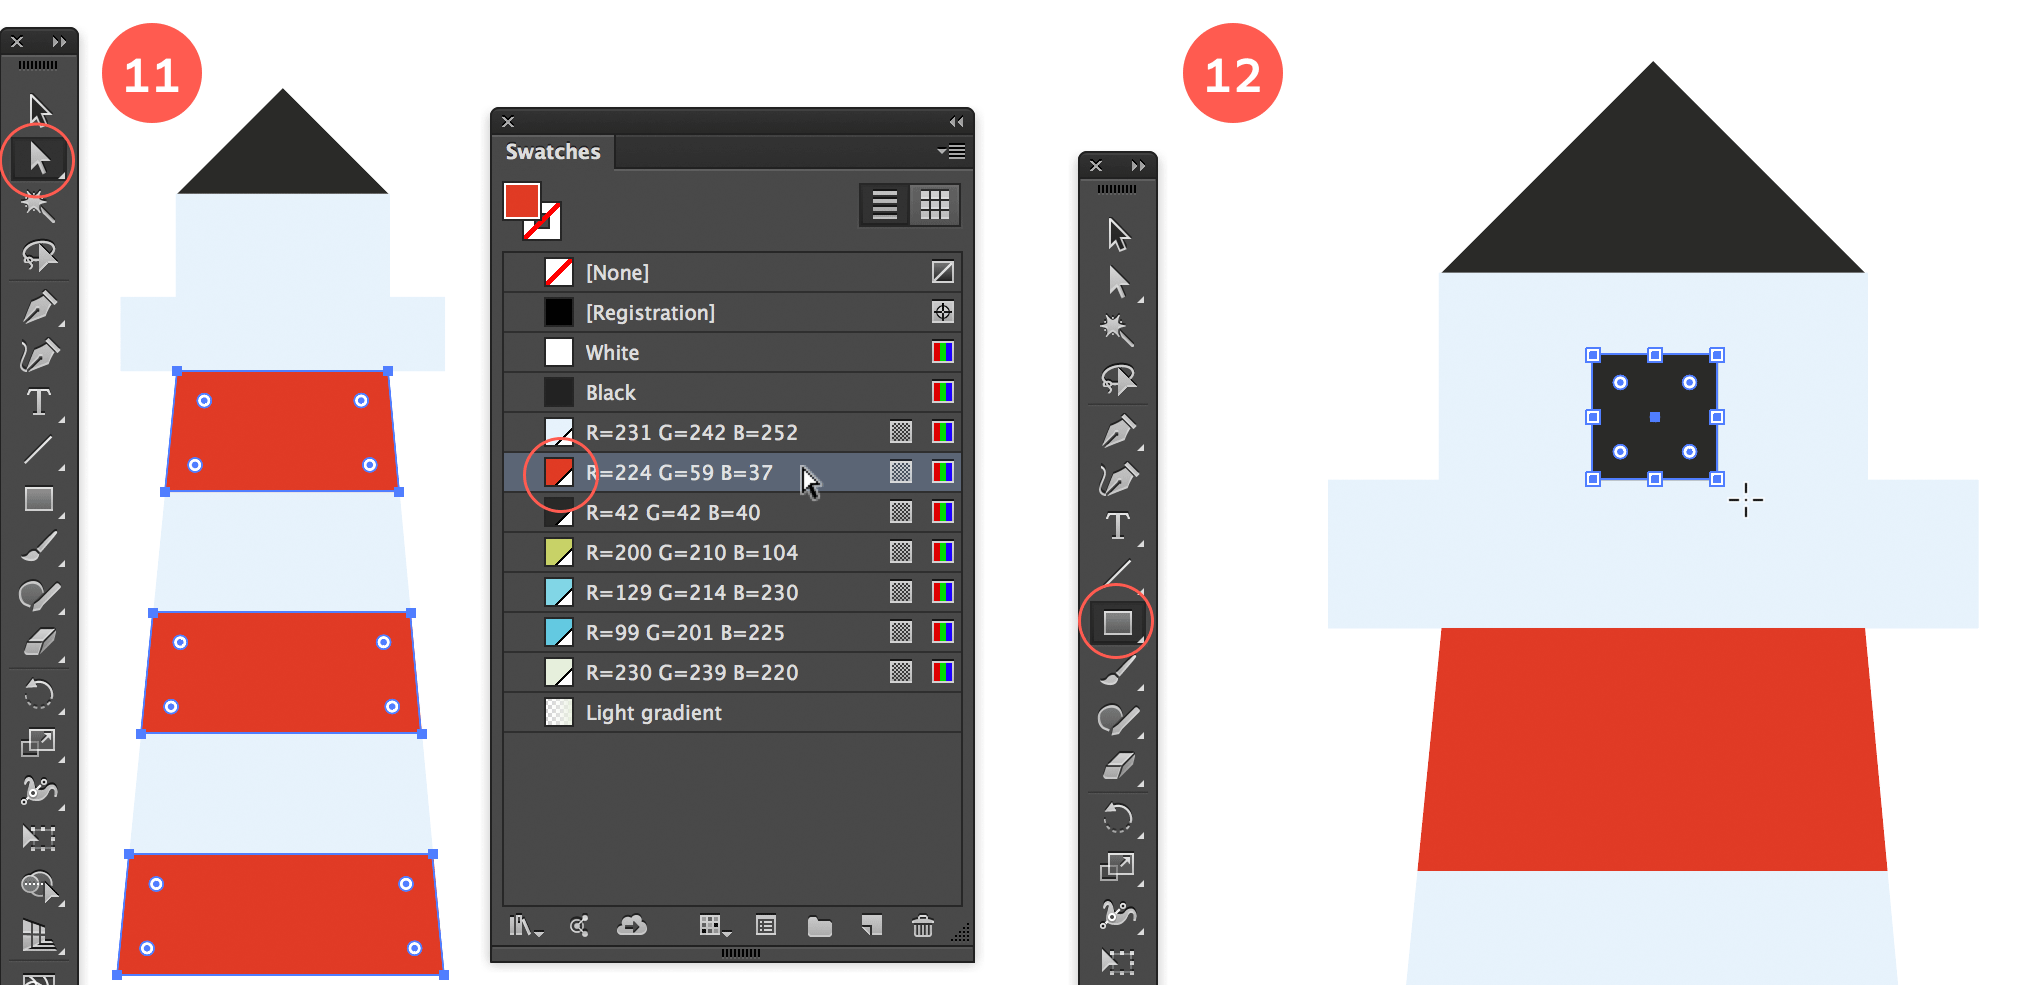
11. Color the Stripes
Use the Direct Selection tool (white arrow) to select the 1st, 3rd and 5th segment of the tower and give it the red fill. To select these shapes, you can also use the Selection tool (black arrow) and go into Isolation Mode, by double clicking the (entire) tower. In Isolation Mode you can then select each segment separately. Click the back arrow at the top left to leave this mode when you're done.
Create color the stripes and the small window
12. Create the Small Tower Window
Select the Rectangle tool again and draw a small square on top of the top most small rectangle of the tower as shown in the image above. Give it the dark black grey color.
13. Horizontal Align Center the Window
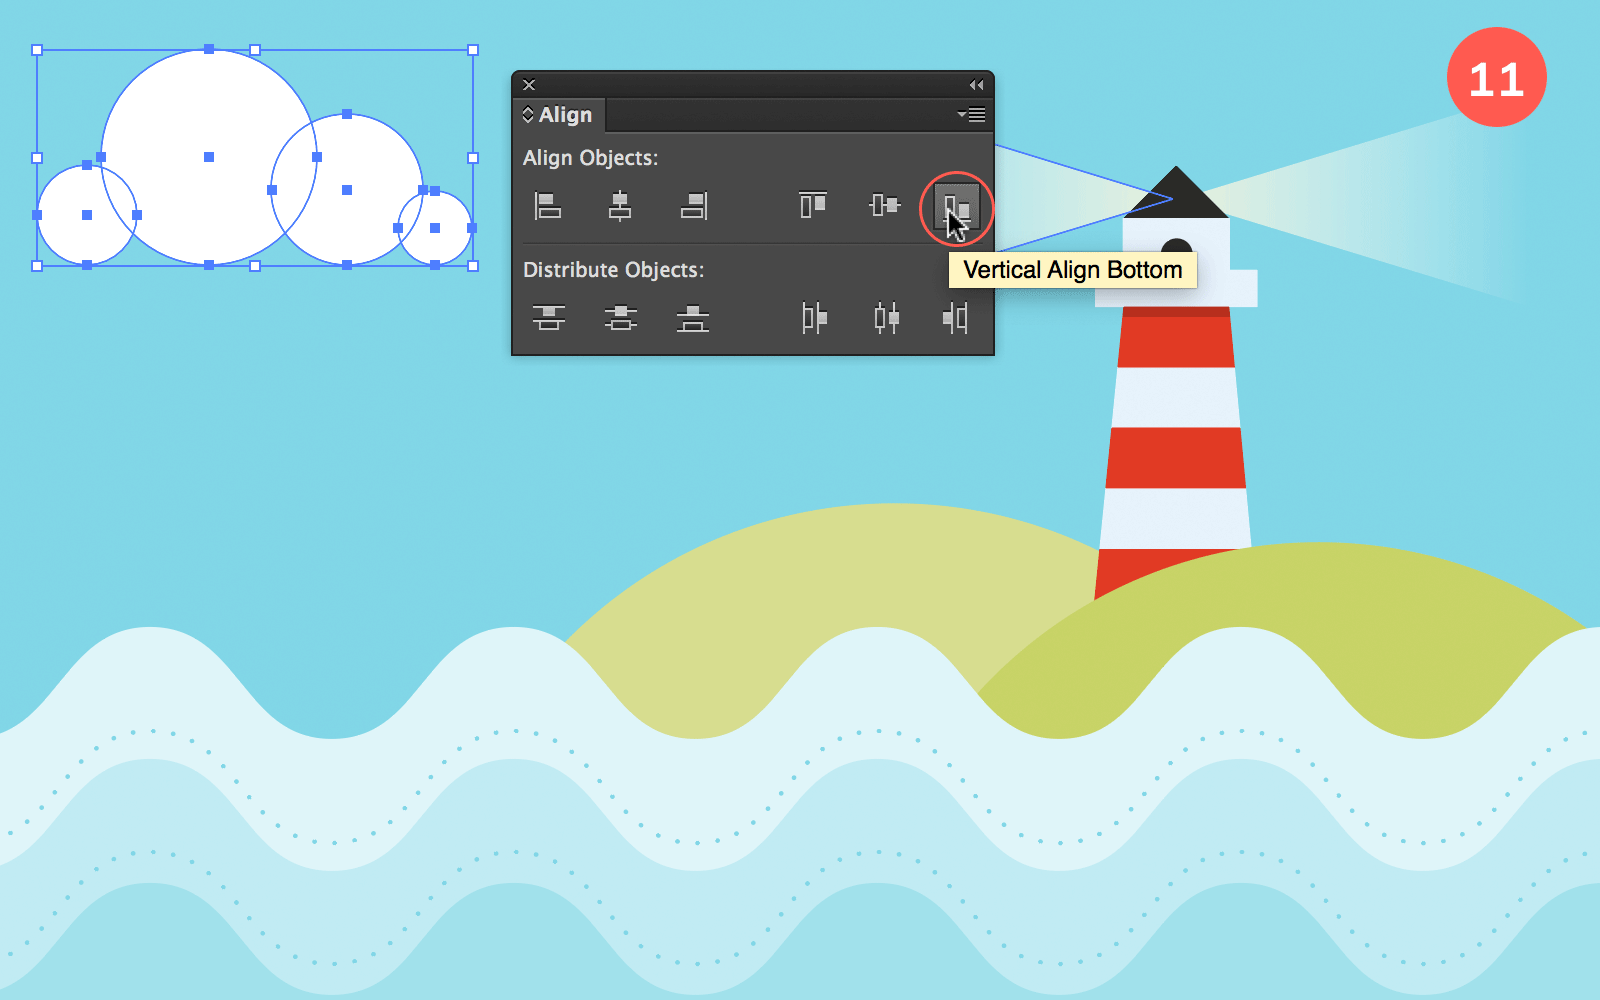
Select both the square and the light blue rectangle below it using the Shift key to select the 2nd object. Release the Shift key and select/click the light blue rectangle again to make it the Key Object (to align to). A tick selection line should appear (as shown in the image below). Choose the Horizontal Align Center option from the Align or Properties panel. Then also choose the Vertical Align Bottom option to be sure it aligns perfectly to the bottom.
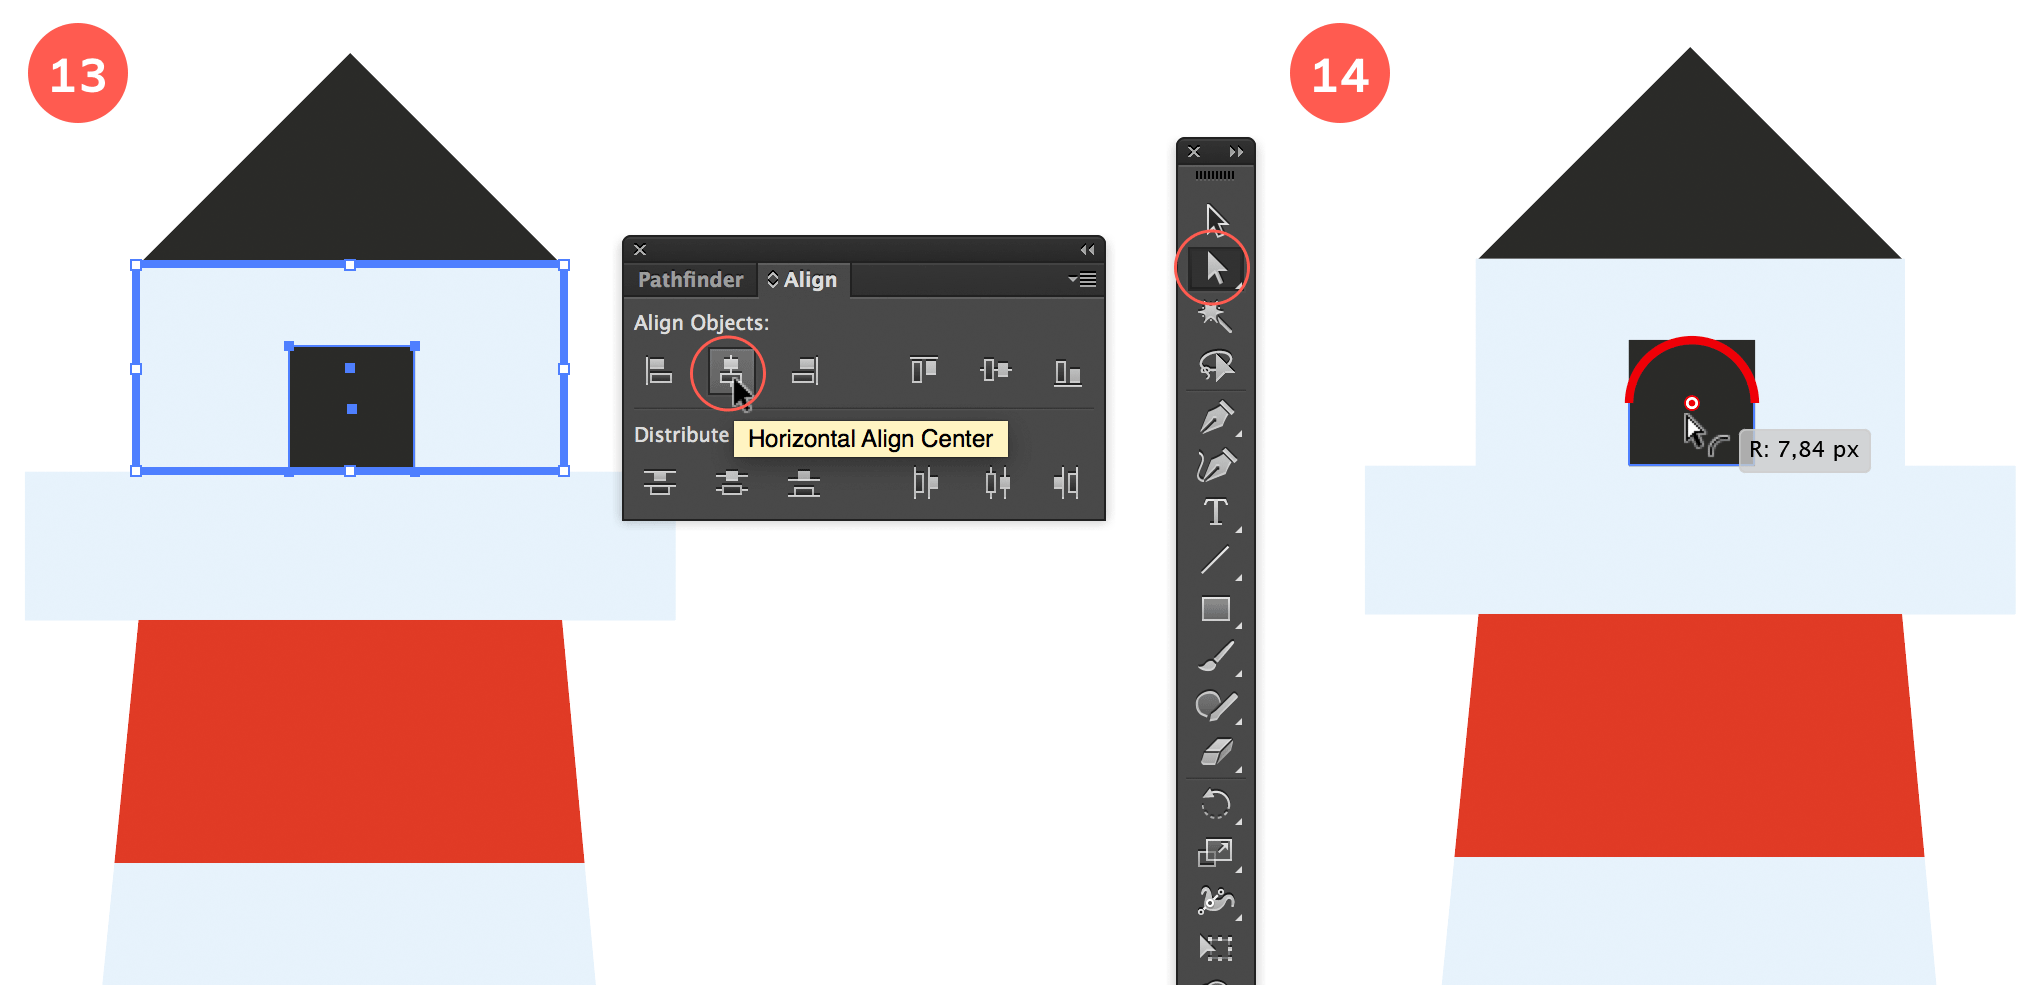
Align the window and make the top round
14. Make the Window's Top Round
Select the Direct Selection tool and select the 2 top anchor points of the square. Drag both anchor points inwards towards the center of the square to make the top part fully rounded.
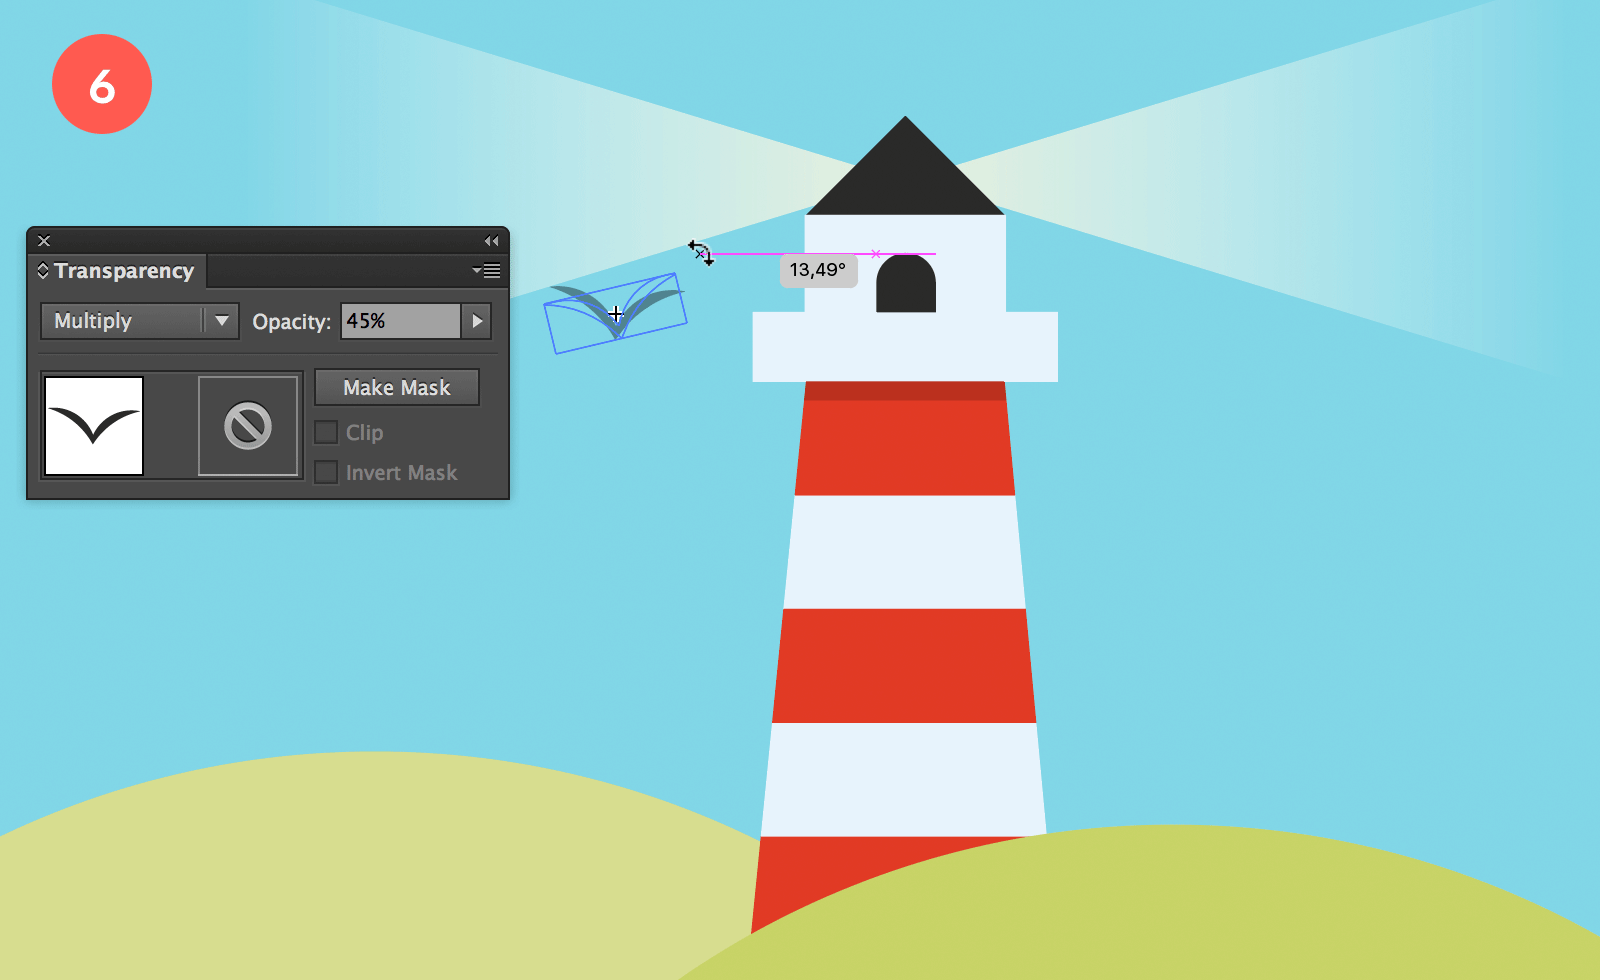
15. Create the Drop Shadow
Now we’ll be creating a subtle drop shadow at the top of the tower. Select the top red shape of the tower and hit Cmd/Ctrl + C to copy it. Then hit Cmd/Ctrl + F to past this shape in front. Give it the black grey color and apply 20% opacity in Multiply mode via the Transparency, Properties or Appearance panel.
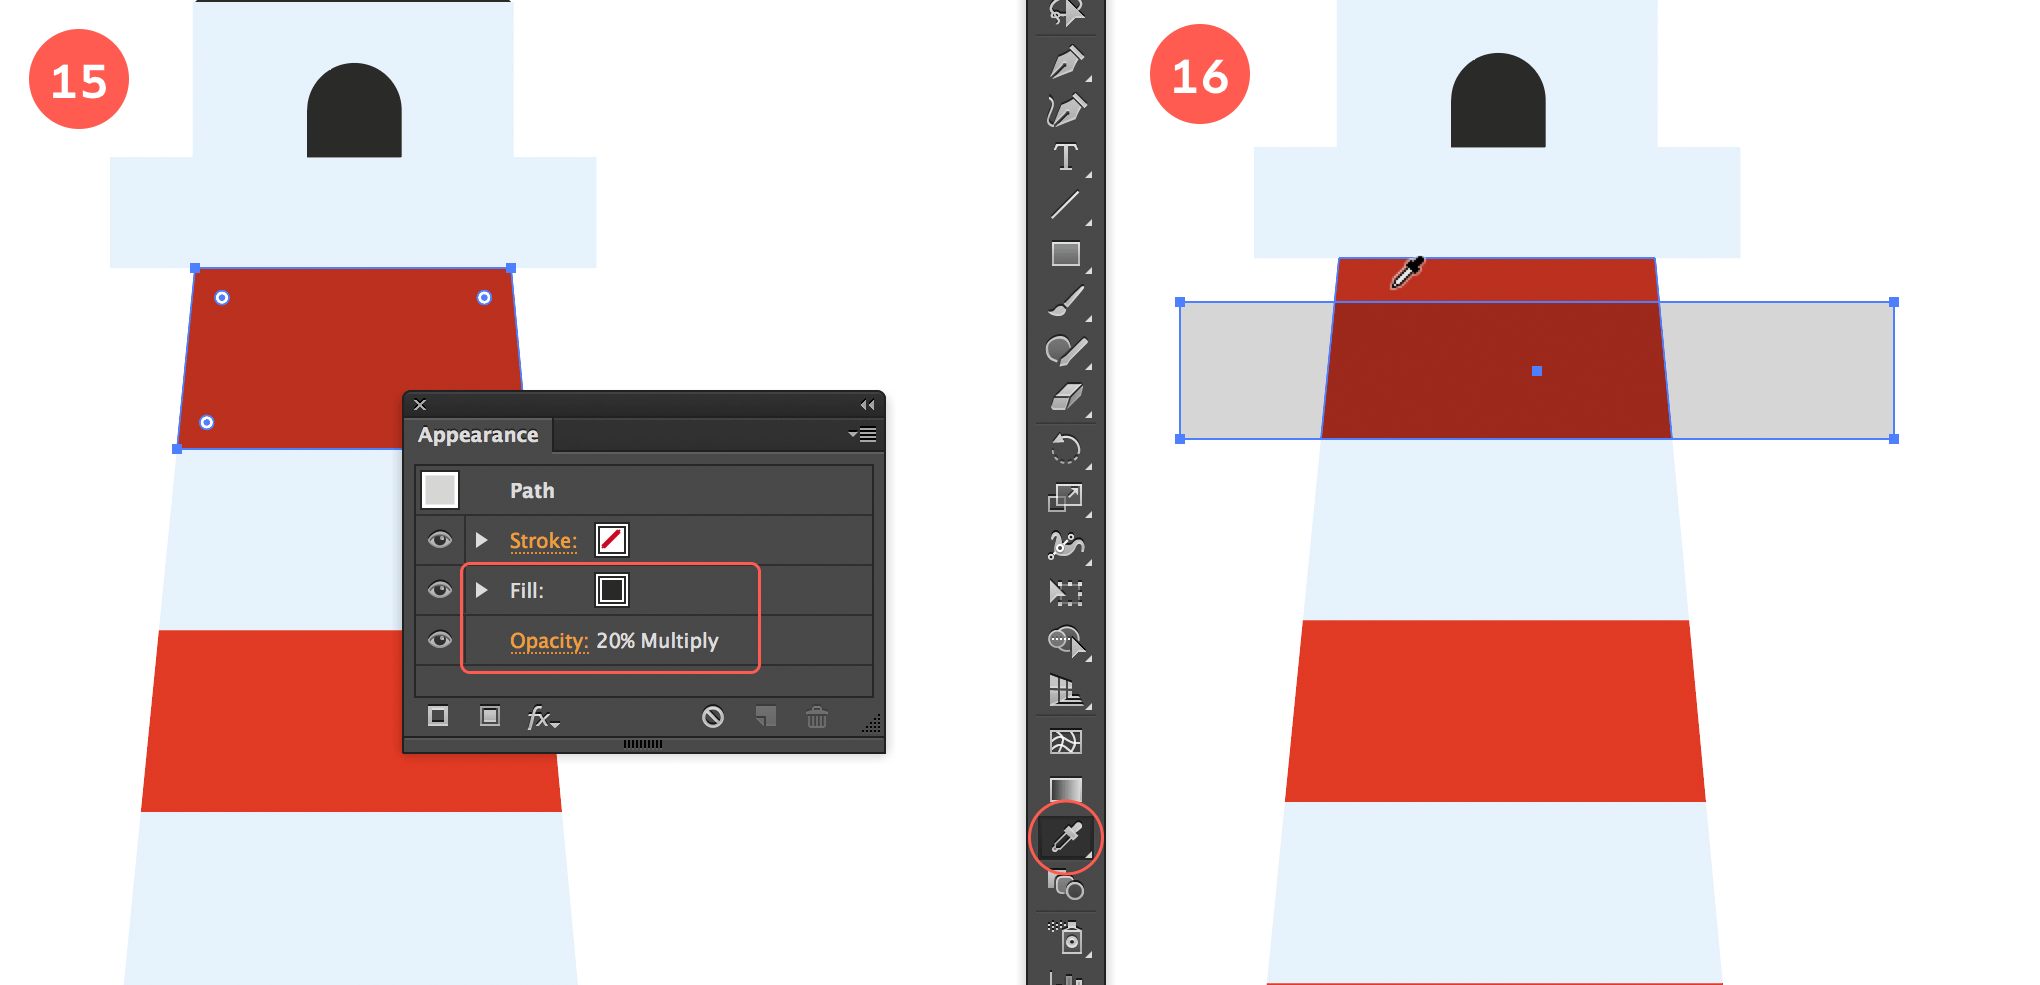
Add drop shadow
16. Apply a Transparent Fill
Draw a wider rectangle on top of the current shape, but a bit lower. The vertical Y position difference is the height of the shadow. Make sure this rectangle also uses the exact same fill: black grey fill with 20% opacity in Multiply mode.
17. Minus Front
Select both shapes, and choose Minus Front from the Pathfinder or via Properties panel.
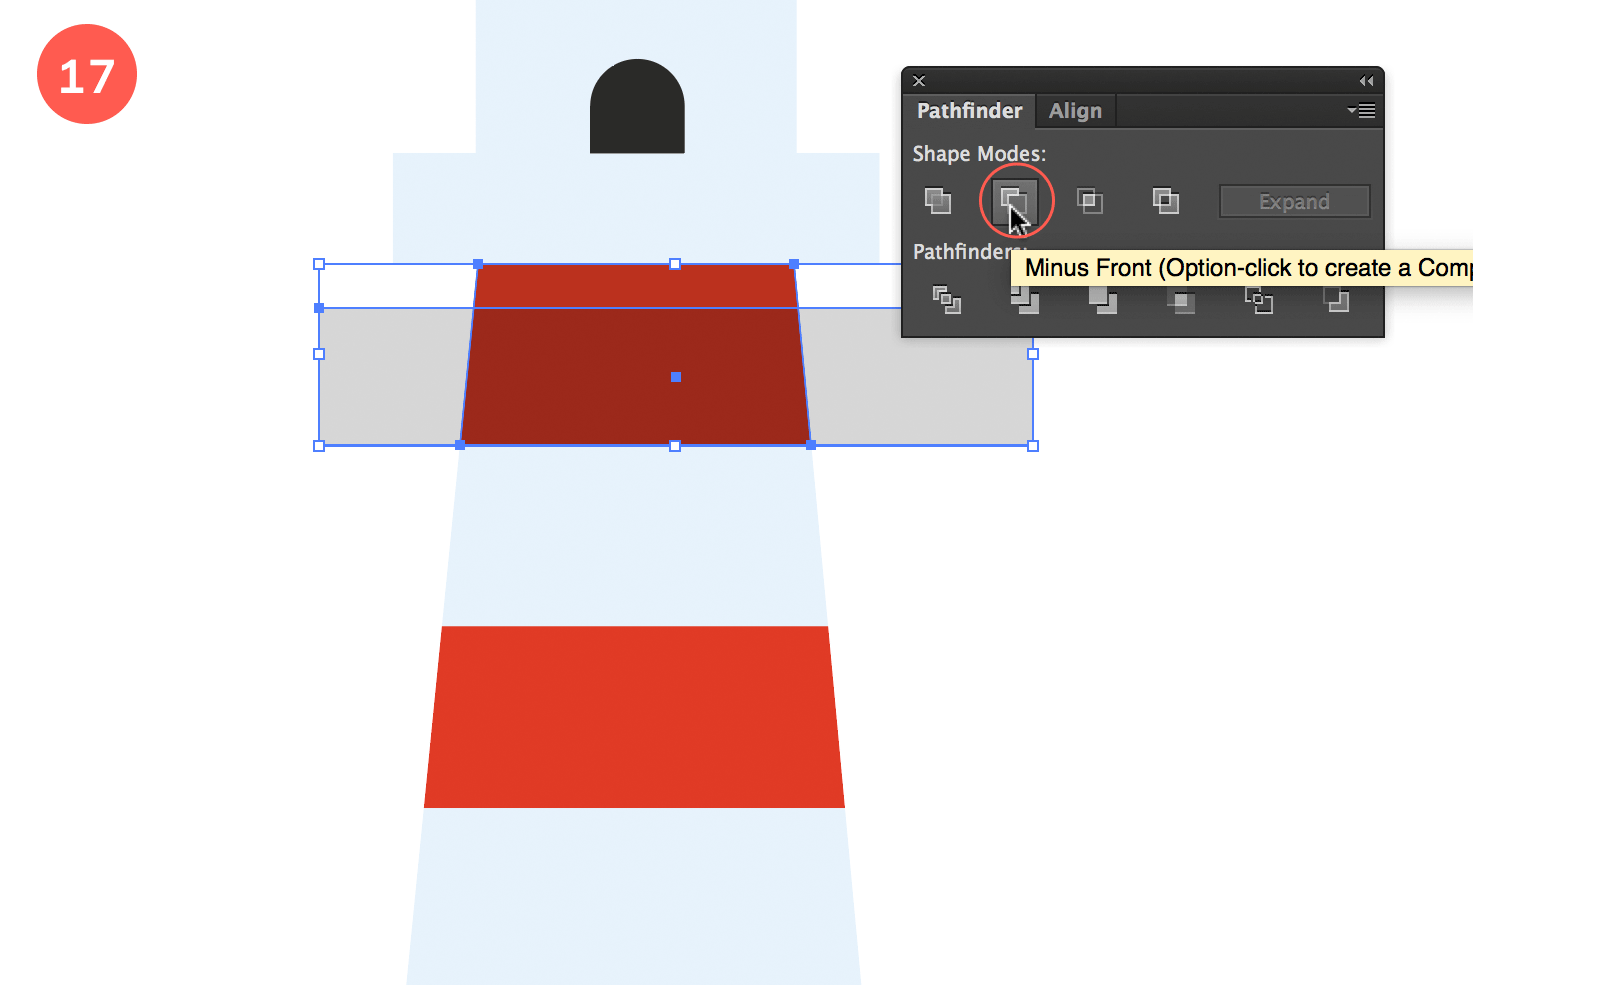
Minus front
18. Draw a Line for the Light Beams
Now we'll create the light beams. Select the Line tool and draw a line to the left of the tower at the top as shown in the image below.

Draw a line
19. Copy Reflect the Line
Make sure the line is selected. Now select the Reflect tool from the Tools bar (located under the Rotation tool, or simply hit the letter O to select this tool), hold down the Alt/Option key and click in anchor point at the top of the tower as shown in the image below. In the Reflect options window that appears, select Horizontal, and hit the Copy button to duplicate the line.
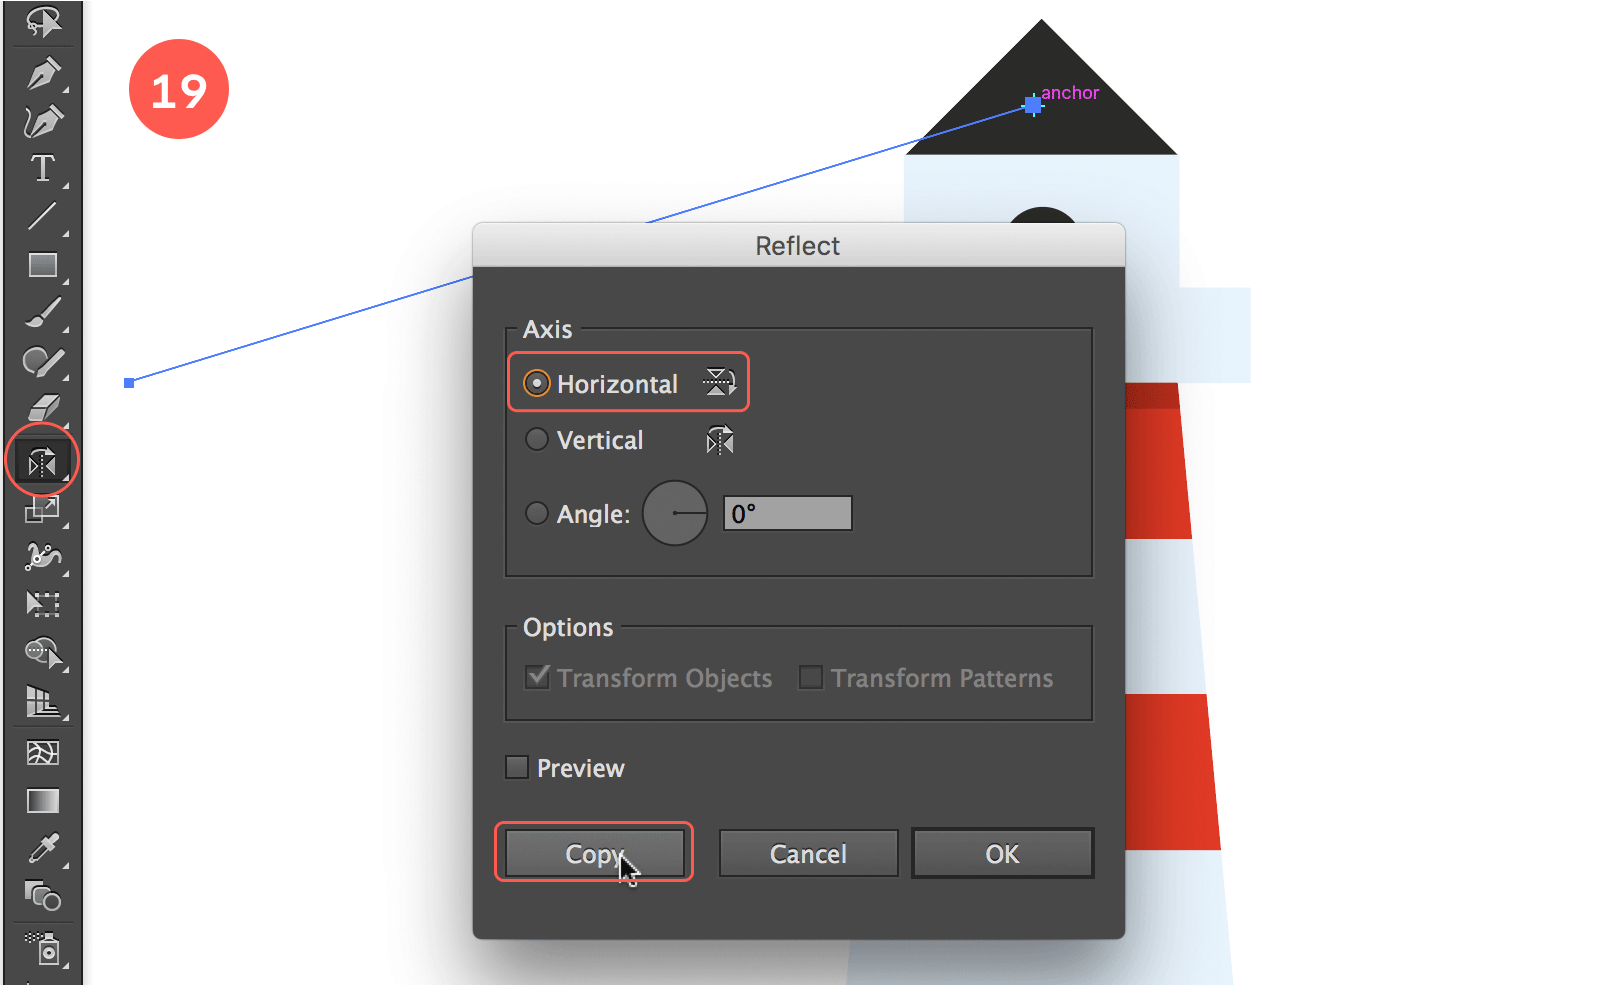
Copy reflect line
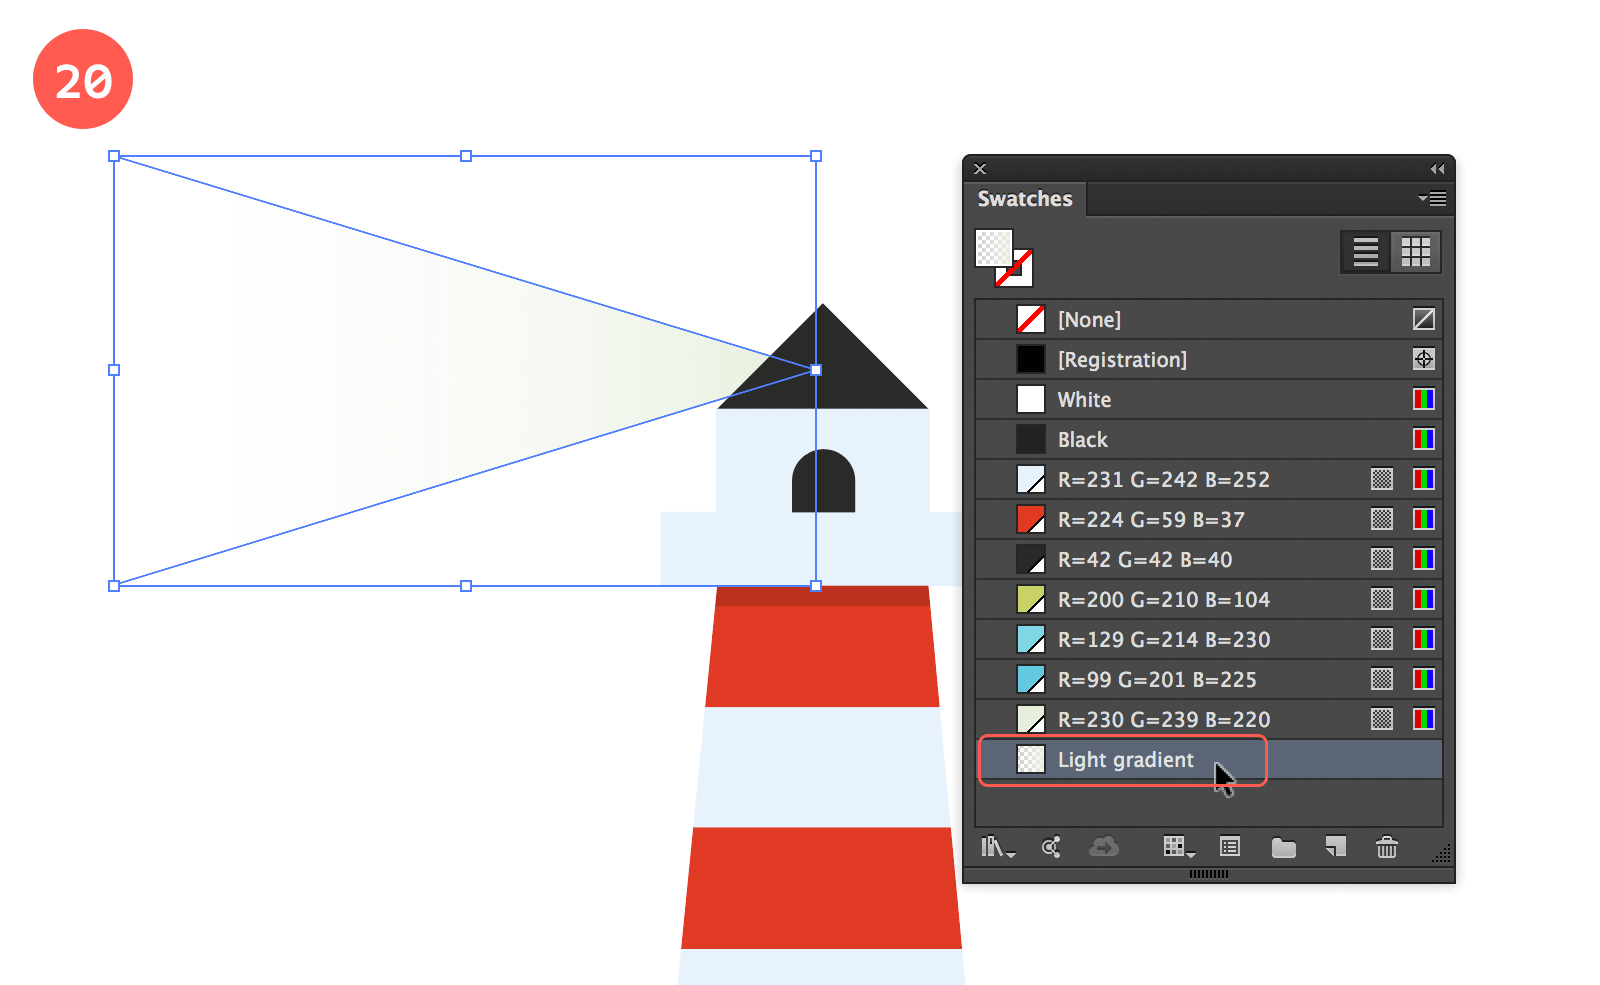
20. Join the Lines and Apply Gradient Fill
With both lines selected, hit Cmd/ctrl + J (Object > Path > Join) twice to join the anchor points on both sides of the lines to close the shape. Give the shape the light yellow gradient fill and go to Object > Arrange > Send to Back, to move the item behind the tower.
Apply gradient fill
21. Copy Reflect the Light Beam
With the item still selected, select the Reflect tool again, hold down the Alt/Option key and click in the center top point of the tower as shown in the image above. In the Reflect window that appears select Vertical and hit the Copy button.
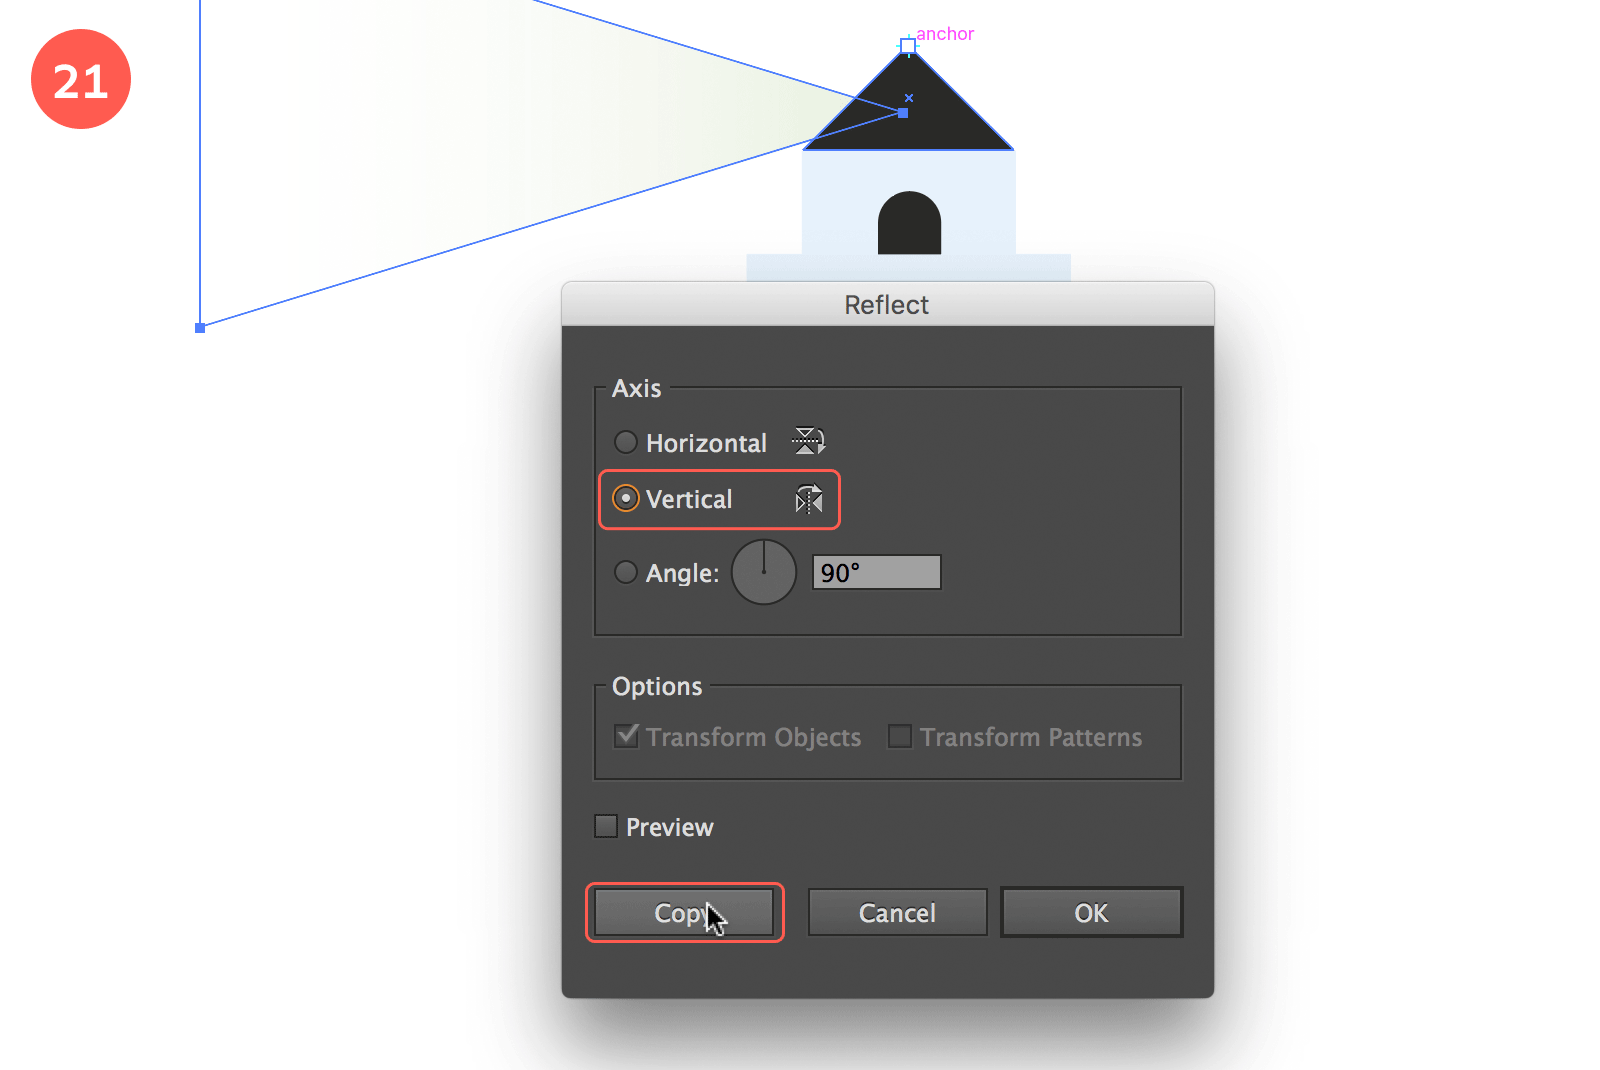
Duplicate the light beam to the other side of the tower
22. Organise the Layers
With this last step we’ve completed the lighthouse tower. Time to organise our file a bit, this way we avoid any possible mess. A well organised file can save you minutes of time in the long run. Select the entire object and hit Cmd/Ctrl + G (Object > Group) to group the shapes together into 1 object. In the Layers panel I’ve already named the layer ‘Illustration’ for you. Now click the little triangle to the left to reveal the objects of this Layer, double click the text and name this group object ‘lighthouse’.
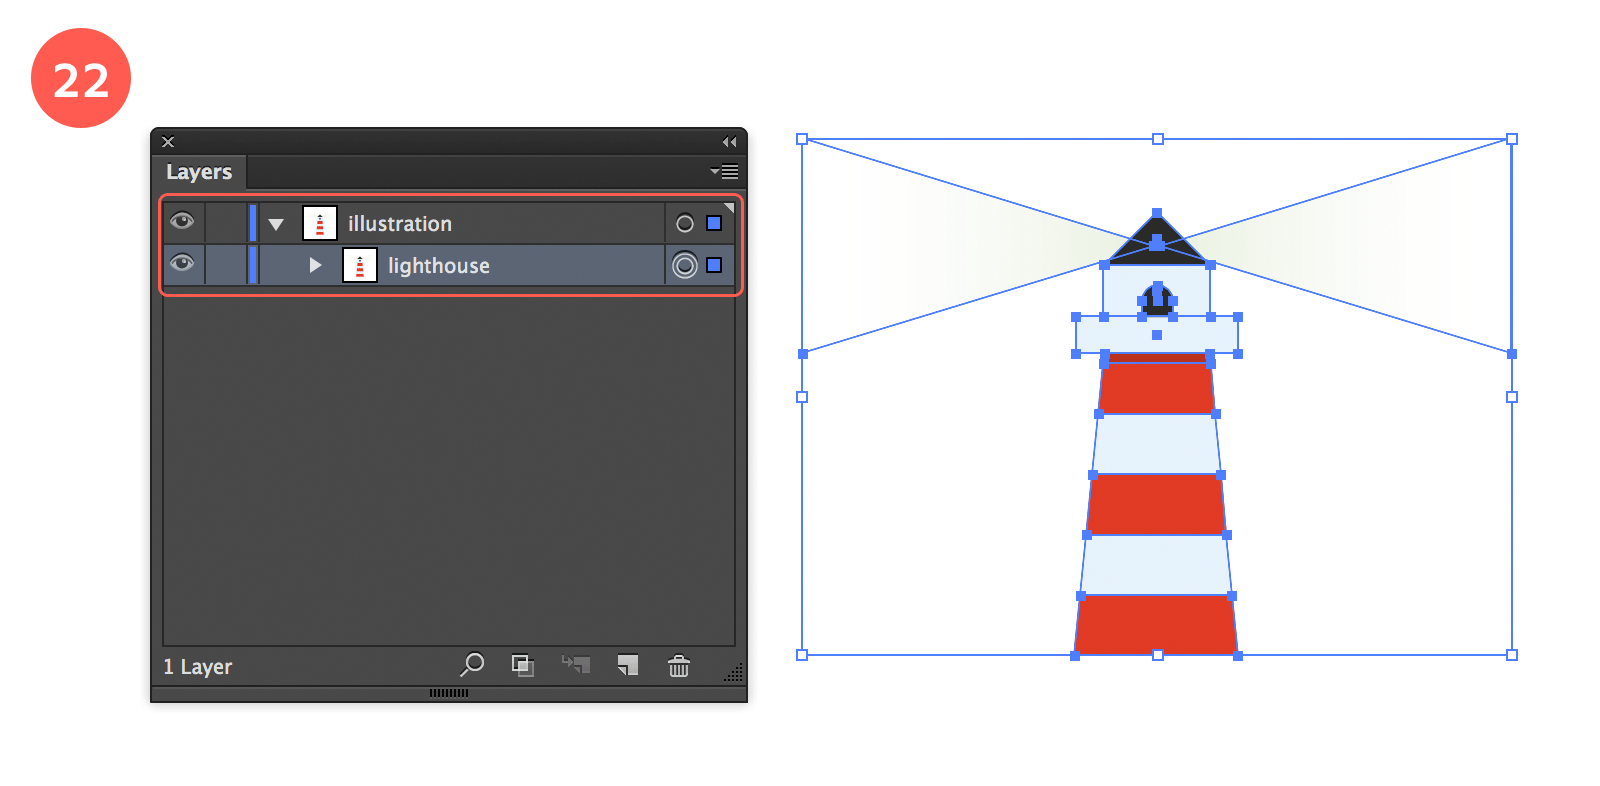
Organize your layers
The Sea
Now let’s move on to the sea and create these nice wavy lines. To get started select the Stroke option at the bottom of the Toolbar or from the Color panel and select the aqua blue color swatch from the Swatches panel. Keep the width of the Stroke to the default 1 pt size. Make sure the Fill option is set to no fill (red diagonal line swatch).
1. Create a Curved Horizontal Line
Now select the Line tool and draw a straight horizontal line from one side of your canvas to the other (holding down the Shift key while dragging), a bit below the lighthouse. With the line selected, go to Effects > Distort & Transform > Zig Zag. In the Zig Zag options window that appears, enter a value of 28 px for the Size, make sure Absolute is selected, and enter 10 for Ridges per segment with Smooth Points selected. Check the Preview option to view the result. If all is well hit the OK button. Next go to Object > Expand Appearance.
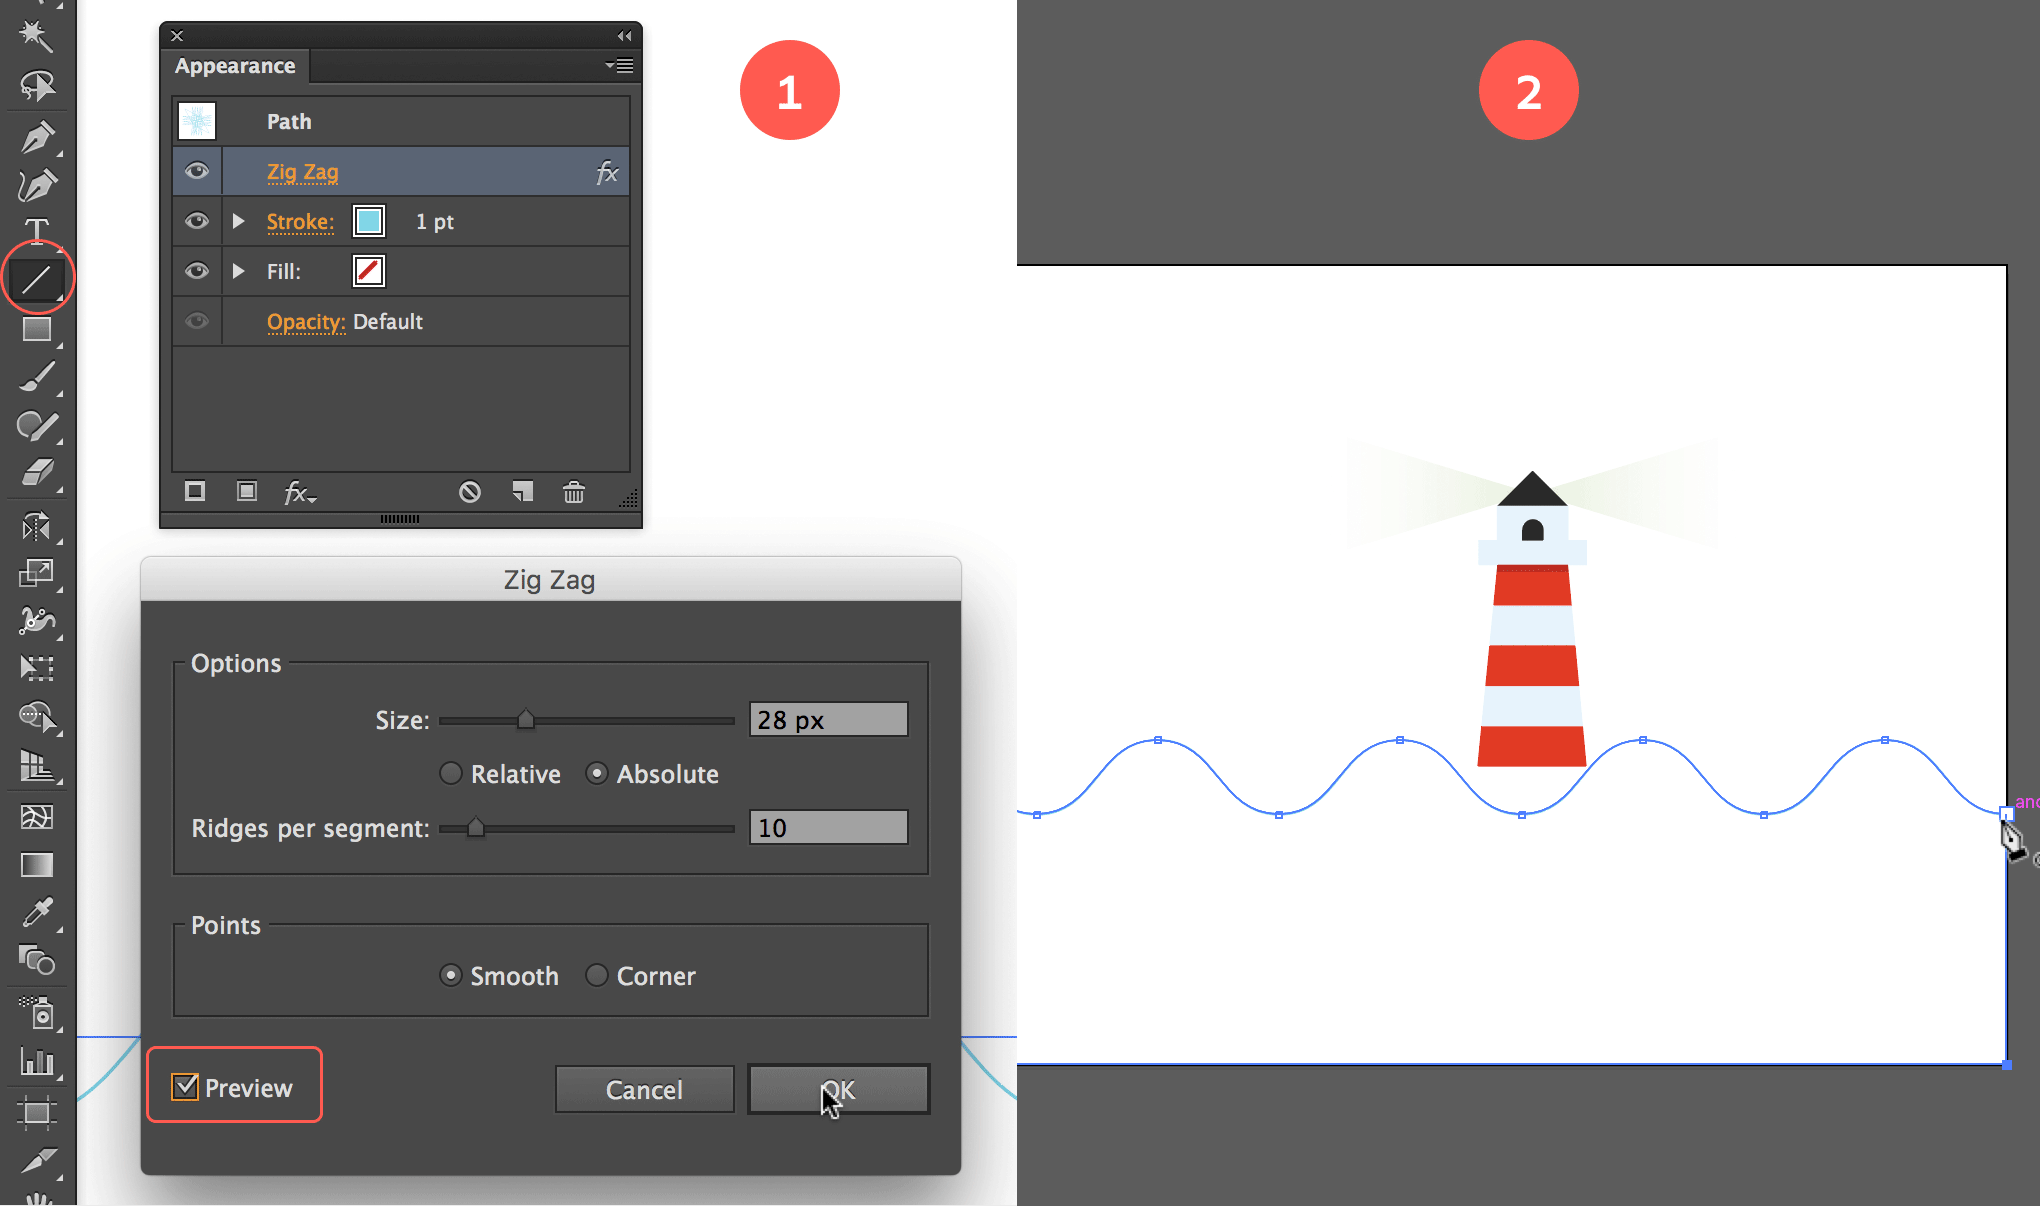
Create a curved horizontal line
2. Close the Sea 'Object'
Before proceeding to the next step. Copy the line via Cmd/Ctrl + C to have it in your memory, as we’ll paste it back in a later phase. Now select the Pen tool and click in the most left anchor point of the line, hold down the Shift Key and click the bottom left corner of your canvas, next click the bottom right one, and close the path by clicking in the right anchor point of the wavy line.
3. Add a Color Fill to the Sea
Next give the shape the aqua blue fill and no stroke. You can easily do this by clicking the Swap arrows right above the stroke and fill swatches at the bottom of the Toolsbar or in the Color panel.
Apply color to the sea
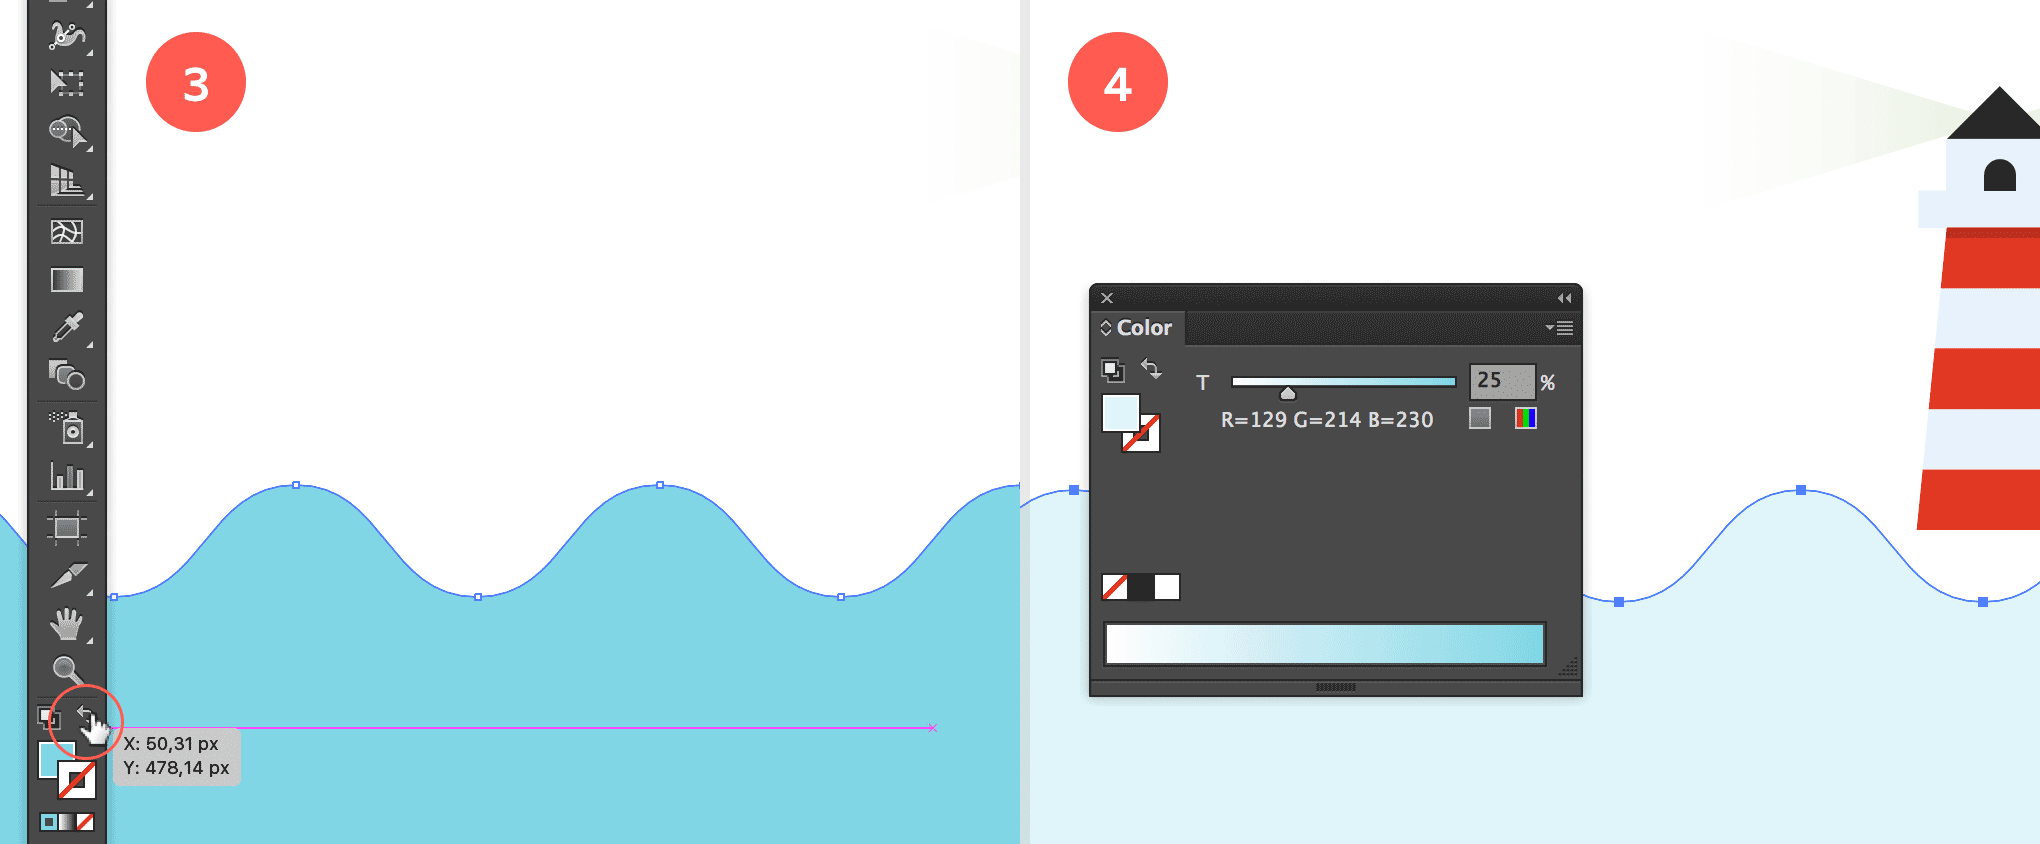
4. Make the Blue Fill Lighter
In the Color panel reduce the fill of the color to 25% as shown in the image above. One of the advantages of using Global Swatches is the possibility of applying only a percentage of the color swatch.
The power of using Global Swatches
Notice the small white triangle at the bottom right of each color swatch in the Swatches panel, plus the grey square to the right? This shows the swatch is a Global Color. If you double click one of the color swatches, you see the details of this color, showing its values and the color mode (RGB, CMYK, Pantone…). There is also an option called 'Global'. All the swatches I've created have this option checked. The advantage of using Global Swatches is that when you modify its color values, all objects using that swatch will automatically be updated into this new color. It makes a color more powerful, as you can save a lot of of time when trying to find the right color. If you decide the red in the illustration is a bit too cherry and it should be more like coral or orange, simply double click the swatch, change its values and all objects where this color is applied to will be automatically updated. It's also handy to check the preview option while moving the sliders and see your illustration change while doing so. Perfect for color experimentation! So here is my tip to you : use it whenever you can!
5. Duplicate Shape & Apply Fill
Select the sea shape, click drag the shape a bit downwards (as shown in the image below), while you start dragging hold down the Shift and Option/Alt key. Then first release the mouse and then the keys. Go to the Color panel and move the slider of the fill towards 50%. Now repeat the same step : select this new shape and start dragging the shape a bit downwards again while holding down the Shift + Alt/Option keys. Again make sure to release the mouse first and then the keys. Now apply 75% as color fill.
Add more depth and styling to the sea
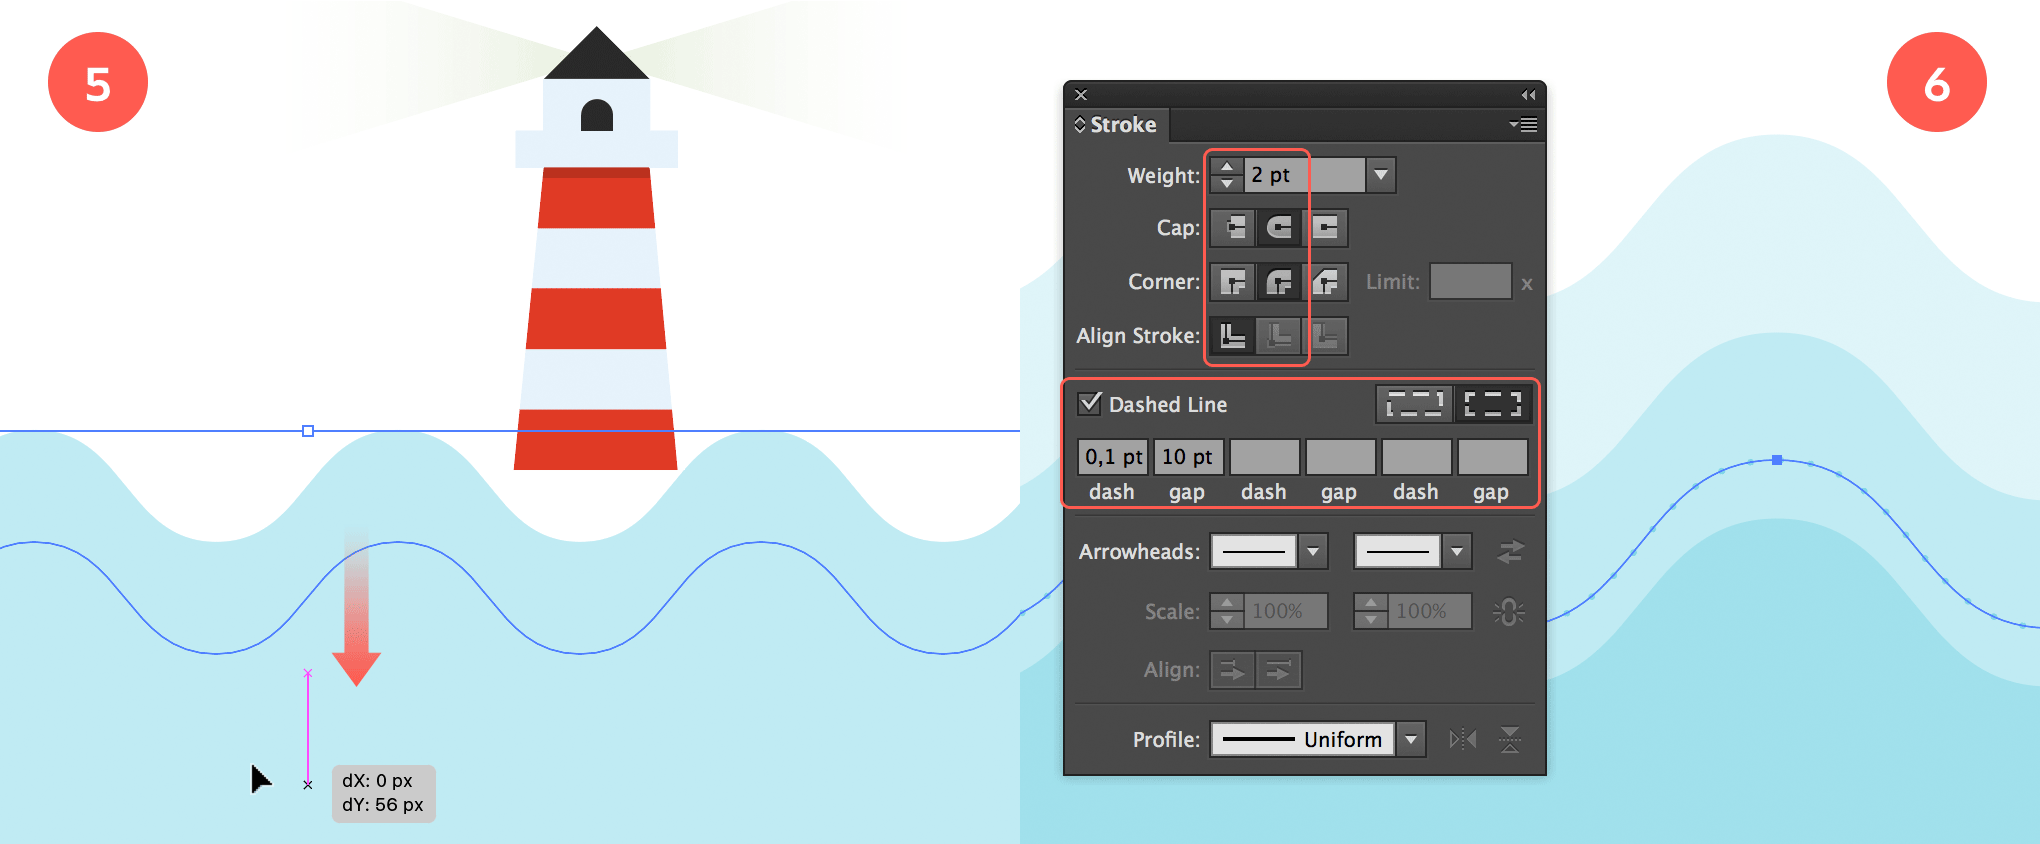
6. Add More Styling to the Sea
Hit Cmd/Ctrl + F to paste the wavy line (in front) that should have still been in your copy memory. Grab the object and move it a bit down while holding down the Shift key to make sure you move it perfectly vertical. Move the line a little bit above the bottom wavy shape as shown in the image above. Go to the Stroke panel and choose 2pt as Weight. Choose a round Cap and a round Corner, and select the Dashed Line option. Add 0,1 pt (or 0.1 depending on your decimal settings) for dash value and 10pt for gap value. With the dotted line still selected, drag it upwards right above the middle wavy shape, while holding down the Shift and Option/Alt keys, to duplicate the line. Again, when your line is in position, make sure to first release the mouse then the keys.
7. Organize Layers by Grouping Objects
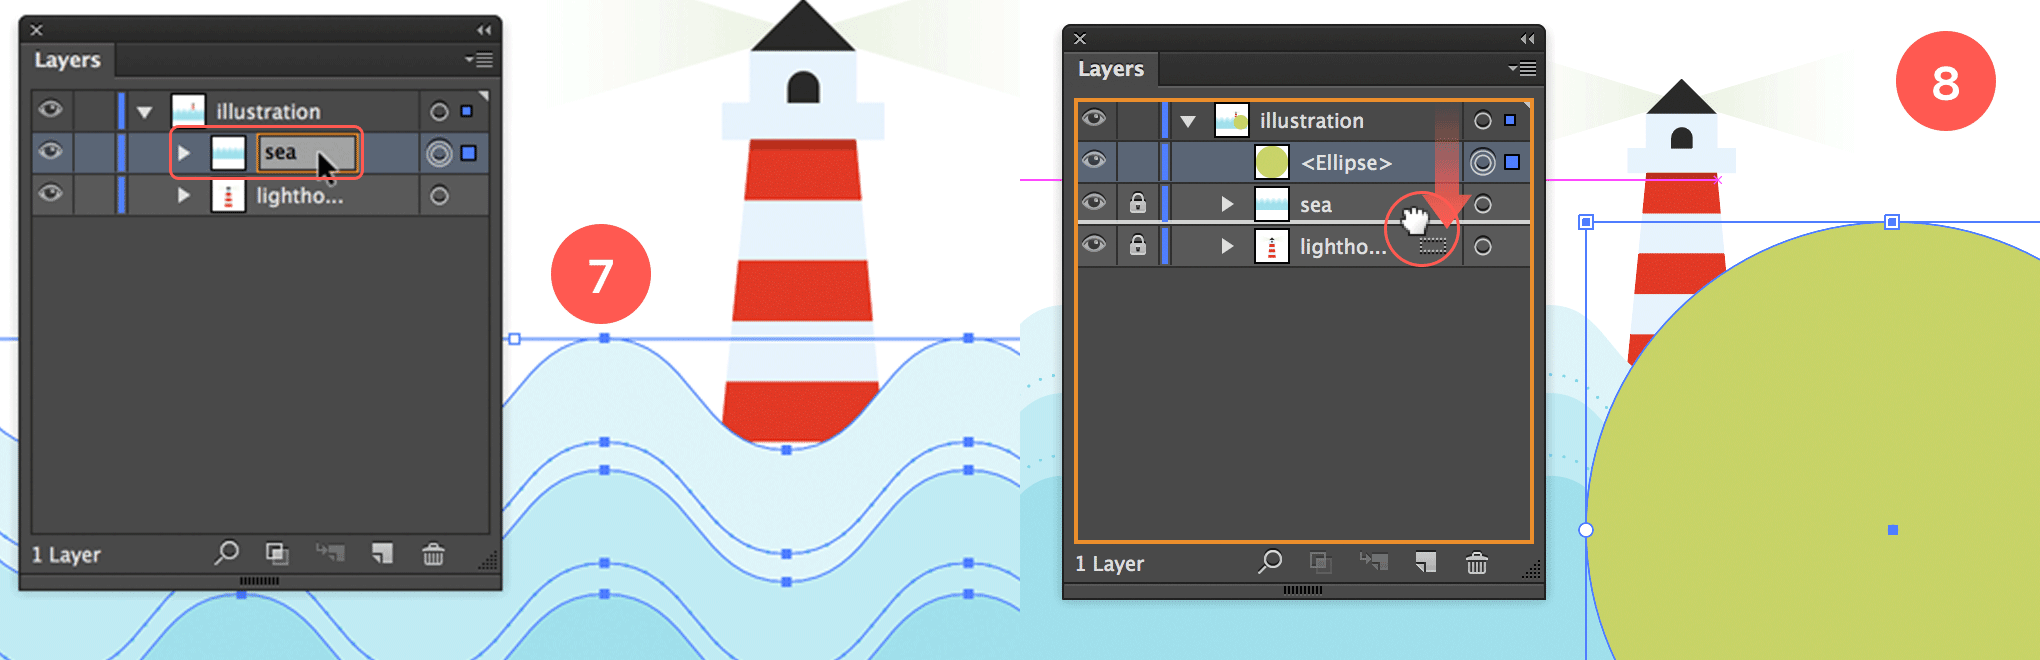
The sea is finished, so we repeat the same steps as we did with the lighthouse. Select all the wavy shapes, group them into 1 object by hitting Cmd/Ctrl + G. Then in the Layers panel, name the grouped object ‘sea’. Now on to the next item of our illustration: land!
The Land
For the creation of the land we also use a basic shape tool, the Ellipse. We will be creating 2 simple hills using 2 circles. The lighthouse needs to appear in between 2 hills. We’ll create a 1st hill above (in stacking order that is) the lighthouse. This one is positioned to the right of the lighthouse, and a 2nd one below the lighthouse (again, 'stacking orderly' speaking) which appears to the left of the lighthouse.
First select the green swatch as your color fill and make sure stroke is set to none.
Organize the layers, then draw a green circle for the land
8. Draw a Green Circle & Move into Place
Draw a rather big circle (by holding down the Shift key) to the right of the lighthouse as shown in the image above. Since the land needs to go behind the sea, go to the Layers panel, grab the Ellipse object layer and drag it below the sea object.
9. Duplicate Green Circle & Apply Fill
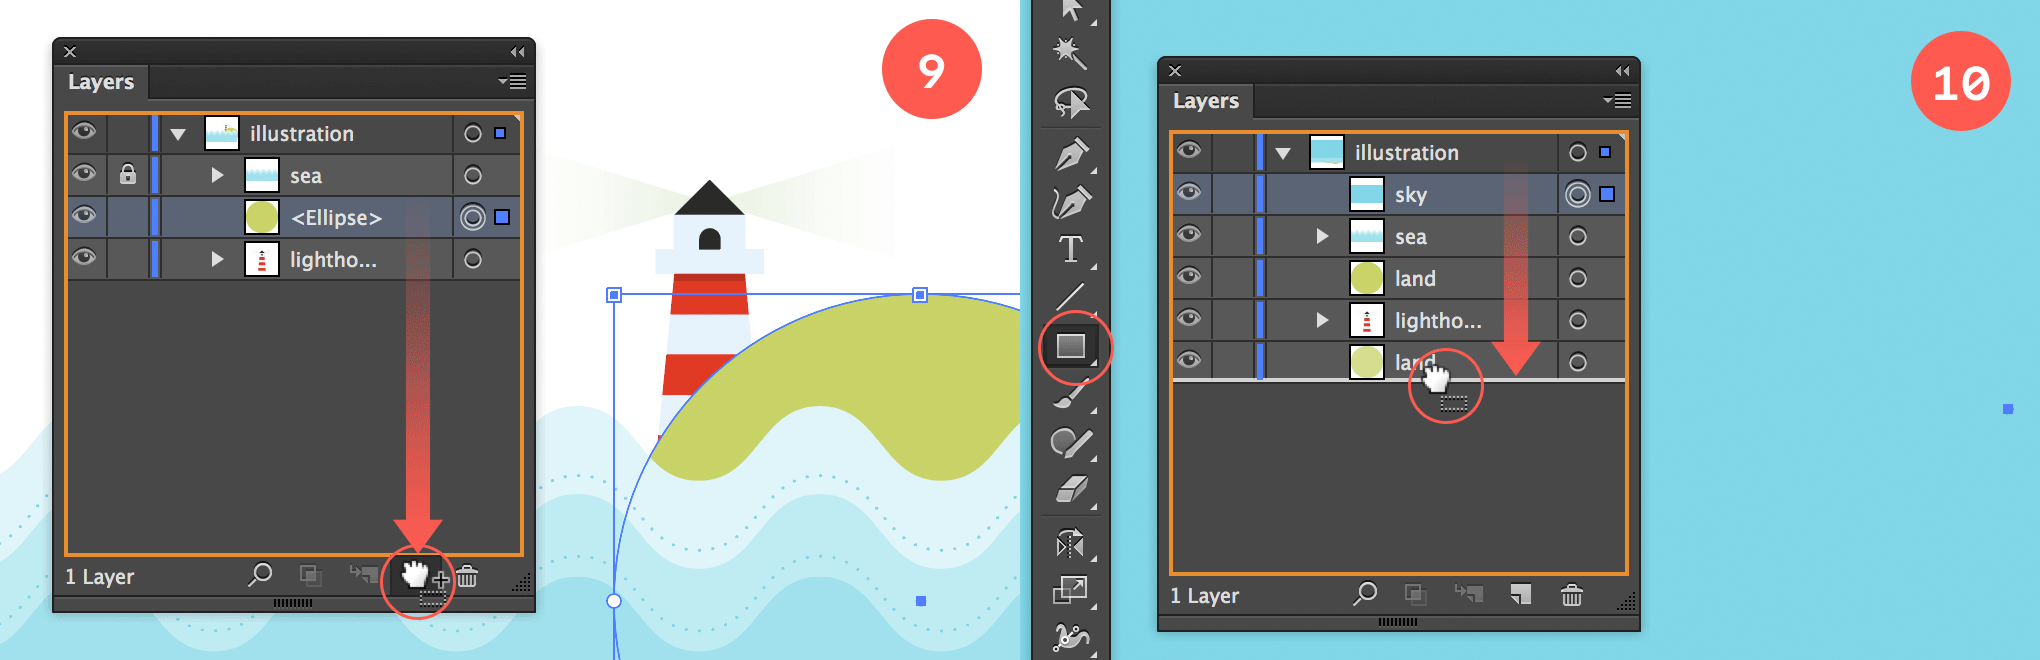
Move the circle (or the lighthouse) in place if needed. The lighthouse should be aligned to the left of the land, and the land should be aligned with the right side of your canvas. Now drag the Ellipse object in the Layers panel onto the New Layer icon at the bottom of the panel to duplicate this object. Move the new circle to the right of the lighthouse and apply 75% of the green swatch.
Now move the Ellipse object below the lighthouse object in the Layers panel. This way the lighthouse appears in between both hills. You can name each Ellipse object in the Layers panel 'land' or maybe 'hill' if you like.
Duplicate green circle, move into place & apply fill
The Sky
Next item to be drawn is the sky, which includes the creation of clouds. Again this is done in a very simple and easy way using basic shapes in combination with aligning and using a Pathfinder option. Before you get started, it might be best to lock the object layers of the other items. Go to the Layers panel and click into the 'empty' squared area to the right of the eye icon of the land (or hills) objects, the sea and the lighthouse to lock each one. Then to move on to the sky, select the blue color swatch as fill and set the stroke to none.
11. Create the Sky Object and Move it into Place
Grab the Rectangle tool and draw a rectangle the size of your canvas. In the Layers panel name the object 'sky', select it and move it all the way to the bottom of the stack.
12. Create a Cloud
Choose white as fill and set the stroke to none. Select the Ellipse tool and draw a couple of slightly overlapping circles as shown in the image above for the creation of a cloud. Draw 3 or 4 circles with a big one somewhere towards the middle. Select all circles and align them vertically at the bottom via the Align panel (or Properties or Control bar).
Align the circles of the cloud
12. Finish the Cloud
Now select the Rectangle tool and draw a rectangle box right on top of the bottom area to close or to fill this area up. Smart Guides should be your help on where exactly this rectangle should be placed. If you don’t get it right from the start you can use the handlebars of the rectangle to tweak the size and position. The rectangle should be perfectly aligned to the bottom of the circles. The bottom left and right side corners should be aligned to the bottom anchor point of the outer left and outer right circle. If you end up with small gaps still, than you can draw other (white) rectangle(s) on top.
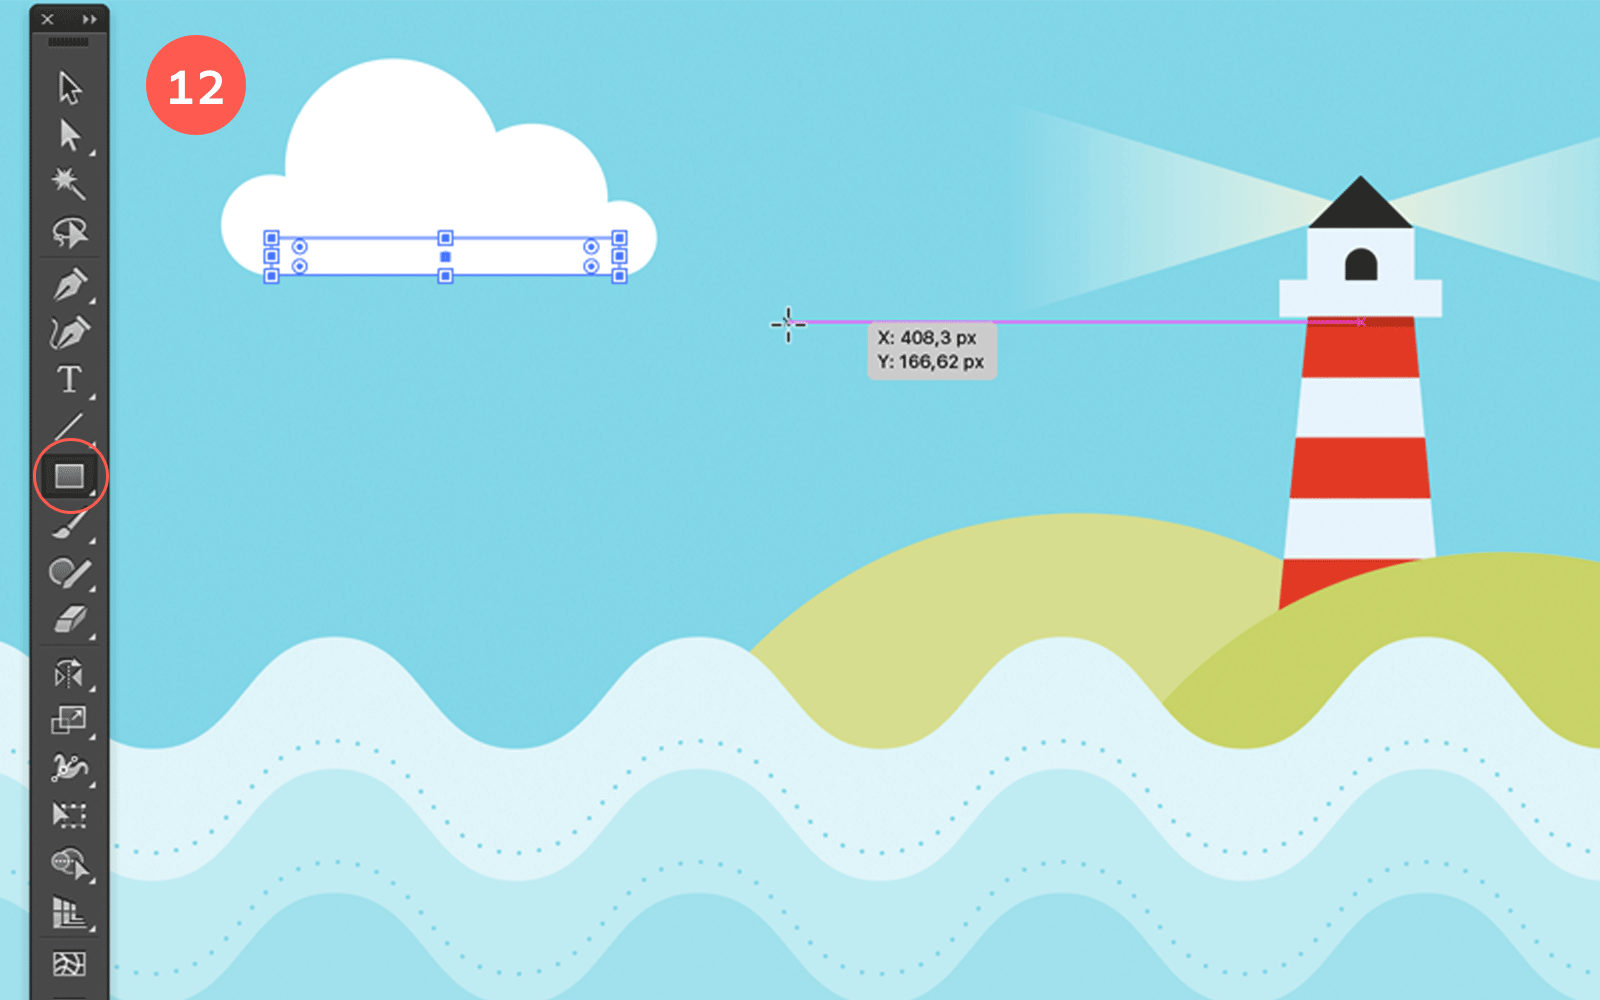
Finish the cloud
13. Unite the Shapes
Select all shapes, go to the Pathfinder and choose Unite from the Pathfinder (or Properties) panel. BTW, this can also be easily done using the Shape Builder tool, which you'll apply in a later step when we create the birds.
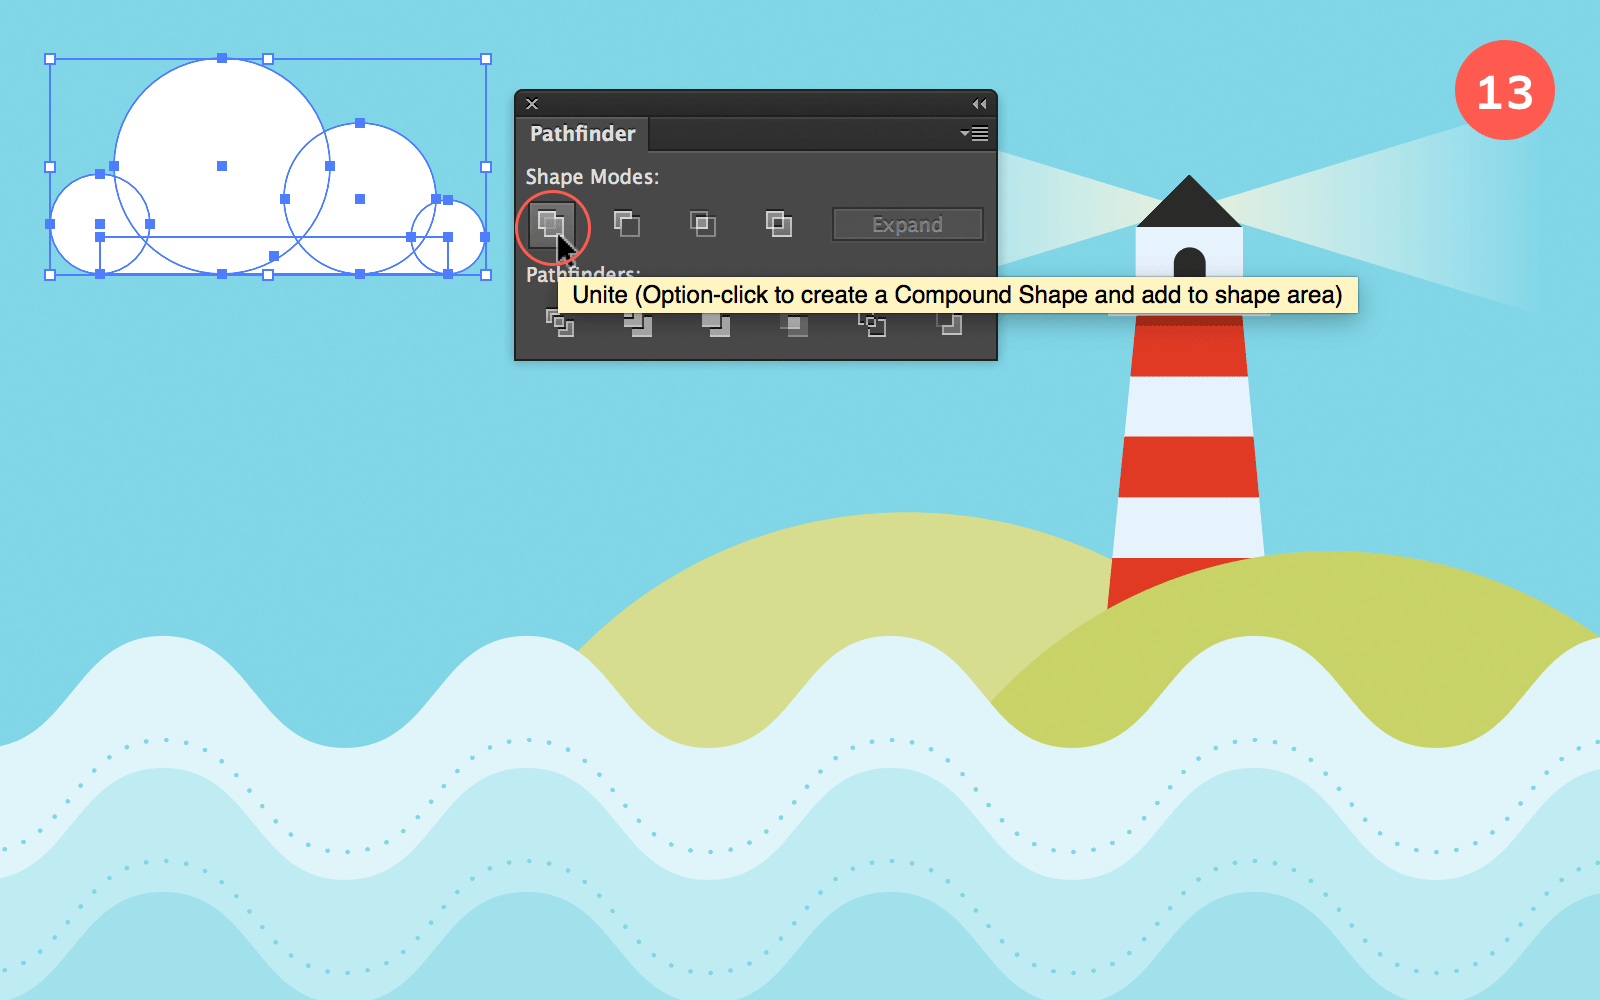
Unite the Shapes into 1 Cloud Object
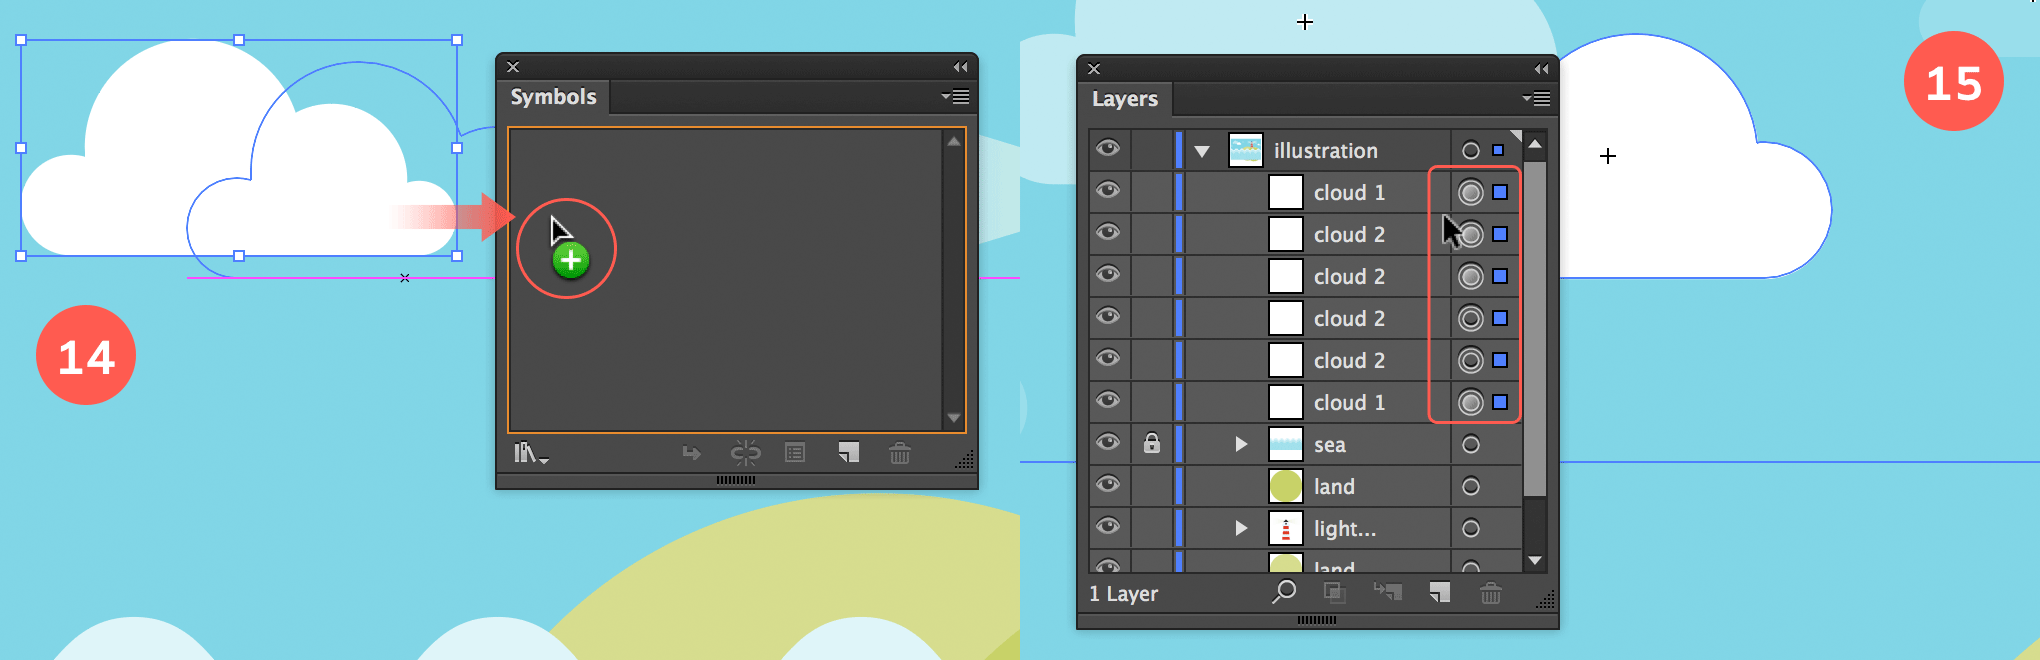
14. Create Cloud Symbol & Reuse It
Since we’re going to add more than 1 cloud, drag the object into the Symbols panel to create a symbol. Name the object ‘cloud 1’. Now create another cloud using the same steps as before. Make sure this one looks different than the one you’ve already created. If this one has 3 circles, make one with 4 circles or vice versa. When finished, do the same and drag it into the Symbols panel. Name it ‘cloud 2’.
Now drag the cloud symbols from the Symbols panel onto the blue sky. Position each one of them to your liking. Make some of them big, some of them small. Add transparency to some by applying an opacity value below 100% in the Transparency (or Properties) panel. You can also mirror some of them horizontally to create extra randomness.
Organize objects
15. Organize Objects
When you’re happy with your clouds composition, go to the Layers panel and select all cloud objects. You can do this via the Layers panel by clicking the small circles to the right of each layer object. Group all cloud objects into 1 group by hitting Cmd/Ctrl + G (Object > Group). Name the object layer ‘clouds’.
The Birds
Last item in the list of this illustration is the group of birds. We’ll be using the same technique of converting one bird into a symbol, and then we’ll add this bird in different ways in our illustration. To create the bird we’ll use the Ellipse tool again in combination with some Pathfinder options and the Shapebuilder tool. Start by choosing a white fill and set the stroke to none.
1. Create the Left Wing
Select the Ellipse tool and draw a circle. Then draw a 2nd circle in double the size on top, overlapping most of the circle positioned as shown in the image below. The area of the smaller circle that pops out will be the left wing of the bird. Select both circles and choose Minus Front from the Properties or Pathfinders panel.
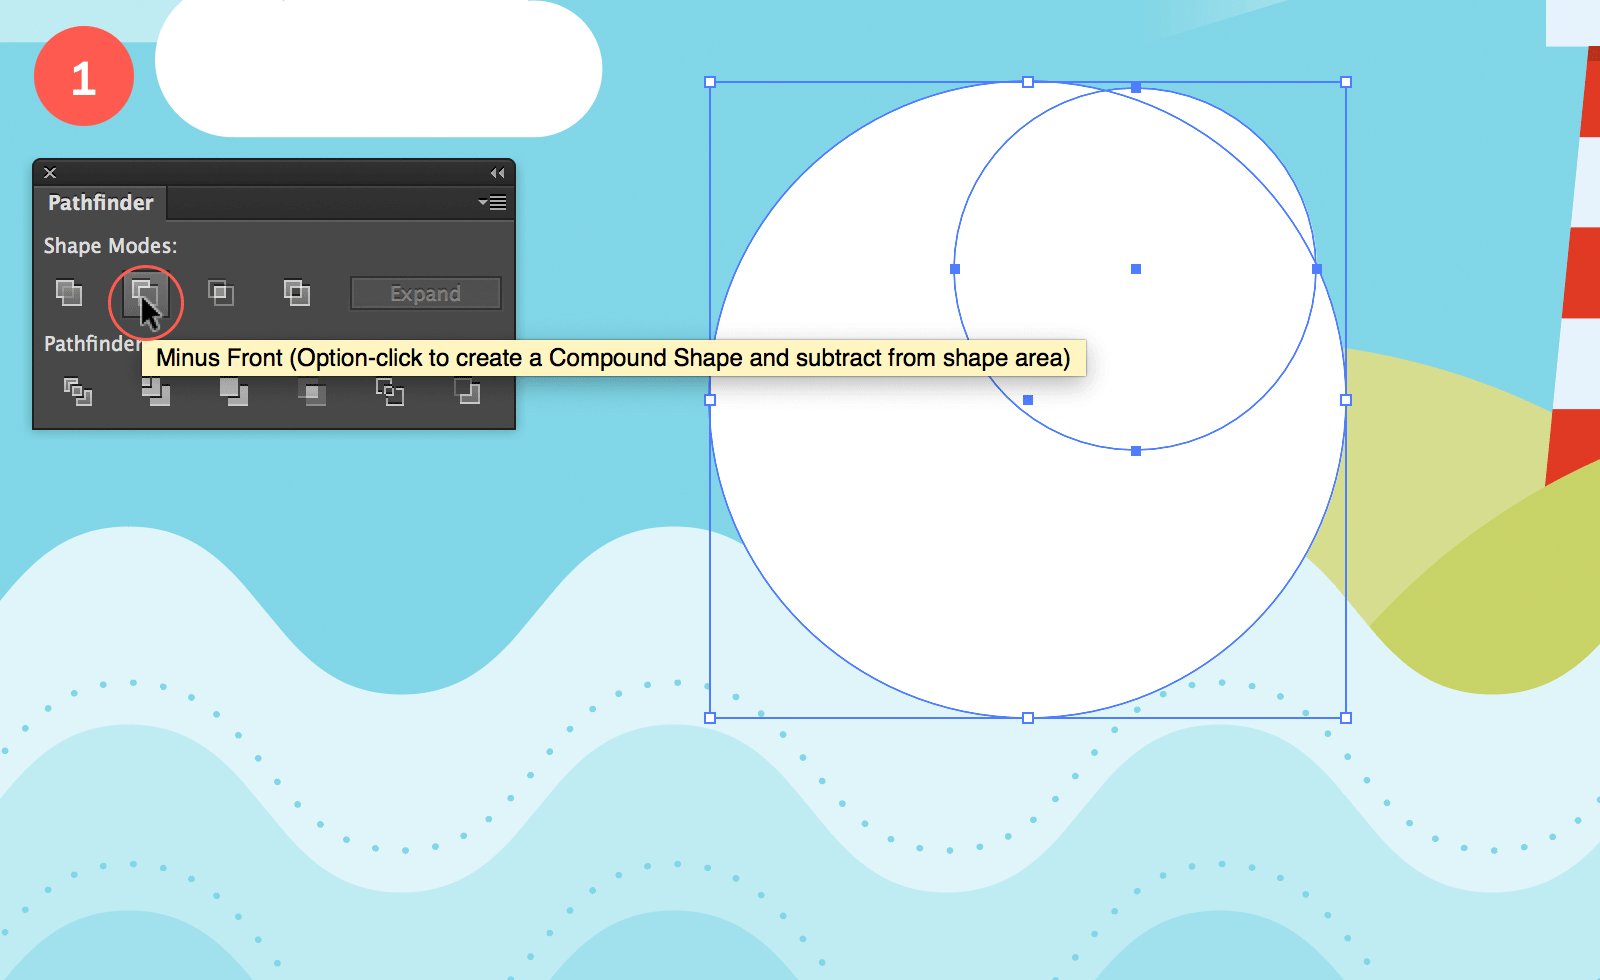
Draw 2 circles to create the left wing
2. Copy Reflect the Wing
Now select the Reflect tool, hold down the Option/Alt key and click somewhere at the bottom to the right of this shape as shown in the image below. In the window the appears choose Vertical as Axis and hit the Copy button. You should end up with something similar as shown in the image further below. So there should be a small overlap at the bottom of the 2 shapes.
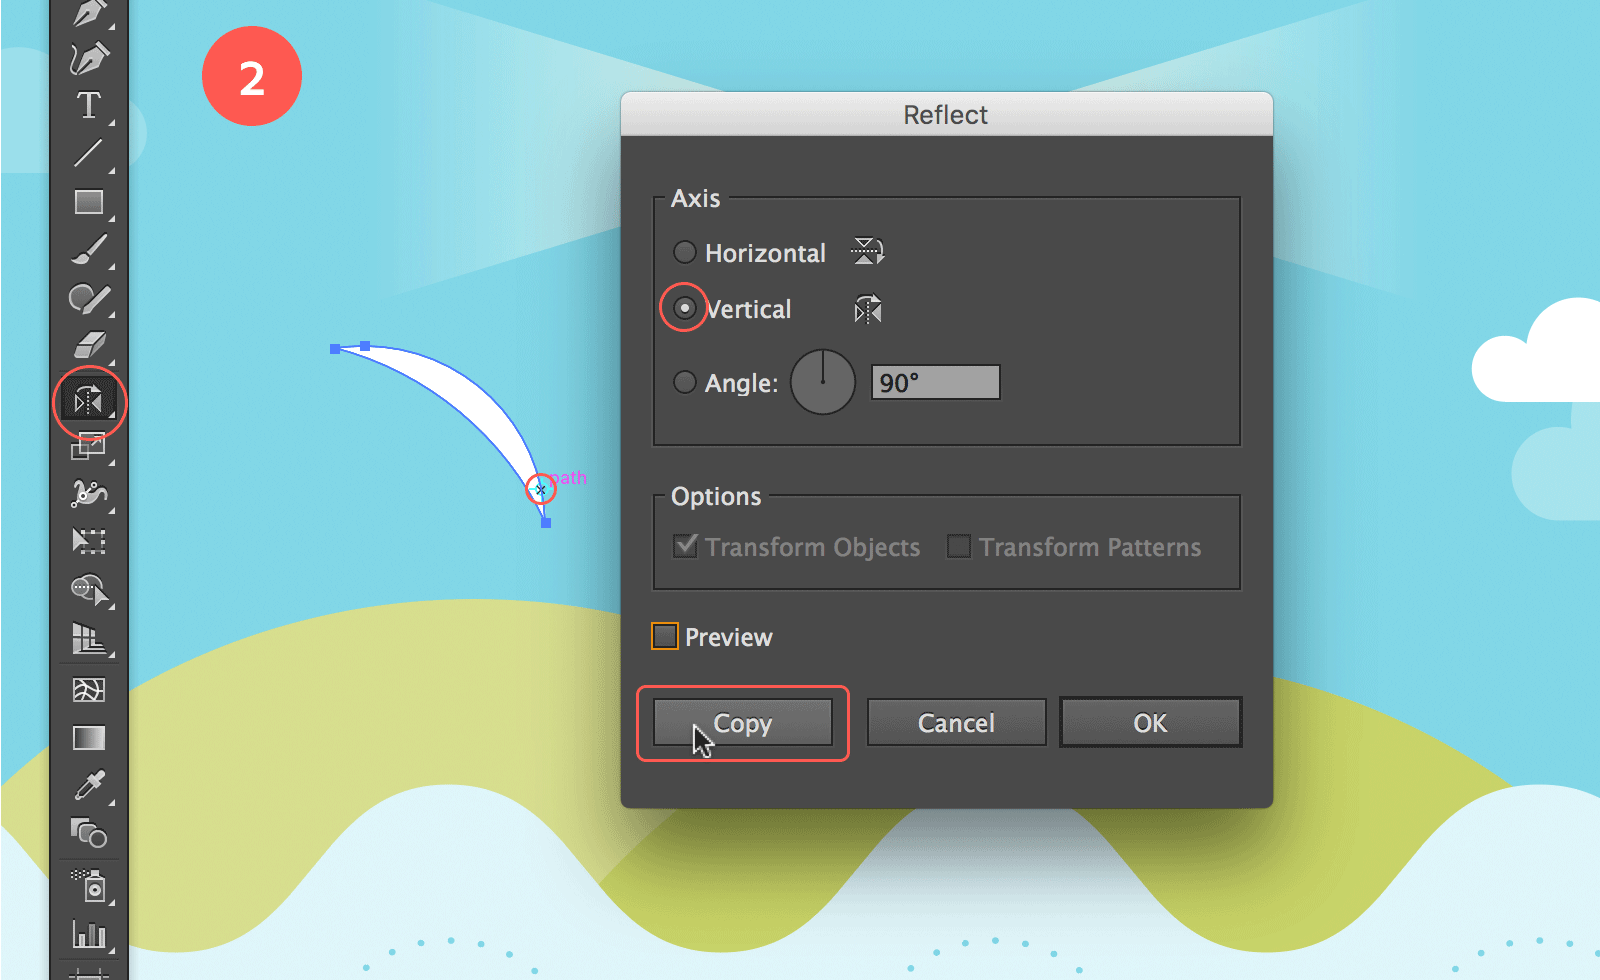
Copy reflect the wing to the right
3. Remove Unnecessary Segments
Select both shapes and choose the Shape Builder tool from the Toolsbar. Hold down the Option/Alt key and hover over the bottom left segment. A minus appears to the left of your cursor and the area you’re hovering is filled with a dark raster effect which indicates you’re about to remove this segment from the object. Click in the area to confirm this action. Do the same for the other bottom segment to the right.
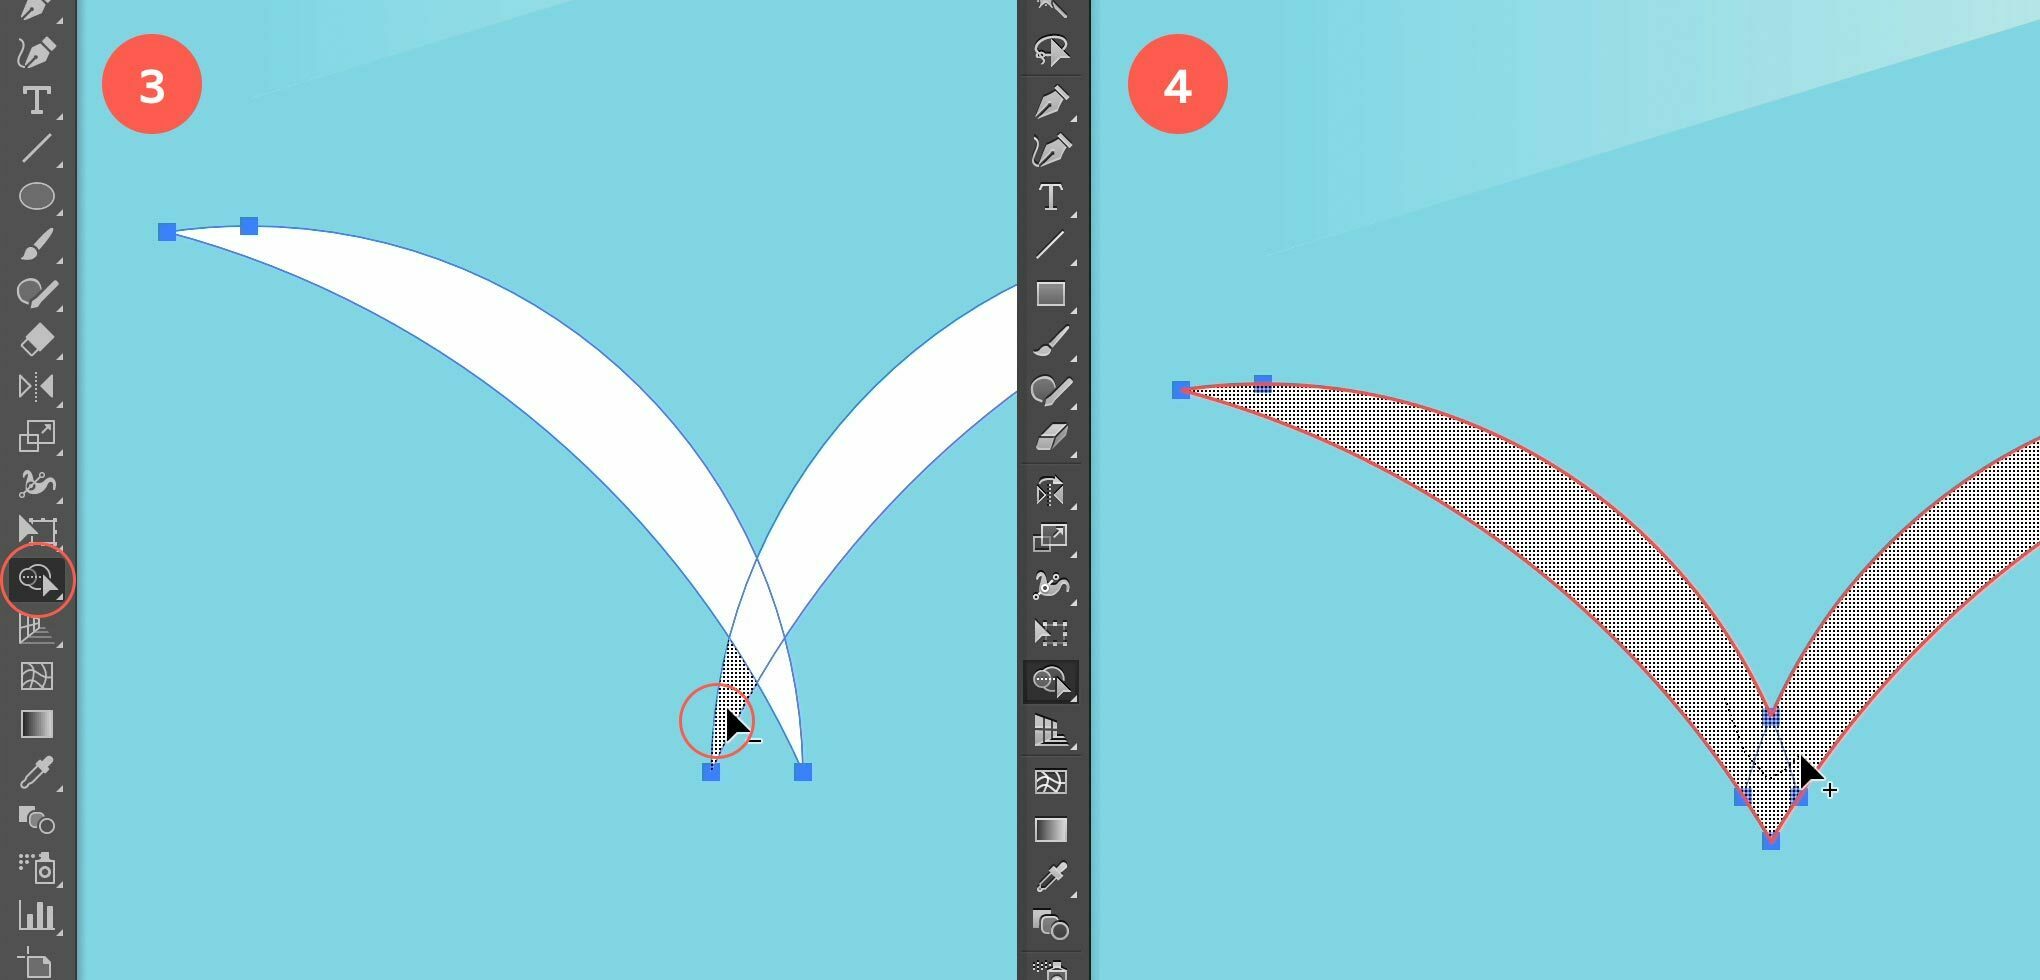
Remove and unite segments using the Shape Builder tool
4. Unite Segments into 1 Object
Now release the Alt/Option key so you see the plus sign at your cursor again, and click drag your mouse over the shapes of the bird to unite them together.
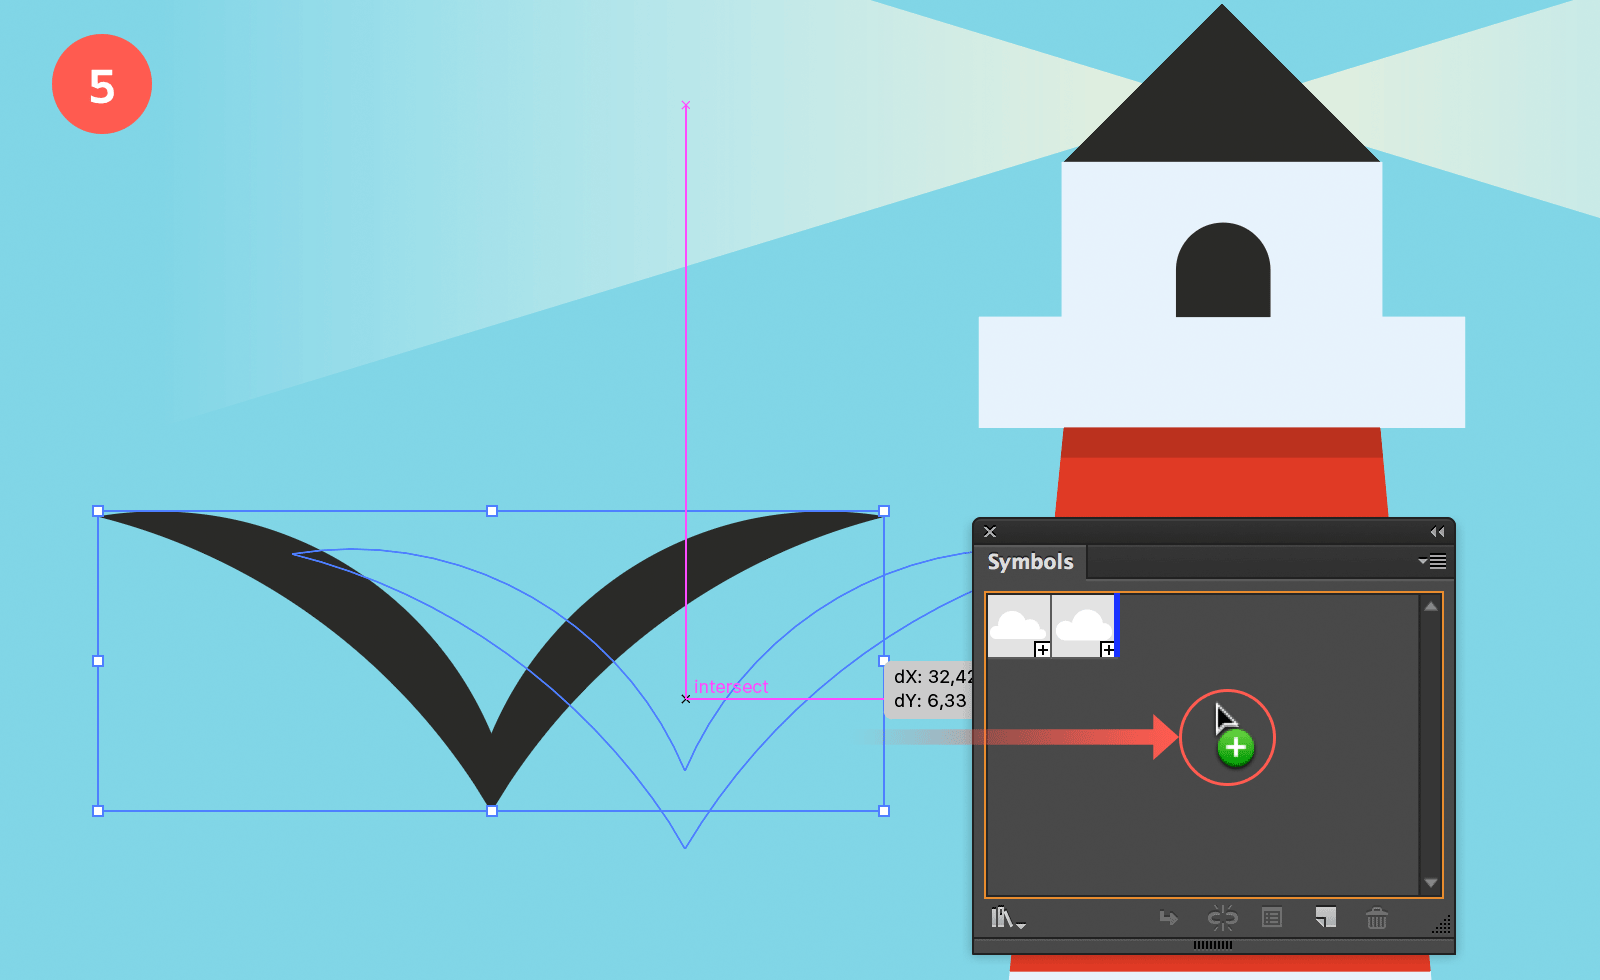
5. Add a Color Fill to the Bird
Give the bird object the black grey fill and drag it into the Symbols panel to turn it into a symbol.
Add a color fill to the bird object
6. Create a Bird Symbol
Now drag the birds from the Symbol panel onto your illustration. Create a group of birds that circle around the top of the lighthouse. Scale, and rotate each one of them in a different size and angle. Give each one a different transparency to create some randomness.
Create a Symbol of the bird object
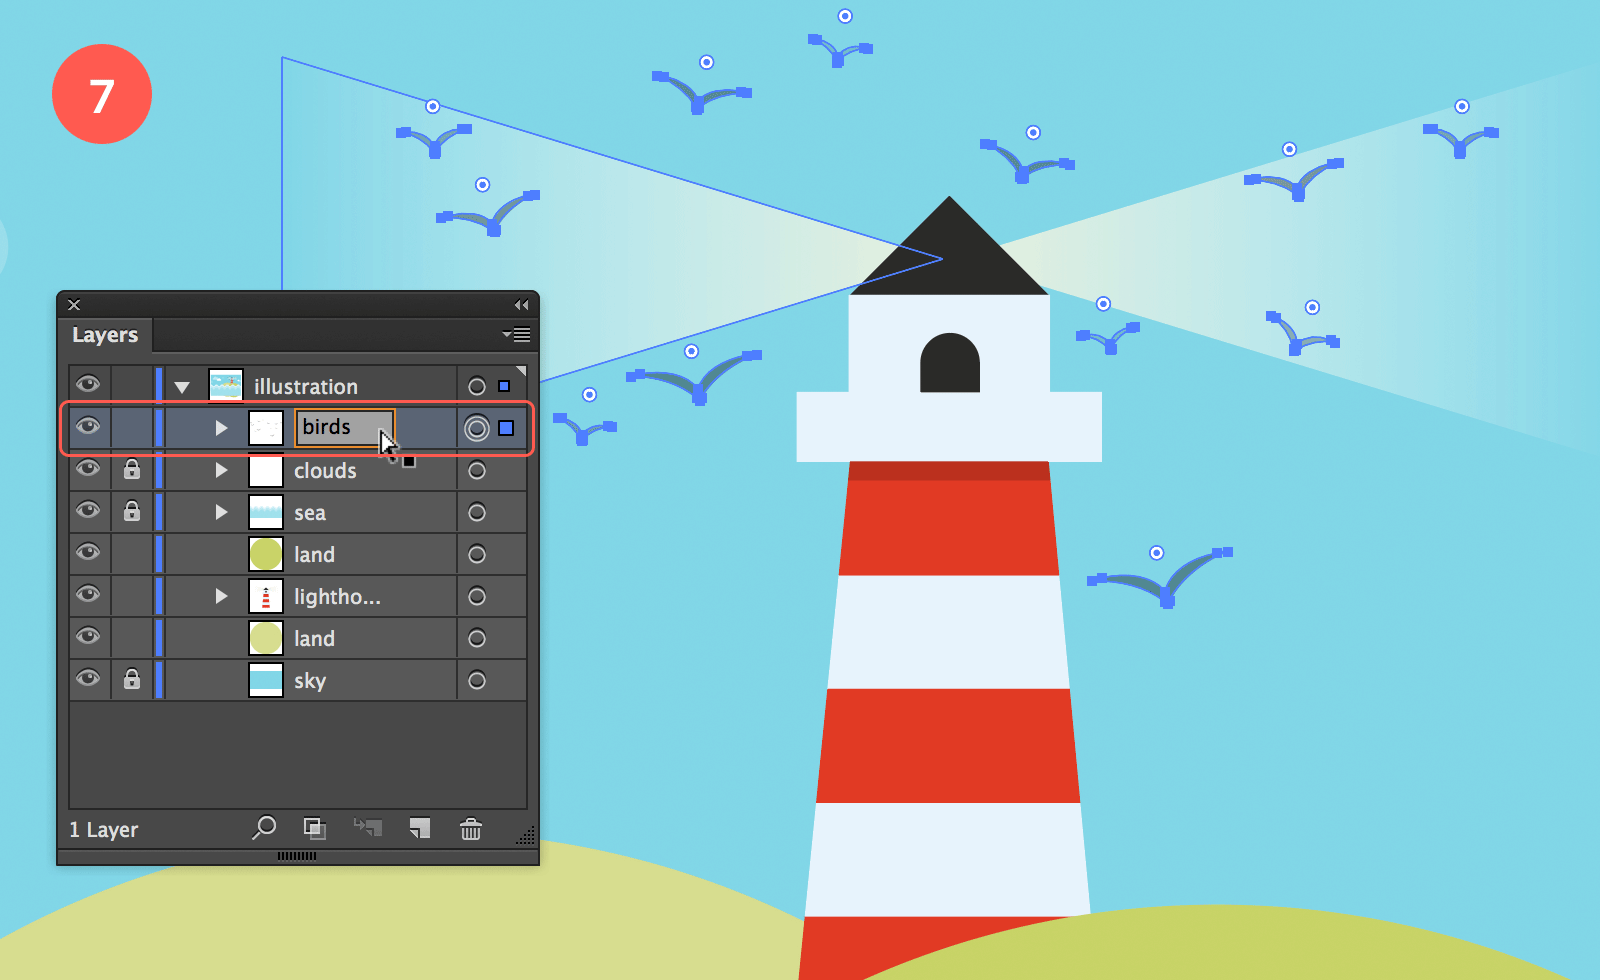
7. Add More Birds
I made the smaller ones more transparent than the slightly bigger ones, because they're a bit further away. I also first created the group of birds on the left of the tower and copy mirrored this group to the other side of the tower. Then I tweaked this group a bit to make sure it doesn't look the same as the birds on the other side of the tower. When you're finished, select all the birds and group them together by hitting Cmd/Ctrl + G (Object > Group). In the Layers panel name the grouped object 'birds' and make sure the object layer is the top most one of the stack.
Add more birds
Clipping Mask
Last but not least we'll create a Clipping Mask for our illustration. This way the illustration will be nicely framed into our canvas.
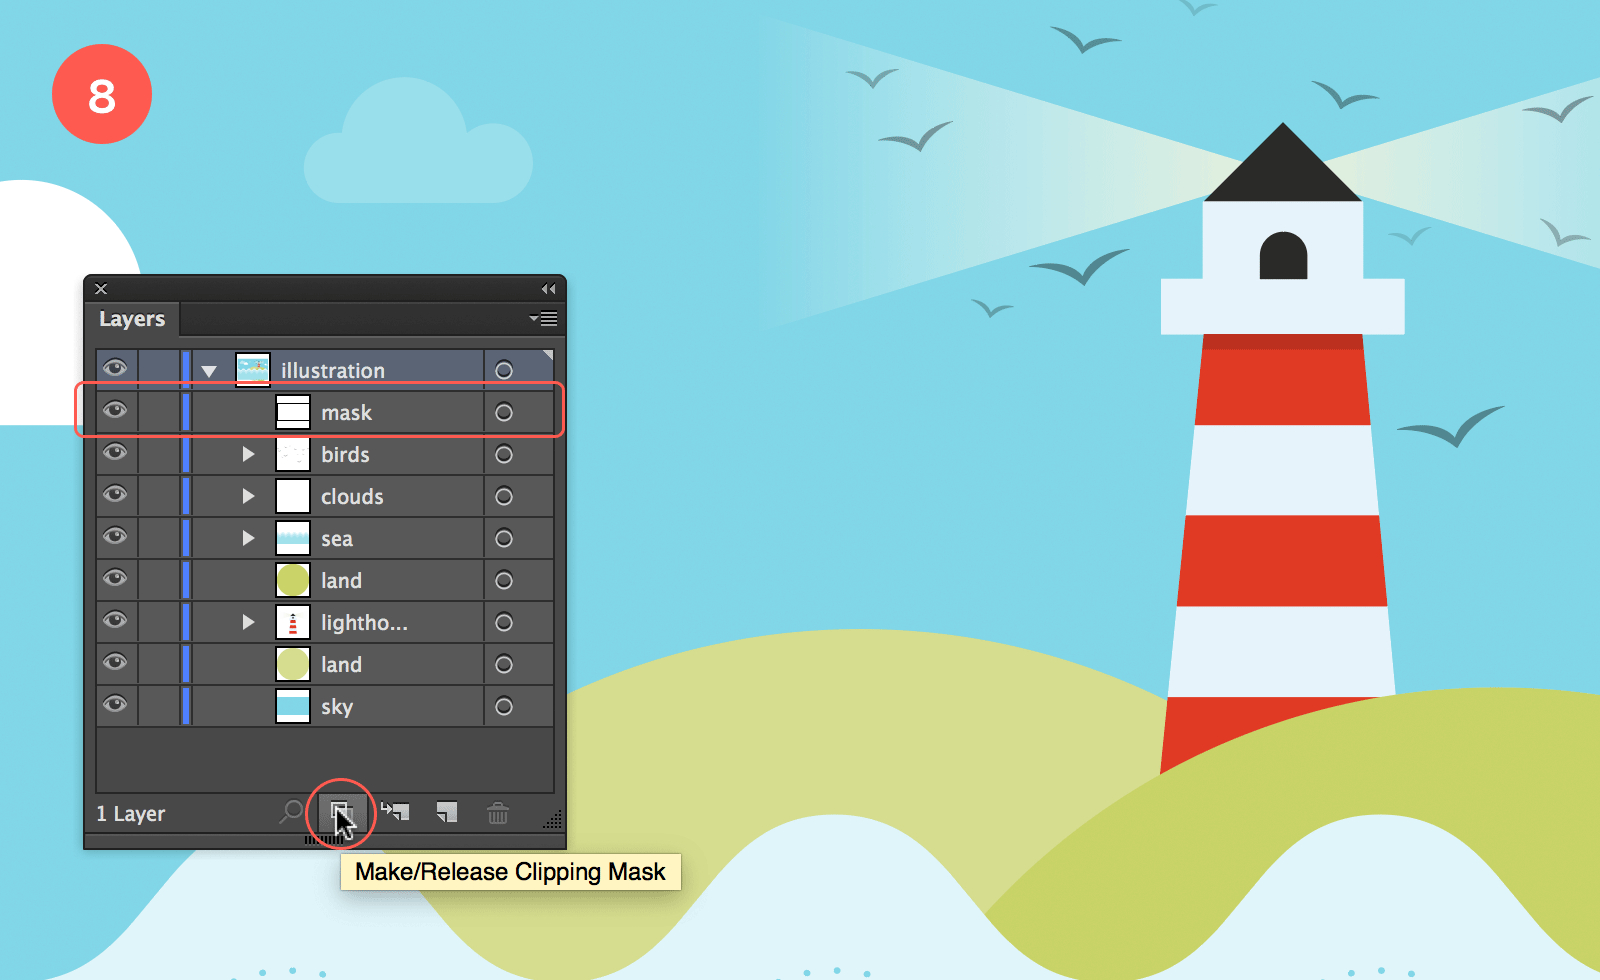
8. Add a Clipping Mask
Select the Rectangle tool and draw a box exactly the size of your canvas. Give it no fill and no stroke. Make sure this 'empty' box follows the borders of your canvas, and that the object layer sits on top of the stack in the Layers panel. If you like you can give the layer the name 'mask' (as shown in the image below) since it will serve as a Clipping Mask. Next, make sure no object is selected by clicking somewhere outside your artwork holding down the Cmd/Ctrl key, or you make sure the Selection tool is selected when you click. When another tool is selected, you can hold down the Cmd/Ctrl key to temporarily have the black arrow at your disposal. It's something I constantly do to save time in between my actions. When no object is selected, go to the Layers panel and click on the main layer 'Illustration'. Now click the Make/Release Clipping Mask icon at the bottom of the panel.
Finish it off by adding a clipping mask
That's it! Hope you've enjoyed this tutorial.
