
Create a Snowflake in Adobe Illustrator
A Step-by-step Illustration
Article written on Friday, 30 Nov 2018
- Requirements
- Adobe Illustrator CS6 or later
- Level
- beginner
- Download
- Ai document with guides & colors
Will it be a white Christmas? Yes it will, because we're going to creating a snowflake! It's time to have a bit of fun and I promise this one is really easy. You can draw a simple snowflake in only a couple of simples steps. Once you have created this one, I'll show you how you can create a few more complex ones. Hopefully this will spark your creativity and give you some inspiration to create a couple of your own...
Start by dragging a vertical guide and a horizontal guide. To do this, make sure your document rulers are visible. Go to View > Rulers, or hit Cmd/Ctrl + R if they're not visible. The intersection point of these 2 guides will serve as the center point of our snowflake. To help you get started you can download this basic Illustrator document.
1. Draw a vertical line
Select the Line tool and draw a vertical line by holding down the Shift key. Give the line a light blue Stroke color and a thickness of 2 pixels, but you might choose another value depending on the dimensions you are working in. Just try to use more or less the proportions shown in the image below.
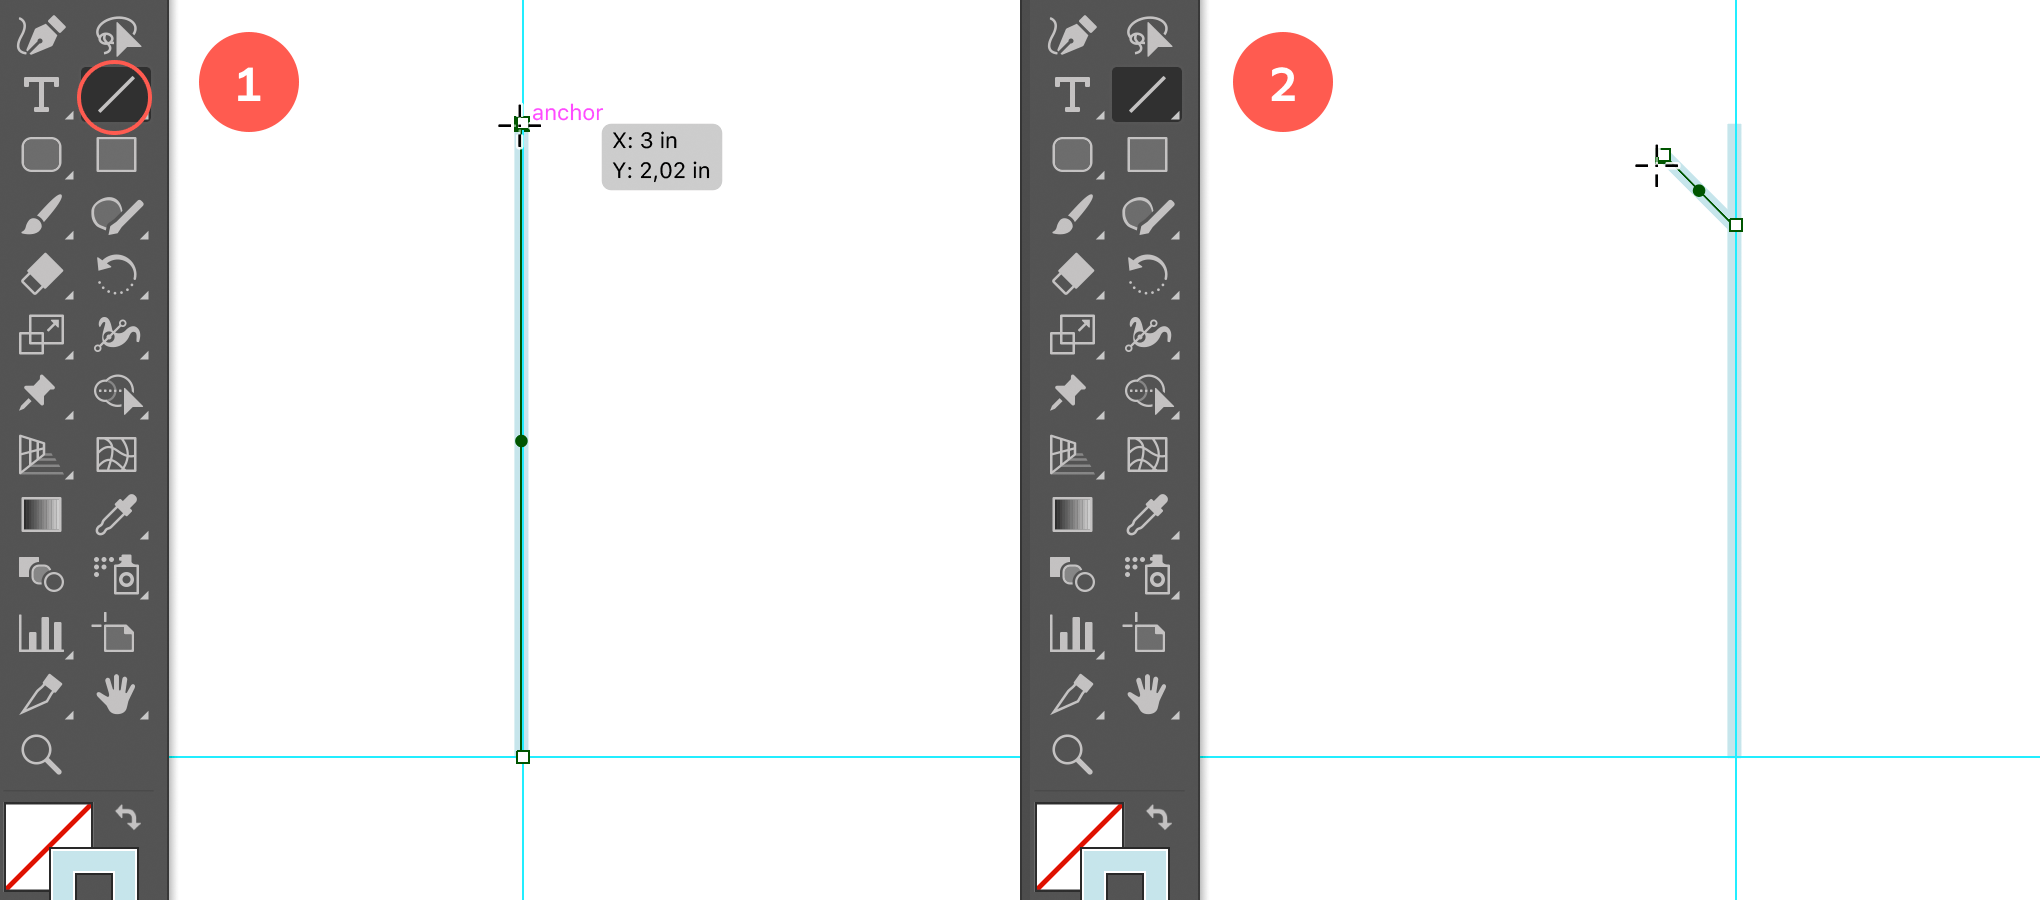
Draw a vertical line, and then a 2nd short line at 45°, starting at the vertical line dragging upwards towards to the top holding down the Shift key
2. Draw a 2nd line at a 45° angle
With the Line tool still selected, draw a second line at an angle of 45°, starting from the vertical line, dragging diagonally upwards, holding down the Shift key.
3. Draw another line at 45° below
Repeat the same step by drawing another line below at an angle of 45°. You could also copy the line you've created and paste it in front, using Cmd/Ctrl + F, and then drag the line vertically downwards while holding down the Shift key.
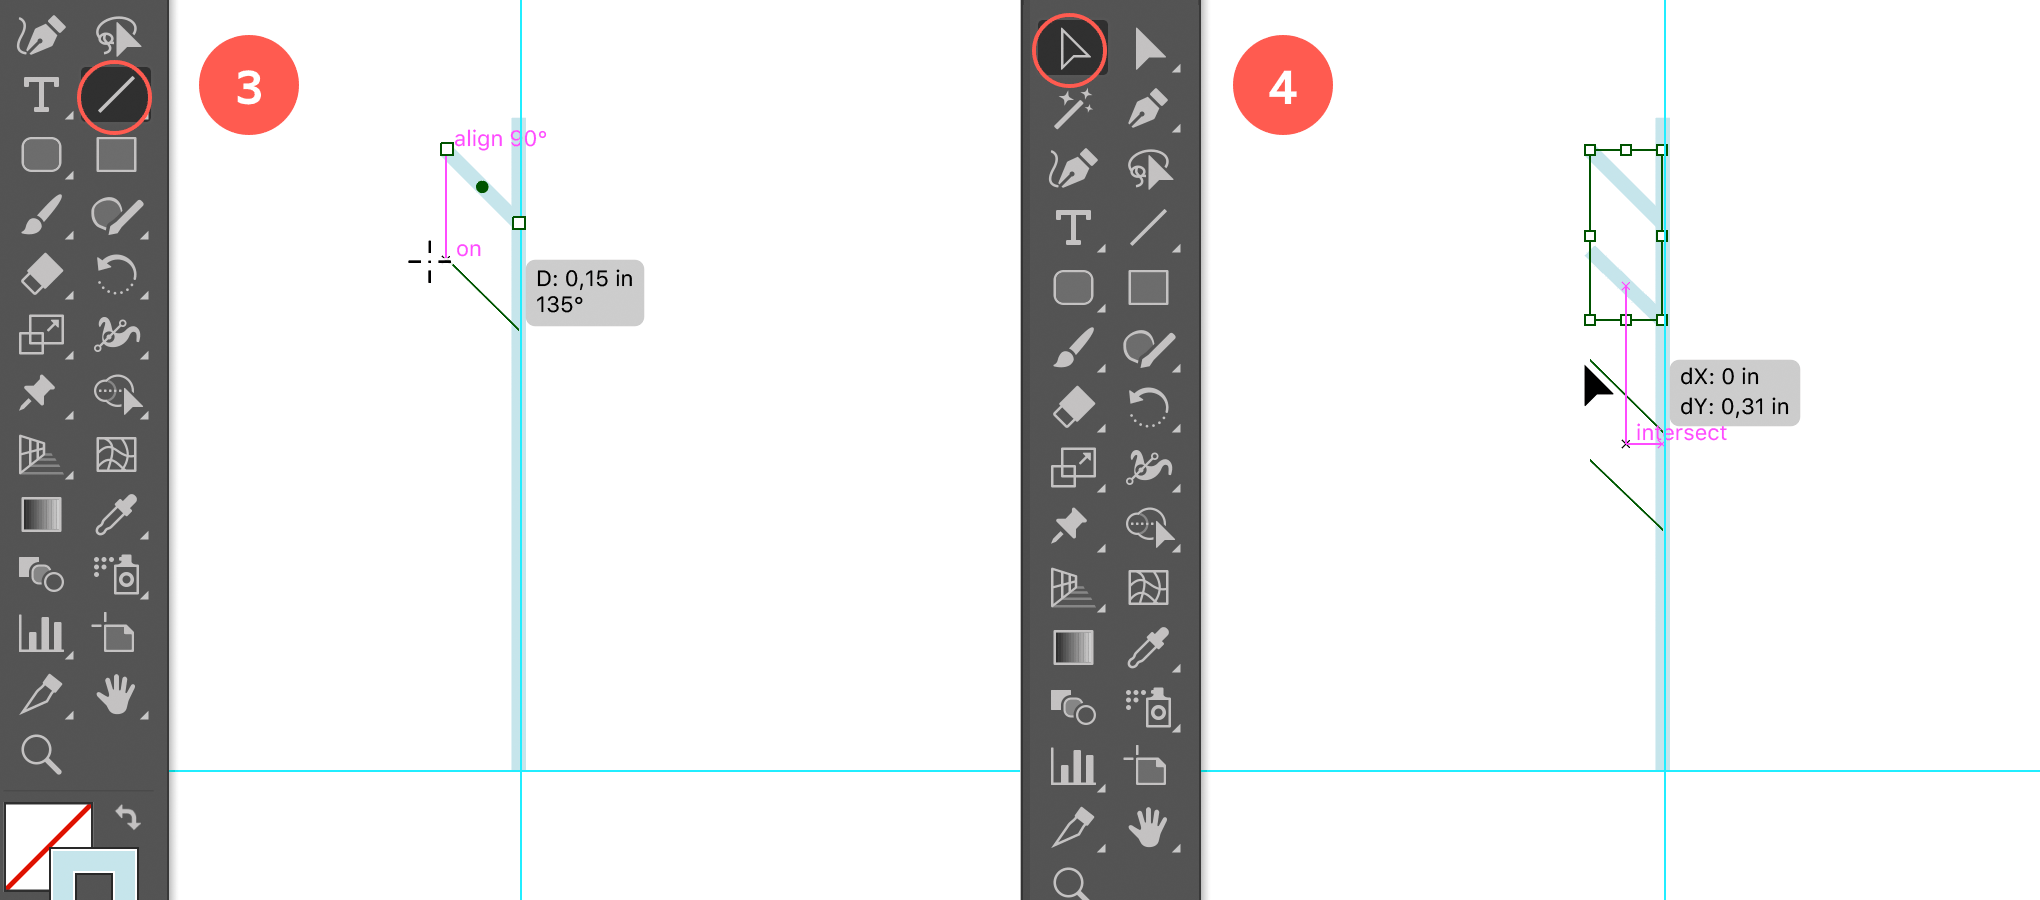
Draw 4 lines below each other at 45°
4. Duplicate the 2 lines, so you end up with 4
Create another 2 of the same lines below so you end up with 4 in total. You can select the first 2 lines, copy them, paste them in front (Cmd/Ctrl + F), and drag them vertically downwards holding down the Shift key, or you could just draw them one by one.
5. Vertically distribute center the lines
Select all the 45° angled lines using the Selection tool and the Shift key. Then select the Vertical Distribute Center option from the Properties, Control panel or Align panel.
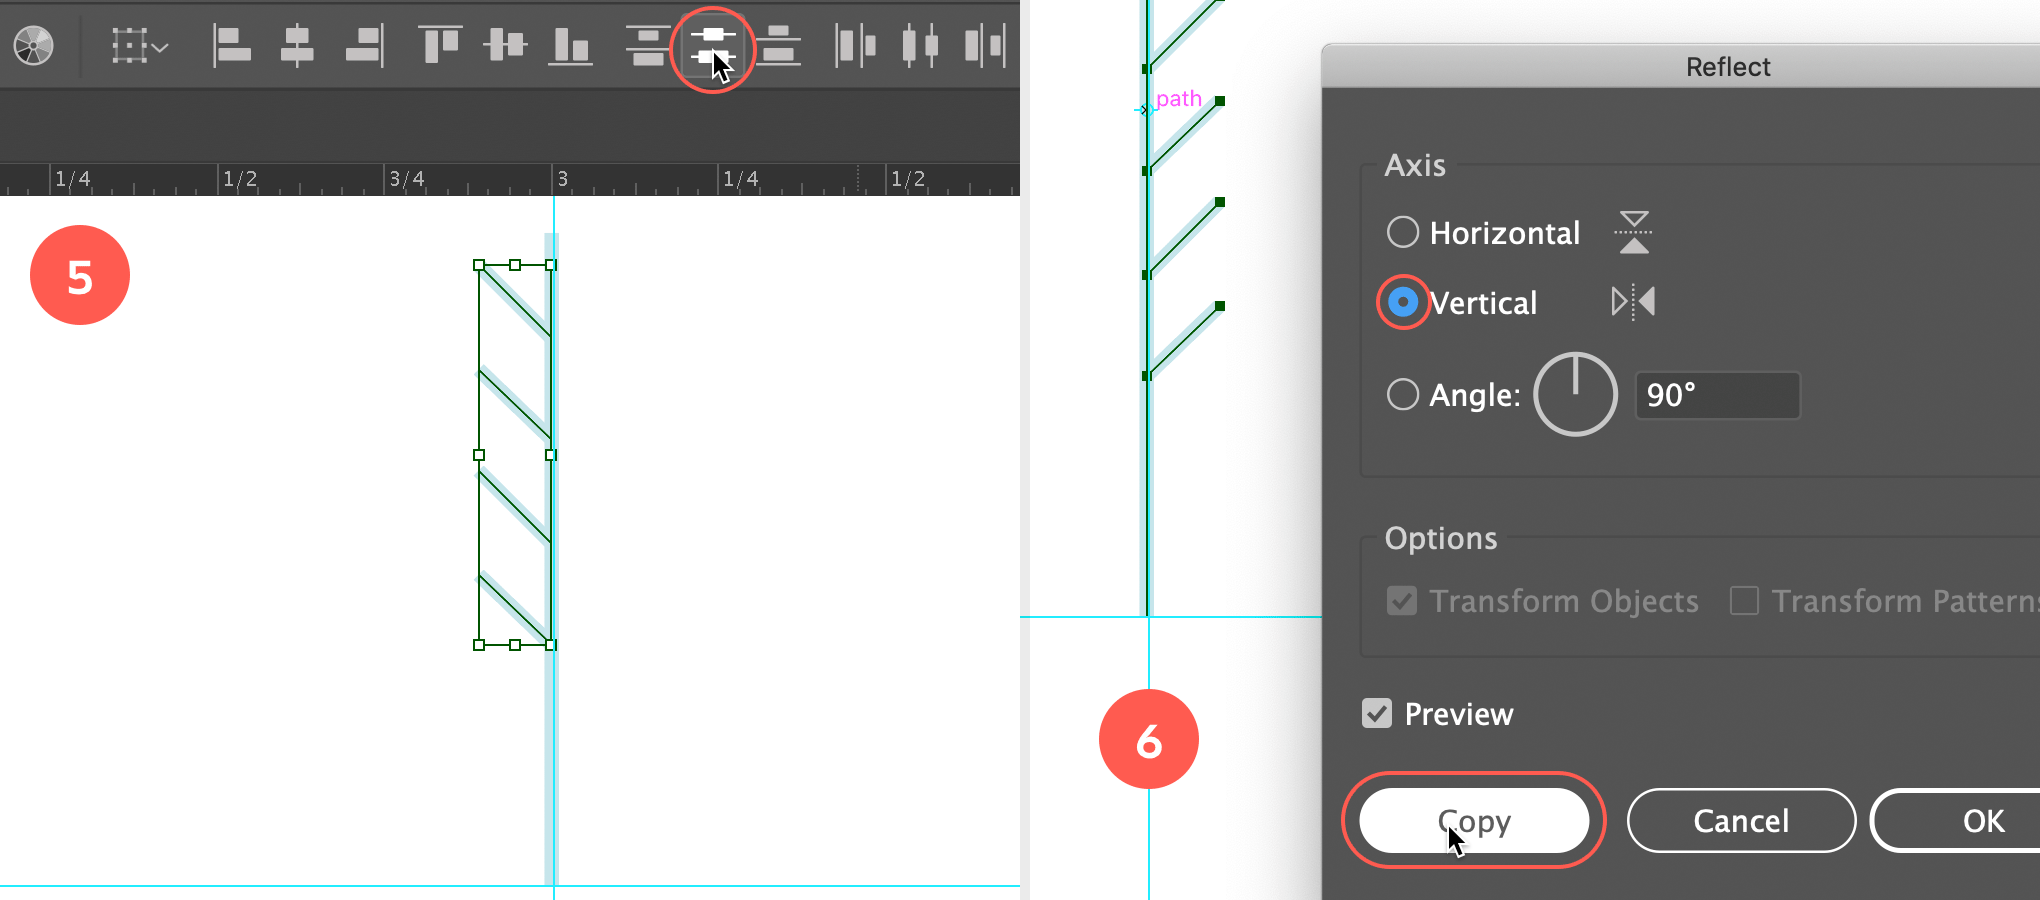
Vertically distribute center, then copy reflect the 4 lines along the vertical line to the other side of the line.
6. Copy Reflect the 45° lines
Select all the 45° angled lines using the Selection tool and the Shift key. Then select the Reflect tool from the toolbox (this tool might be hidden under the Rotate tool). Hold down the Option/Alt key and click on the vertical line (or vertical guide) to mark this position as the vertical axis. In the window that appears, choose Vertical as Axis and click the Copy button.
7. Copy Rotate
Now select the entire object and select the Rotate tool from the toolbox. Hold down the Option/Alt key and click at the bottom center of the object (or intersection of the 2 guides) to mark this position as the point we want the object to rotate around. In the window that appears choose 60° (360/6) in case you want to have a snowflake with 6 parts, or 72° in case you prefer 5 parts (360/5). Now click the Copy button so you keep the original object.
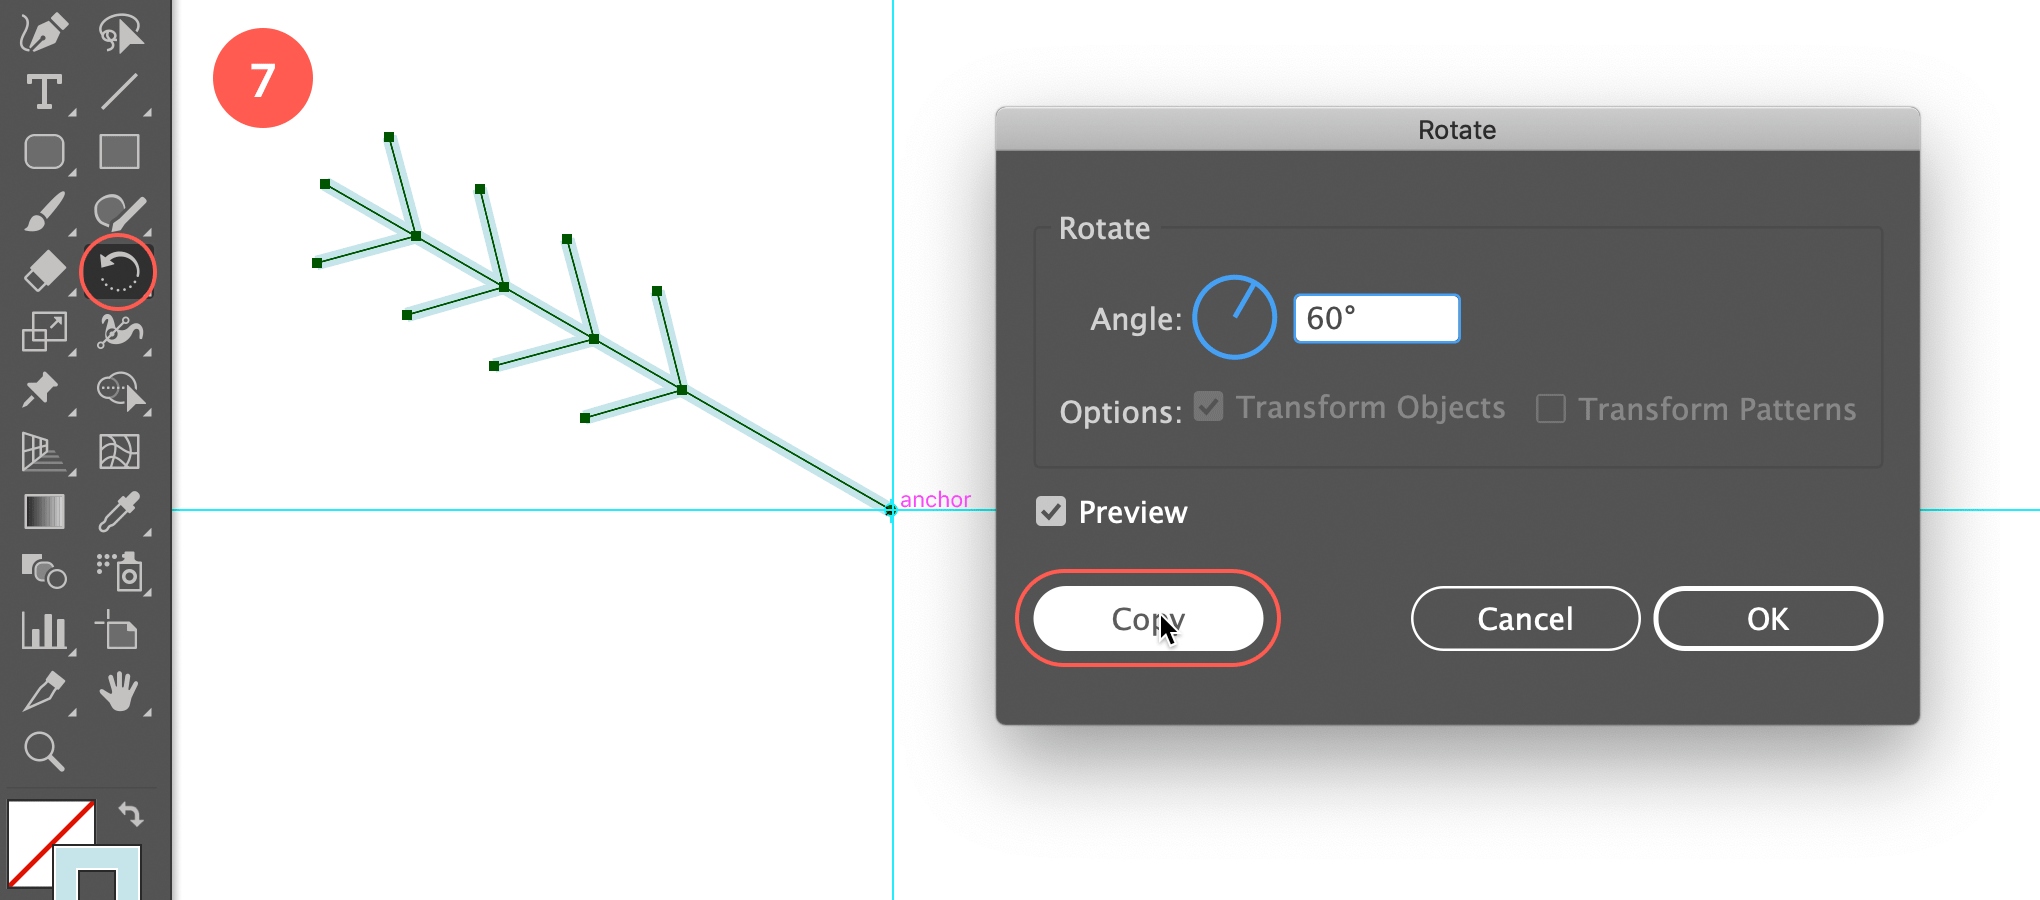
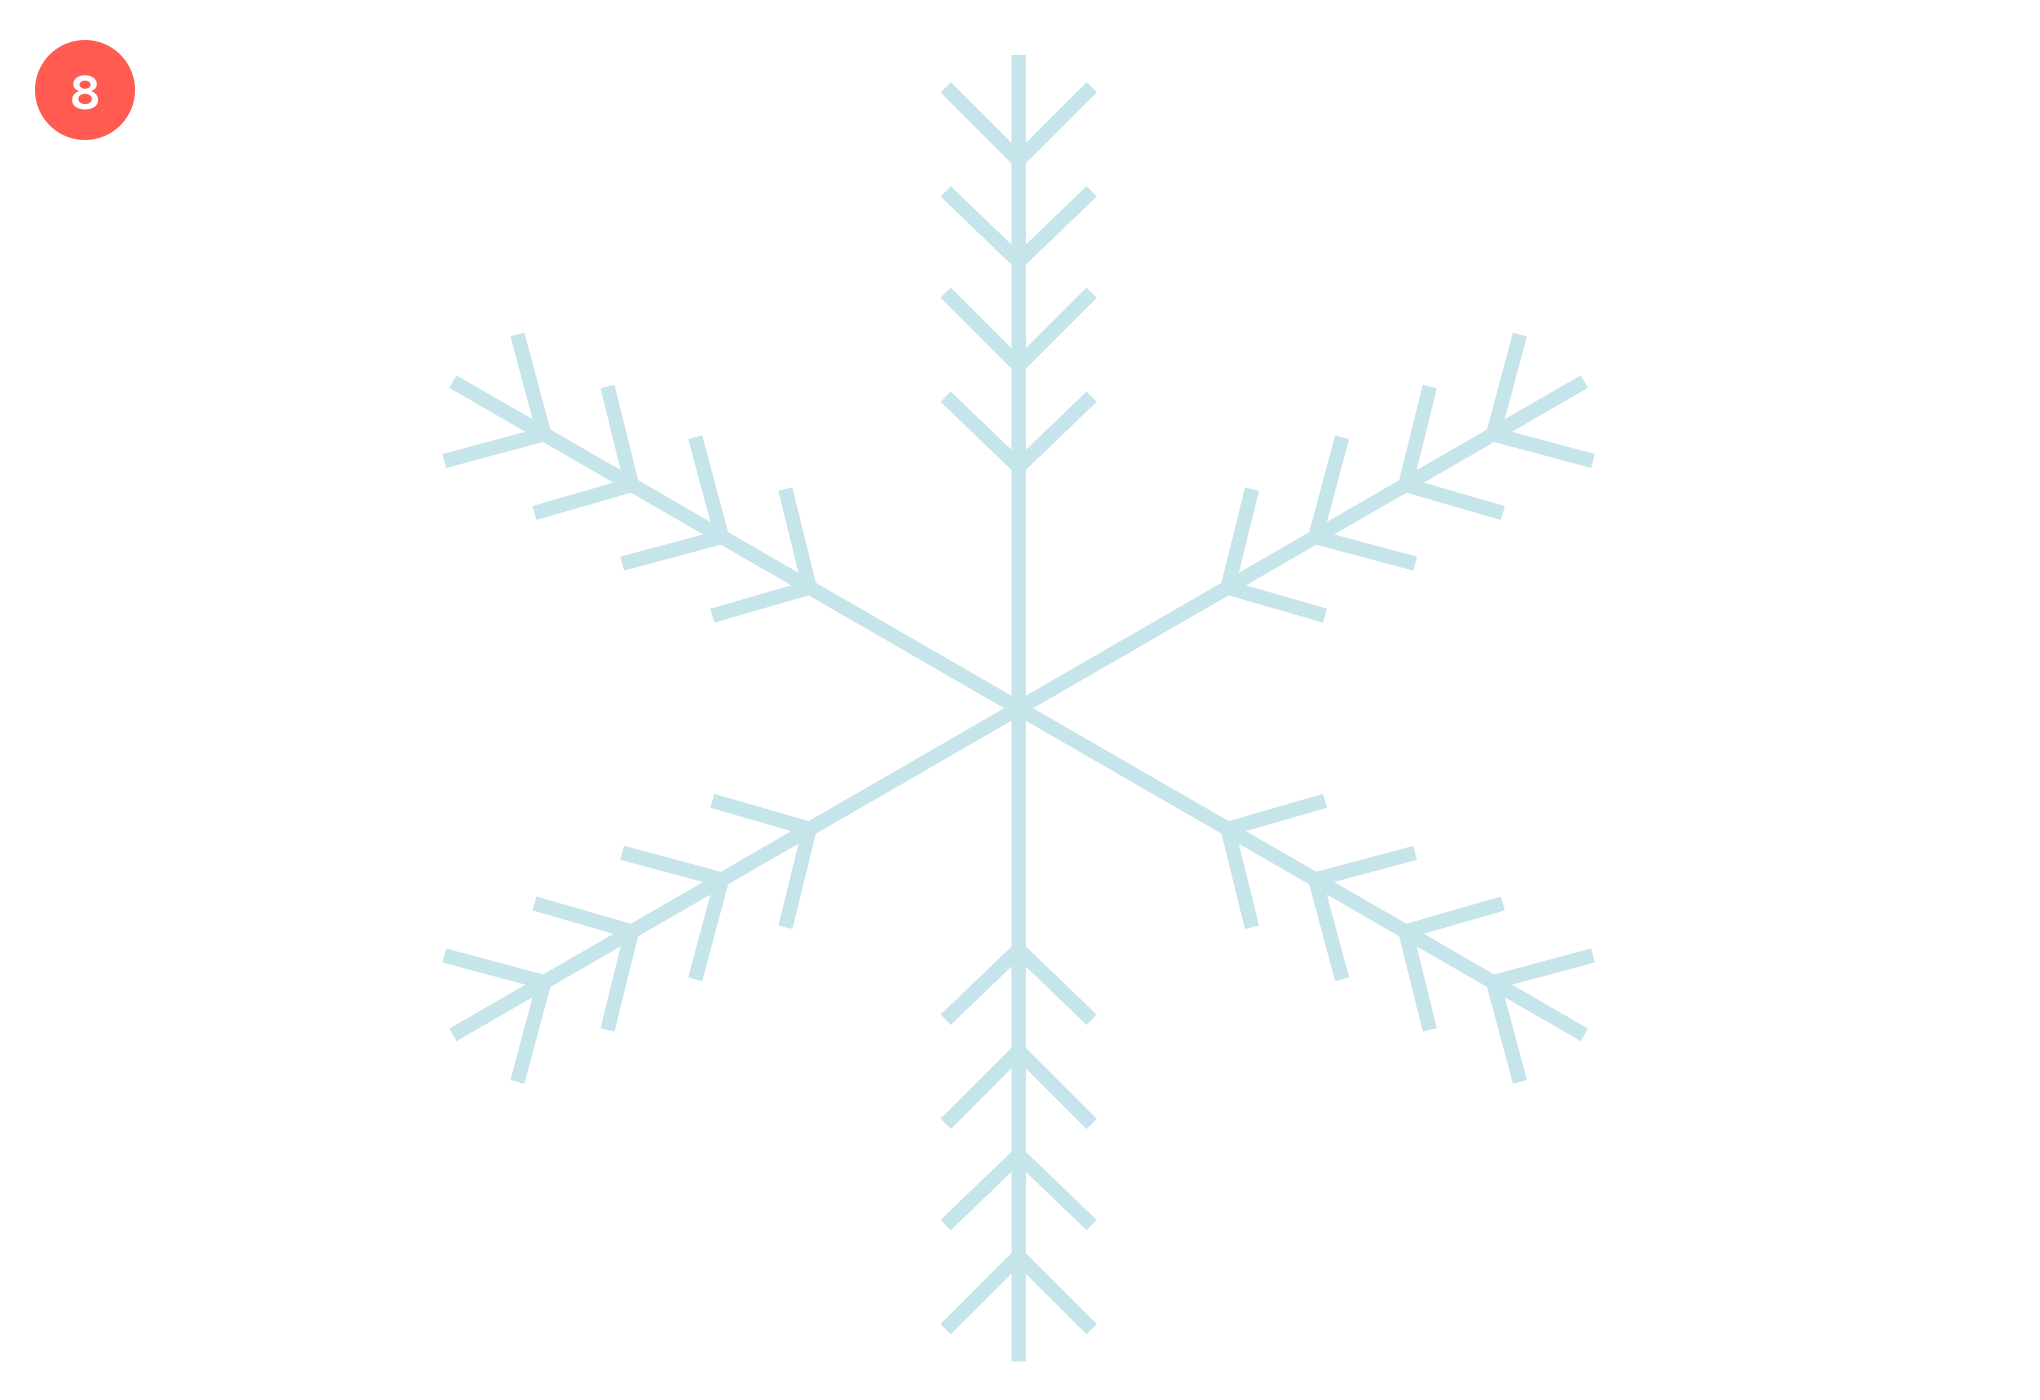
Copy Rotate the object at 60° for 6 parts, at 72° for 5 parts. Then hit Cmd/Ctrl + D until the snowflake is complete.
8. Transform Again
Now you simply repeat this action by hitting Cmd/Ctrl + D, 4 times in a row to have it rotated and duplicated 4x in a row. In case you've used 72°, you only need to do this 3 times in row. That's it! We have our simple snowflake completed.

Now try out different snowflakes (see examples below), and use them in your design. Combine these with other elements from The Magical Christmas Creation deal bundle for only $29 from Designcuts (see below) to create beautiful Christmas cards, wrapping paper, or other creations.
Unfortunately this deal is expired.
subscribe to my newsletter, so you won't miss out on any future design deals.
9. Try out different snowflakes
Now it's time to try out a couple of different snowflakes by adding in a bit more variation and creativity in the mix:
Snowflake variation 1

- Start with the center of the star by drawing a small star
Select the Star tool from the toolbox, and click on the canvas (on the center point of the 2 guides). In the window that appears enter 8 px for Radius 1, 4 px for Radius 2 and 6 for Points. Click OK and give the star a fill. - Add a 2nd bigger star
Select the Star tool again and Option/Alt click in the center of the star (intersection of the guides). In the window that appears enter 16 px for Radius 1, 8 px for Radius 2 and 6 for Points. Click OK and give the star a 2 pt stroke. - Rotate the 2 stars at 30°
Select both stars, select the Rotation tool, and Option/Alt click in the center of the stars. Enter 30° in the window as rotation angle, and click OK. - Align both stars
Select the Vertical Align Center and Horizontal Align Center from the Control, Properties or Align panel to make sure the 2 stars are perfectly aligned. Make sure both stars are perfectly center positioned on the intersection of the 2 guides. - Draw a vertical line
Select the Line tool and draw a perfect vertical line above the star using the Shift key (draw onto the vertical guide). - Add 2 side lines at 45°
Use the Shift key again to draw these lines. Both lines should have equal length. You can copy drag the 2nd one below using the Shift + Alt/Option keys, or copy and paste in front (Cmd/Ctrl +F) and drag the new line downwards using the Shift key. - Copy mirror the 2 lines
Select the 2 smaller lines and select the Reflect tool. Click on the vertical line (or guide), select Vertical Axis in the window that appears and click the Copy button to duplicate the lines. - Add a dot
Select the Ellipse tool and draw a small dot at the top of the vertical line. Give the dot a fill. Draw another slightly bigger dot at the top of the right top point of the bigger star and give this one a 2 pt stroke. - Copy rotate this object
Select the Selection tool and select the object except the stars. Use the Shift key in case you need to deselect. Now select the Rotate tool again, and click into the center of the star (the intersection of the 2 guides). Enter 60° and click the Copy button. Now hit Cmd/Ctrl + D 4 times.
Snowflake variation 2

- Start with the center of the star by drawing a small star
Select the Star tool from the toolbox, and click on the canvas (on the intersection point of the 2 guides). In the window that appears enter 8 px for Radius 1, 5 px for Radius 2 and 6 for Points. Click OK and give the star a fill. - Add a 2nd bigger star
Select the Star tool again and Option/Alt click in the center of the star (or the intersection of the guides). In the window that appears enter 16 px for Radius 1, 10 px for Radius 2 and 6 for Points. Click OK and give the star a 2 pt stroke. - Rotate the 2 stars at 30°
Select both stars, select the Rotation tool, and Option/Alt click in the center of the stars. Enter 30° in the window as rotation angle, and click the OK button. - Align both stars
Select the Vertical Align Center and Horizontal Align Center from the Control, Properties or Align panel to make sure the 2 stars are perfectly aligned. Make sure both stars are perfectly center positioned on the intersection of the 2 guides. - Draw a vertical line
Select the Line tool and draw a perfect vertical line above the star using the Shift key (onto the vertical guide). - Add 3 side lines at 45° at a different length
Use the Shift key again to draw these lines. Keep the first one very short, the 2nd one a bit longer and the 3rd one again a bit longer. The 3 lines should line up into a perfect 45° line. - Copy mirror the 3 lines
Select the 3 smaller lines and select the Reflect tool. Click on the vertical line (or guide), select Vertical Axis in the window that appears and click the Copy button to duplicate the lines. - Add a line and dot
Select the Line tool and draw a short line upwards starting from the top left point of the star (see image). Make sure to follow the angle of the point of the star (see image). Select the Ellipse tool and draw a small 3 dot at the top of that line. Give the dot a fill. - Copy rotate this object
Select the Selection tool and select the object except the stars. Use the Shift key to deselect them if needed. Now select the Rotate tool again, and click into the center of the star (intersection of the 2 guides). Enter 60° and click the Copy button. Now hit Cmd/Ctrl + D 4 times.
Snowflake variation 3

- Start with the center of the star by drawing a small star
Select the Star tool from the toolbox, and click on the canvas (on the center point of the 2 guides). In the window that appears enter 8 px for Radius 1, 5 px for Radius 2 and 6 for Points. Give the star a 2 pt stroke. - Rotate the star at 30°
Select the Rotation tool, Option/Alt click in the center of the star, enter 30° in the window as rotation angle, click OK. Make sure the star is perfectly positioned entered at the intersection of the guides. - Draw a vertical line
Select the Line tool and draw a perfect vertical line above the star using the Shift key (onto the vertical guide). - Add 3 side lines at 45° at a different length
Use the Shift key again to draw these lines. Keep the first one very short, the 2nd one a bit longer and the 3rd one again a bit longer. The 3 lines should line up into a perfect 45° line. - Copy mirror the 3 lines
Select the 3 smaller lines and select the Reflect tool. Click on the vertical line (or guide), select Vertical Axis in the window that appears and click the Copy button to duplicate the lines. - Add 3 dots
Select the Ellipse tool and draw the 3 dots as shown in the image above. Give 2 of them a fill and the other one a stroke. - Copy rotate this object
Select the Rotate tool again and click into the center of the star (or intersection of the 2 guides). Enter 60° and click the Copy button. Now hit Cmd/Ctrl + D 4 times.
